Returning a binary file from REST service

You might want to return a binary file such as image or pdf from a REST service, if thats the case then JAX-RS provides you with 3 options. I wanted to try those options to i did create a sample application, that you can download from here. I did create a HelloBinaryService.java file which is a resource class that has 3 methods in each of these methods i am reading a static image file from c:/temp and returning it

package com.webspherenotes.rest;

import java.io.File;
import java.io.FileInputStream;
import java.io.IOException;
import java.io.InputStream;
import java.io.OutputStream;

import javax.ws.rs.GET;
import javax.ws.rs.Path;
import javax.ws.rs.Produces;
import javax.ws.rs.WebApplicationException;
import javax.ws.rs.core.MediaType;
import javax.ws.rs.core.StreamingOutput;

@Path("/hellobinary")
public class HelloBinaryService {

  @GET
  @Path("/file")
  @Produces("image/png")
  public File getFile(){
    File samplePDF = new File("c:/temp/distributedmap.png");
    return samplePDF;
  }

  @GET
  @Path("/fileis")
  @Produces("image/png")
  public InputStream getFileInputStream()throws Exception{
    FileInputStream fileIs = new FileInputStream("c:/temp/distributedmap.png");
    return fileIs;
  }

  @GET
  @Path("/fileso")
  @Produces("image/png")
  public StreamingOutput getFileStreamingOutput() throws Exception{
    
    return new StreamingOutput() {
      
      @Override
      public void write(OutputStream outputStream) throws IOException,
          WebApplicationException {
        FileInputStream inputStream = new FileInputStream("c:/temp/distributedmap.png");
        int nextByte = 0;
        while((nextByte  = inputStream.read()) != -1 ){
          outputStream.write(nextByte);
        }
        outputStream.flush();
        outputStream.close();
        inputStream.close();
      }
    };
  }
  
}
The first and easiest option would be to return a object of java.io.File directly and the JAX-RS will figure out how to read the file and return binary content of the file, but you cannot use this option if your returning a file that is not stored on the file system. Second option would be to return object of InputStream, in that case the InputStream could be pointing to file on local system or file stored in database or something like that, in this case JAX-RS container will figure out how to return bytes from InputStream and return it The last option would be to return object of StreamingOutput, this gives you most flexibility in this case JAX-RS container will give you control at the time of writing body of the message, this is little more work for you since you have to take care of reading the bytes from InputStream and write into output stream but then you get chance to compress the content,....

Createing Hello JAXRS service for deployment using Sun Jersey

If you want to build a REST service and deploy it in one of the Java EE 5 compliant containers for example WebSphere APplication Server 7.0, then you will have to use one of the external JAXRS containers such as Jersey, which is very popular among REST service developers.

I wanted to try this option out so i built a HelloJersey application that you can download from here. I followed these steps for building my sample application

  • First create a Dynamic Web APplication project called HelloJersey

  • Download following .jar files and add it to the WEB-INF/lib folder of your web application

    1. asm-3.1.jar

    2. jersey-core-1.5.jar

    3. jersey-server-1.5.jar

    4. jsr311-api-1.1.1.jar


  • Next create a HelloJerseyRESTService.java file like this

    package com.webspherenotes.rest;

    import javax.ws.rs.GET;
    import javax.ws.rs.Path;
    import javax.ws.rs.Produces;
    import javax.ws.rs.QueryParam;
    import javax.ws.rs.core.MediaType;

    @Path("/hellojersey")
    public class HelloJerseyRESTService {

    @GET
    @Produces(MediaType.TEXT_HTML)
    public String sayHello(@QueryParam("name") String name ){
    return "Hello " + name;
    }
    }

    The HelloJerseyRESTService only handles GET request and returns HTML markup


  • Next declare the Jersey servlet in the web.xml and create servlet mapping

    <?xml version="1.0" encoding="UTF-8"?>
    <web-app id="WebApp_ID" version="2.5"
    xmlns="http://java.sun.com/xml/ns/javaee" xmlns:xsi="http://www.w3.org/2001/XMLSchema-instance"
    xsi:schemaLocation="http://java.sun.com/xml/ns/javaee http://java.sun.com/xml/ns/javaee/web-app_2_5.xsd">
    <display-name>DynaCacheSample1</display-name>
    <servlet>
    <servlet-name>Jersey REST Service</servlet-name>
    <servlet-class>com.sun.jersey.spi.container.servlet.ServletContainer</servlet-class>
    <init-param>
    <param-name>com.sun.jersey.config.property.packages</param-name>
    <param-value>com.webspherenotes.rest</param-value>
    </init-param>
    <load-on-startup>1</load-on-startup>
    </servlet>
    <servlet-mapping>
    <servlet-name>Jersey REST Service</servlet-name>
    <url-pattern>/rest/*</url-pattern>
    </servlet-mapping>
    <welcome-file-list>
    <welcome-file>index.html</welcome-file>
    <welcome-file>index.htm</welcome-file>
    <welcome-file>index.jsp</welcome-file>
    <welcome-file>default.html</welcome-file>
    <welcome-file>default.htm</welcome-file>
    <welcome-file>default.jsp</welcome-file>
    </welcome-file-list>
    </web-app>


  • After you deploy the application in container you should see that when the server is starting it will scan all the resource and in our case it should find only com.webspherenotes.rest.HelloJerseyRESTService

    [10/16/11 17:17:47:250 PDT] 0000000e ApplicationMg I WSVR0228I: User initiated module stop operation request completed on Module, HelloJersey.war, of application, DynaCacheSample1EAR
    [10/16/11 17:17:49:932 PDT] 0000000e ApplicationMg I WSVR0225I: User initiated module start operation requested on Module, HelloJersey.war, of application, DynaCacheSample1EAR
    [10/16/11 17:17:50:466 PDT] 0000000e webapp I com.ibm.ws.webcontainer.webapp.WebGroupImpl WebGroup SRVE0169I: Loading Web Module: HelloJersey.
    [10/16/11 17:17:50:521 PDT] 0000000e WASSessionCor I SessionContextRegistry getSessionContext SESN0176I: Will create a new session context for application key default_host/HelloJersey

    [10/16/11 17:17:50:602 PDT] 0000000e PackagesResou I Scanning for root resource and provider classes in the packages:
    com.webspherenotes.rest
    [10/16/11 17:17:50:666 PDT] 0000000e ScanningResou I Root resource classes found:
    class com.webspherenotes.rest.HelloJerseyRESTService

    [10/16/11 17:17:50:667 PDT] 0000000e ScanningResou I No provider classes found.
    [10/16/11 17:17:50:850 PDT] 0000000e WebApplicatio I Initiating Jersey application, version 'Jersey: 1.5 01/14/2011 12:36 PM'
    [10/16/11 17:17:51:816 PDT] 0000000e servlet I com.ibm.ws.webcontainer.servlet.ServletWrapper init SRVE0242I: [DynaCacheSample1EAR] [/HelloJersey] [Jersey REST Service]: Initialization successful.
    [10/16/11 17:17:51:817 PDT] 0000000e webcontainer I com.ibm.ws.wswebcontainer.VirtualHost addWebApplication SRVE0250I: Web Module HelloJersey has been bound to default_host[*:9080,*:80,*:9443,*:5060,*:5061,*:443].
    [10/16/11 17:17:51:824 PDT] 0000000e ApplicationMg I WSVR0226I: User initiated module start operation request completed on Module, HelloJersey.war, of application, DynaCacheSample1EAR
    [10/16/11 17:17:51:825 PDT] 0000000e AppBinaryProc I ADMA7021I: Distribution of application DynaCacheSample1EAR completed successfully.


You can test the service by either directly going to the http://localhost:9080/HelloJersey/rest/hellojersey?name=sunil URL or using the REST client

Create Hello JAX-RS service in WAS 8.0

The WAS 8.0 is Java EE 6.0 compliant that means it allows you to deploy JAX-RS compliant service and you dont have to go through painful steps for setting up external JAXRS container such as Jersey in your web application

I wanted to figure out what it takes to create HelloREST application in WAS 8.0 so i followed this steps to create Hello JAX-RS service. You can download the source code for sample from here


  • First i used RAD 8.0 to create Servlet Technology 3.0 compliant web application( Which means no need for web.xml or no need of declaring servlets)


  • Next create a HelloRestService class that is basically a REST service and is available at /hellorest url


    package com.webspherenotes.rest;

    import javax.ws.rs.GET;
    import javax.ws.rs.Path;
    import javax.ws.rs.Produces;
    import javax.ws.rs.QueryParam;

    @Path("/hellorest")
    public class HelloRESTService {

    @GET
    @Produces("text/html")
    public String sayHello(@QueryParam("name") String name){
    return "Hello " + name;
    }

    }


  • Next create HelloApplication class which is basically a REST servlet class like this.

    package com.webspherenotes.rest;

    import java.util.HashSet;
    import java.util.Set;

    import javax.ws.rs.ApplicationPath;
    import javax.ws.rs.core.Application;

    @ApplicationPath("/rest/")
    public class HelloApplication extends Application{

    @Override
    public Set<Class<?>> getClasses() {
    Set<Class<?>> s = new HashSet<Class<?>>();
    s.add(HelloRESTService.class);
    return s;
    }

    }

    The HelloApplication class extends javax.ws.rs.core.Application which helps you to declare the JAX-RS application, in this class i am overriding the getClasses() method which returns set of JAX-RS classes that act as JAX-RS service. In my case i do have only one HelloRESTService class so i am only adding that

  • Now deploy the application on your WAS 8.0 server, if you try accessing it by sending GET request to http://localhost:9080/HelloRESTService/rest/hellorest?name=Sunil URL and you should get Hello Sunil as response

Pretty printing SOAP messages

If your dealing with SAAJ API or you want to create a Debug Message Handler that prints the SOAP Message then you can call SOAPmessage.writeTo(System.out), but this method writes the full SOAP message in one line and which can be little hard to read this is sample output


<SOAP-ENV:Envelope xmlns:SOAP-ENV="http://schemas.xmlsoap.org/soap/envelope/"><SOAP-ENV:Body><wn:sayHello SOAP-ENV:encodingStyle="http://schemas.xmlsoap.org/soap/encoding/" xmlns:wn="http://ws.websphrenotes.com/"><arg0>Sunil</arg0></wn:sayHello></SOAP-ENV:Body></SOAP-ENV:Envelope>


If you want to pretty print the SOAPMessage then you can use the following method.


package com.webspherenotes.ws;
import java.io.ByteArrayOutputStream;

import javax.xml.soap.SOAPMessage;
import javax.xml.transform.OutputKeys;
import javax.xml.transform.Source;
import javax.xml.transform.Transformer;
import javax.xml.transform.TransformerFactory;
import javax.xml.transform.stream.StreamResult;
public class SOAPHelper {
public static String getSOAPMessageAsString(SOAPMessage soapMessage) {
try {

TransformerFactory tff = TransformerFactory.newInstance();
Transformer tf = tff.newTransformer();

// Set formatting

tf.setOutputProperty(OutputKeys.INDENT, "yes");
tf.setOutputProperty("{http://xml.apache.org/xslt}indent-amount",
"2");

Source sc = soapMessage.getSOAPPart().getContent();

ByteArrayOutputStream streamOut = new ByteArrayOutputStream();
StreamResult result = new StreamResult(streamOut);
tf.transform(sc, result);

String strMessage = streamOut.toString();
return strMessage;
} catch (Exception e) {
System.out.println("Exception in getSOAPMessageAsString "
+ e.getMessage());
return null;
}

}
}


It generates the output which looks like this

<?xml version="1.0" encoding="UTF-8"?>
<SOAP-ENV:Envelope xmlns:SOAP-ENV="http://schemas.xmlsoap.org/soap/envelope/">
<SOAP-ENV:Body>
<wn:sayHello SOAP-ENV:encodingStyle="http://schemas.xmlsoap.org/soap/encoding/" xmlns:wn="http://ws.websphrenotes.com/">
<arg0>Sunil</arg0>
</wn:sayHello>
</SOAP-ENV:Body>
</SOAP-ENV:Envelope>


I ended up doing this because i could not find SaajOutputer.java class

Updating WAS 8

In the Installing WAS 8 Beta on your machine, entry i talked about how IBM has changed the way we installed WebSphere Application Server starting from V8.0. Now we have to use the IBM Installation Manager,

One advantage of using the IBM Installation manager for installing/managing the WAS 8.0 is that updating it has become very easy, I had to use simple wizard to install latest WAS 8.0 recommended fixes on my machine, no need to go through the process of finding recommended fixes, downloading them and the using update installer to install fixes.


Installing enterprise application files by adding them to a monitored directory

The WebSphere Application Server 8.0 introduces this new feature, in which you can copy enterprise application file in the monitoredDirectory and it automatically gets installed on the server. This feature is similar to concept of copying .war file in the webapps directory. I wanted to try this feature, so i followed these steps

  • The monitored directory feature is disabled by default so the first step would be to enable this feature, for that login into WAS Admin Console and go to Applications -> Global Deployment settings.


    On this page the Monitor directory to automatically deploy applications check box is unchecked by default, so check it. Then you can either use the default path for the monitored directory which is app_profile_root/monitoredDeployableApps or you can change this path to something else, save the changes and restart the server

  • Once the server is restarted you will notice that app_profile_root/monitoredDeployableApps gets created for you


  • I did export HelloMonitoredDirectoryEAR.ear into the monitoredDirectory


  • After copying the .ear into monitoredDirectory i was looking at the logs and i could notice that it is being picked up for deployment

    [7/5/11 12:32:35:944 PDT] 00000013 WatchService I CWLDD0007I: Event id 1937700630-1. Start of processing. Event type: Added, File path: C:\IBM\WebSphere\AppServer\profiles\AppSrv01\monitoredDeployableApps\servers\server1\HelloMonitoredDirectoryEAR.ear.
    [7/5/11 12:32:36:022 PDT] 00000013 ModelMgr I WSVR0801I: Initializing all server configuration models
    [7/5/11 12:32:37:303 PDT] 00000013 WorkSpaceMana A WKSP0500I: Workspace configuration consistency check is disabled.
    [7/5/11 12:32:38:475 PDT] 00000013 AppManagement I CWLDD0028I: Event id 1937700630-1. The target of the current operation is [WebSphere:cell=ascendan-ggbz6iNode01Cell,node=ascendan-ggbz6iNode01,server=server1].
    [7/5/11 12:32:38:553 PDT] 00000013 AppManagement I CWLDD0014I: Event id 1937700630-1. Installing application HelloMonitoredDirectoryEAR...
    [7/5/11 12:32:40:022 PDT] 00000013 annotations I ArchiveInputStreamData mapData Collision on [ WEB-INF/classes/com/webspherenotes/test/HelloMonitoredServlet.class ] in [ HelloMonitoredDirectory.war ]
    [7/5/11 12:32:43:631 PDT] 00000014 annotations I ArchiveInputStreamData mapData Collision on [ WEB-INF/classes/com/webspherenotes/test/HelloMonitoredServlet.class ] in [ HelloMonitoredDirectory.war ]
    [7/5/11 12:32:55:645 PDT] 00000014 webcontainer I com.ibm.ws.webcontainer.internal.WebContainer addExtensionFactory SRVE0239I: Extension Factory [class com.ibm.ws.soa.sca.web.extension.SCAWebExtensionFactory] was registered successfully.
    [7/5/11 12:32:55:676 PDT] 00000014 webcontainer I com.ibm.ws.webcontainer.internal.WebContainer addExtensionFactory SRVE0240I: Extension Factory [class com.ibm.ws.soa.sca.web.extension.SCAWebExtensionFactory] has been associated with patterns [""].
    [7/5/11 12:32:55:692 PDT] 00000014 WebSphereSCAS I Added Servlet mapping: /dojo
    [7/5/11 12:32:55:692 PDT] 00000014 WebSphereSCAS I Added Servlet mapping: /dojo
    [7/5/11 12:32:55:692 PDT] 00000014 WebSphereSCAS I Added Servlet mapping: /tuscany
    [7/5/11 12:32:55:692 PDT] 00000014 WebSphereSCAS I Added Servlet mapping: /tuscany
    [7/5/11 12:32:58:848 PDT] 00000014 annotations I ArchiveInputStreamData mapData Collision on [ WEB-INF/classes/com/webspherenotes/test/HelloMonitoredServlet.class ] in [ HelloMonitoredDirectory.war ]
    [7/5/11 12:32:58:957 PDT] 00000014 InstallSchedu I ADMA5013I: Application HelloMonitoredDirectoryEAR installed successfully.
    [7/5/11 12:33:03:223 PDT] 00000013 annotations I ArchiveInputStreamData mapData Collision on [ WEB-INF/classes/com/webspherenotes/test/HelloMonitoredServlet.class ] in [ HelloMonitoredDirectory.war ]
    [7/5/11 12:33:04:144 PDT] 00000013 annotations I ArchiveInputStreamData mapData Collision on [ WEB-INF/classes/com/webspherenotes/test/HelloMonitoredServlet.class ] in [ HelloMonitoredDirectory.war ]
    [7/5/11 12:33:04:207 PDT] 00000013 annotations E CWWAM0001E: An exception occurred during annotation processing: java.lang.IllegalArgumentException: The feature 'annotated-classes' is not a valid feature

  • I did wait for couple of minutes and then i checked the WAS Admin console and i could see newly installed application like this


  • I wanted to see where exactly the application is getting installed so i looked at the value of application binaries and i can see that it got installed in regular installedApp directory


How to use TCP/IP monitor for web service

The TCP/IP monitor view in Rational Application developer lets you monitor HTTP traffic. It makes it easier to monitor the Web Service request and response. The basic idea is you create a tunnel for example the default HTTP port for WAS is 9080, and i want to monitor traffic on localhost:9080, so i did create a monitor for port localhost:80 and now whenever i make a request to localhost:80, the TCP/IP monitor will forward that request to localhost:9080 and also log it. This is same principle as that of Tcpmon


I wanted to try this feature so i used these steps.

  • In the TCP/IP montior view click on properties sub menu like this


  • On the next window i did create a monitor that will forward requests sent to localhost:8080 to localhost:9080 like this

    After creating the monitor start it, if its not already started.

  • Create a web service client using RAD, when you create the web service client, RAD copies the wsdl file in the META-INF/wsdl folder and this file has the service binding section, which has the URL for actual service. The Web Service client created by RAD reads URL of the service from wsdl to communicate with the service.

    @WebServiceClient(name = "HelloWebServiceService", targetNamespace = "http://services.webspherenotes.com/",
    wsdlLocation = "META-INF/wsdl/HelloWebServiceService.wsdl")
    public class HelloWebServiceService
    extends Service
    {

    private final static URL HELLOWEBSERVICESERVICE_WSDL_LOCATION;
    private final static Logger logger = Logger.getLogger(com.webspherenotes.services.HelloWebServiceService.class.getName());

    static {
    URL url = null;
    try {

    url = com.webspherenotes.services.HelloWebServiceService.class.getResource("/META-INF/wsdl/HelloWebServiceService.wsdl");

    if (url == null) throw new MalformedURLException("/META-INF/wsdl/HelloWebServiceService.wsdl does not exist in the module.");
    } catch (MalformedURLException e) {
    logger.warning("Failed to create URL for the wsdl Location: 'META-INF/wsdl/HelloWebServiceService.wsdl', retrying as a local file");
    logger.warning(e.getMessage());
    }
    HELLOWEBSERVICESERVICE_WSDL_LOCATION = url;
    }

    public HelloWebServiceService(URL wsdlLocation, QName serviceName) {
    super(wsdlLocation, serviceName);
    }

    public HelloWebServiceService() {
    super(HELLOWEBSERVICESERVICE_WSDL_LOCATION, new QName("http://services.webspherenotes.com/", "HelloWebServiceService"));
    }

    /**
    *
    * @return
    * returns HelloWebService
    */
    @WebEndpoint(name = "HelloWebServicePort")
    public HelloWebService getHelloWebServicePort() {
    return super.getPort(new QName("http://services.webspherenotes.com/", "HelloWebServicePort"), HelloWebService.class);
    }

    /**
    *
    * @param features
    * A list of {@link javax.xml.ws.WebServiceFeature} to configure on the proxy.
    Supported features not in the features parameter will have their default values.
    * @return
    * returns HelloWebService
    */
    @WebEndpoint(name = "HelloWebServicePort")
    public HelloWebService getHelloWebServicePort(WebServiceFeature... features) {
    return super.getPort(new QName("http://services.webspherenotes.com/", "HelloWebServicePort"), HelloWebService.class, features);
    }

    }

    In the static block of the HelloWebServiceService, it is reading the wsdl and using the URL for making request.


  • Now in order for TCP/IP monitor to monitor the traffic, we will have to change the value of the URL so that it goes through the port monitored by TCP/IP monitor. I changed the value to 80 like this


  • Now when i run the client i can see the traffic using TCP/IP monitor like this


Using Ajax Proxy in the Connections

The Connections server has Ajax Proxy that you can use to make cross domain calls. In order to try the Ajax proxy i did create a iWidget that makes call to http://www.atech.com from the page http://wpconnections.atech.com/. In order to test iWidget i did add it to Connections HomePage. You can download the AjaxProxy iWidget from here

This is how my AjaxProxy.xml file the iWidget xml definition file looks like

<?xml version="1.0" encoding="UTF-8" ?>
<iw:iwidget id="AjaxProxy"
xmlns:xsi="http://www.w3.org/2001/XMLSchema-instance"
xmlns:iw="http://www.ibm.com/xmlns/prod/iWidget"
supportedModes="view" mode="view" lang="en" iScope="com.webspherenotes.ajaxproxy"
allowInstanceContent="true" >
<iw:resource uri="ajaxproxy.js" />
<iw:content mode="view">
<![CDATA[
<div>Ajax proxy</div>
<span id="replacecontent">Replace content</span>
]]>
</iw:content>
</iw:iwidget>


The ajaxproxy.xml declares ajaxproxy.js as a resource, which has all the JavaScript logic for the widget. The ajaxproxy widget displays a place holder div, replacecontent

This is how my ajaxproxy.js file looks like

dojo.provide("com.webspherenotes.ajaxproxy");
dojo.declare("com.webspherenotes.ajaxproxy", [], {
onview: function(){
console.log("Inside the onView function()");
var currContext = this.iContext;
try{
dojo.xhrPost({
url: "/homepage/web/proxy/http/www.atech.com",

load: function(data, ioargs){
currContext.getElementById("replacecontent").innerHTML = data;
console.log(data);
},
error: function(error,ioargs){
alert("Error :" + data);
}
});
}catch(error){
console.log("Error in the dojo.xhrPost " + error );
}
}
});


The onview() method of the ajaxproxy widget will get called to generate the VIEW mode markup, in this method i am making HTTP POST to /homepage/web/proxy/http/www.atech.com which actually means http://www.atech.com, once the response is back i will get control in the load() method and i am using the response to display markup in the widget, which looks like this
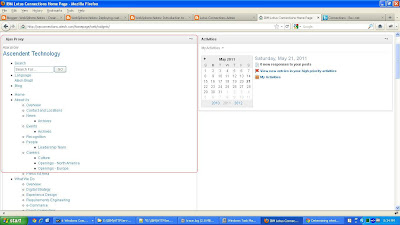


The markup looks unformatted because it does not include the necessary resources. When you deploy the widget on your server it will fail with 403 forbidden error at the time of making xhrPost() call unless your ajax proxy is configured to make POST request.

Troubleshooting Ajax Proxy

I was trying to configure the Ajax proxy in the Connections product but i ran into bunch of issues, so i had to figure out how to turn the trace for Ajax proxy by turning trace for com.ibm.ws.ajaxproxy.*=all but once i did i can see it does generate good trace like this.


[5/19/11 22:02:38:407 PDT] 00000087 ProxyServlet 3 com.ibm.ws.ajaxproxy.servlet.ProxyServlet service entering service(..)com.ibm.ws.ajaxproxy.servlet.ProxyServlet
[5/19/11 22:02:38:501 PDT] 00000087 ProxyServlet 3 com.ibm.ws.ajaxproxy.servlet.ProxyServlet service
com.ibm.ws.ajaxproxy.servlet.ProxyServlet service(..) Method:GET; URI:/homepage/web/proxy/ibm/us/en/sandbox/ver1/; QueryString:null; ContextPath:/homepage; ServletPath:/web/proxy; PathInfo:/ibm/us/en/sandbox/ver1/
[5/19/11 22:02:38:501 PDT] 00000087 ProxyServlet 3 com.ibm.ws.ajaxproxy.servlet.ProxyServlet service com.ibm.ws.ajaxproxy.servlet.ProxyServlet service(..) targetPath: http://www.ibm.com
[5/19/11 22:02:38:501 PDT] 00000087 Policy 3 com.ibm.ws.ajaxproxy.proxy.RequestBean com.ibm.ws.ajaxproxy.proxy.Policy RequestBean(URL, String, String):[Ljava.lang.Object;@6f726f72
[5/19/11 22:02:38:501 PDT] 00000087 Policy 3 com.ibm.ws.ajaxproxy.proxy.RequestBean com.ibm.ws.ajaxproxy.proxy.Policy RequestBean(URL, String, String):http://www.ibm.com/ibm/us/en/sandbox/ver1/
[5/19/11 22:02:38:532 PDT] 00000087 URINormalizer 3 com.ibm.ws.ajaxproxy.util.URINormalizer normalize com.ibm.ws.ajaxproxy.util.URINormalizer normalize(..) Orginal URI: http://www.ibm.com/ibm/us/en/sandbox/ver1/ Normalized URI: http://www.ibm.com/ibm/us/en/sandbox/ver1/
[5/19/11 22:02:38:532 PDT] 00000087 ProxyServlet 3 com.ibm.ws.ajaxproxy.servlet.ProxyServlet service com.ibm.ws.ajaxproxy.servlet.ProxyServlet service(..) Attempting to match Policy too: /http/www.ibm.com/ibm/us/en/sandbox/ver1/
[5/19/11 22:02:38:532 PDT] 00000087 ProxyServlet 3 com.ibm.ws.ajaxproxy.servlet.ProxyServlet service com.ibm.ws.ajaxproxy.servlet.ProxyServletPolicies for: *

ACF: none
Actions:
GET

Cookies:

Headers:
Users:

[5/19/11 22:02:38:532 PDT] 00000087 ProxyServlet 3 com.ibm.ws.ajaxproxy.servlet.ProxyServlet service com.ibm.ws.ajaxproxy.servlet.ProxyServlet service(..)1305867758532

[5/19/11 22:02:38:532 PDT] 00000087 ProxyServlet 3 com.ibm.ws.ajaxproxy.servlet.ProxyServlet service com.ibm.ws.ajaxproxy.servlet.ProxyServlet service(..)1305867758532
[5/19/11 22:02:38:532 PDT] 00000087 ProxyServlet 3 com.ibm.ws.ajaxproxy.servlet.ProxyServlet service com.ibm.ws.ajaxproxy.servlet.ProxyServlet service(..) HostConfiguration set too: HostConfiguration[host=http://wpconnections.atech.com]
[5/19/11 22:02:38:532 PDT] 00000087 ProxyServlet 3 com.ibm.ws.ajaxproxy.servlet.ProxyServlet service com.ibm.ws.ajaxproxy.servlet.ProxyServlet service(..) Assigning GetMethod as method
[5/19/11 22:02:38:532 PDT] 00000087 Policy 3 com.ibm.ws.ajaxproxy.proxy.Policy getValidHeaders com.ibm.ws.ajaxproxy.proxy.Policy getValidHeaders(..) entering
[5/19/11 22:02:38:532 PDT] 00000087 Policy 3 com.ibm.ws.ajaxproxy.proxy.Policy getValidHeaders com.ibm.ws.ajaxproxy.proxy.Policy getValidHeaders(..)Reusing pattern for User-Agent
[5/19/11 22:02:38:532 PDT] 00000087 Policy 3 com.ibm.ws.ajaxproxy.proxy.Policy getValidHeaders com.ibm.ws.ajaxproxy.proxy.Policy getValidHeaders(..)Reusing pattern for Accept.*
[5/19/11 22:02:38:532 PDT] 00000087 Policy 3 com.ibm.ws.ajaxproxy.proxy.Policy getValidHeaders com.ibm.ws.ajaxproxy.proxy.Policy getValidHeaders(..)Reusing pattern for Content.*
[5/19/11 22:02:38:532 PDT] 00000087 Policy 3 com.ibm.ws.ajaxproxy.proxy.Policy getValidHeaders com.ibm.ws.ajaxproxy.proxy.Policy getValidHeaders(..)Reusing pattern for Authorization.*
[5/19/11 22:02:38:532 PDT] 00000087 Policy 3 com.ibm.ws.ajaxproxy.proxy.Policy getValidHeaders com.ibm.ws.ajaxproxy.proxy.Policy getValidHeaders(..) exiting
[5/19/11 22:02:38:532 PDT] 00000087 ProxyServlet 3 com.ibm.ws.ajaxproxy.servlet.ProxyServlet service com.ibm.ws.ajaxproxy.servlet.ProxyServlet service(..) Adding Request Header [User-Agent : Mozilla/5.0 (Windows NT 5.1; rv:2.0.1) Gecko/20100101 Firefox/4.0.1]
[5/19/11 22:02:38:532 PDT] 00000087 ProxyServlet 3 com.ibm.ws.ajaxproxy.servlet.ProxyServlet service com.ibm.ws.ajaxproxy.servlet.ProxyServlet service(..) Adding Request Header [Accept-Charset : ISO-8859-1,utf-8;q=0.7,*;q=0.7]
[5/19/11 22:02:38:532 PDT] 00000087 ProxyServlet 3 com.ibm.ws.ajaxproxy.servlet.ProxyServlet service com.ibm.ws.ajaxproxy.servlet.ProxyServlet service(..) Adding Request Header [Accept-Encoding : gzip, deflate]
[5/19/11 22:02:38:532 PDT] 00000087 ProxyServlet 3 com.ibm.ws.ajaxproxy.servlet.ProxyServlet service com.ibm.ws.ajaxproxy.servlet.ProxyServlet service(..) Adding Request Header [Accept : text/html,application/xhtml+xml,application/xml;q=0.9,*/*;q=0.8]
[5/19/11 22:02:38:532 PDT] 00000087 ProxyServlet 3 com.ibm.ws.ajaxproxy.servlet.ProxyServlet service com.ibm.ws.ajaxproxy.servlet.ProxyServlet service(..) Adding Request Header [Accept-Language : en-us,en;q=0.5]
[5/19/11 22:02:38:532 PDT] 00000087 ProxyServlet 3 com.ibm.ws.ajaxproxy.servlet.ProxyServlet service com.ibm.ws.ajaxproxy.servlet.ProxyServlet service(..) Adding Request Header [Content-Type : application/x-www-form-urlencoded]
[5/19/11 22:02:38:532 PDT] 00000087 Policy 3 com.ibm.ws.ajaxproxy.proxy.Policy getFilteredCookieString com.ibm.ws.ajaxproxy.proxy.Policy getFilteredCookieString(..) rawCookieString: editMode=false; __utma=249276503.1859418337.1303153383.1303153383.1303153383.1; __utmz=249276503.1303153383.1.1.utmcsr=(direct)|utmccn=(direct)|utmcmd=(none); JSESSIONID=0000UQ_tLLLGMSwyBt5z5_Xd10t:15td46icp; LtpaToken2=VQZuwqjVCdZQtnucuRYbpDNspppYkuTG5jaRDPRMbfI89rxcJBaJ0J4qUMgkw6M3OWJ8N2DpI5zm5f+4AIM3l5IDBdt8WiI04G6MTELExy0nTdt5pBlquum/DMA8OoTYZcpADrN/dHicV8hTiiExAjyZQrOe8WQ2QvA9hFnS1IK5wZM+C7a400lcOt3pzh1T3mr65/SPKXW2LLfFIAXIzFcrqj18Af7Ak6zcb1MmX9lFTRdgopVSxVOBq+5ReL0SJkwwuuaO/WiZptOmuP/1Js4QJ60ekfn8+AQ0znWdtV8khwgV/6Searq14egNeSswzoLdtla8XmxXvT9bN+Ht/5VtXKEXkGRwNglHlbZmg74mHIjnhgf4svqYzJM6kuWK/fnHtkFfAj5iaJQ46zYUzGwMHEMaYqfU217WliF4BD5W8wSrZPc+qYseNUb9zMQ3pF0k4sVi5fkYWWkZ9G6eWNvXCinjQPq5Xt3CtJh+sERJs3zuKepD/milfm29QCsTN0klc8bLCT+x+NFx2bwrAs2hpfywQWoFguwt3pdUw71GfaCzvSU3eIj7EmWDfzm9kQtWpDYSfzhSlbDkKb4N5joSNWlOVWk7BRqkWDqx4bSY3jLUFkg8YIAqSf07ZX4LXp0S5FGkCRs8iTZAmpWuddZoWjGkh4TZwUOKd8oGz1hCqVYsaXHK6ZOX6xjpP7dBC++1NGFeuB5dRIy2swj8MA==; LtpaToken=3FQ3Cxvhqjt0NgBdBtA7adO0uhc79AJbvbc1BgkpjWBRdRevNX0wEoT9Q66qd56aALSOlleaerpij2MXbCGkCSx2cHx/SSNjxdBqYWeXIYvG+542IsczVs3w97GxmBXURp0pc/AYTDd1+ZCmep2zGqyhnKbGNdbQJ5eHMON3KLzerrgtrX9H4rrfvLZUEH3Ejq4ota4XMwrqNz2cJCUOJxig+ygmf0oAUR34kUp+8LSebTY+P8uwEGS/d4d8uh3jWR1seXu4XHUDceqV308GH1ewCMraOEJPq2/k5Cw7vHjcd3V+xdKK3PrV+0Ao65DdyMph+XZuo8yroJ730pHqSFYkAy+TsU6DfSJZm+XTcRo=; currentUserName=was bind; currentUserHandle=546b0260-6273-497e-acfa-1e898f3037d4

Synchronizing between LDAP and the profiles database

When you install connection, you will

  • Go to the E:\IBM\LotusConnections directory, there you will see two TDISOL.zip expand the platform specific version in the same directory like this


  • Open the tdienv.bat file and change value of TDIPATH to point to the location where TDI is installed on your machine, By default it is set to C:\Program Files\IBM\TDI\V7.0


    @REM *****************************************************************
    @REM
    @REM IBM Confidential
    @REM
    @REM OCO Source Materials
    @REM
    @REM Copyright IBM Corp. 2010
    @REM
    @REM The source code for this program is not published or otherwise
    @REM divested of its trade secrets, irrespective of what has been
    @REM deposited with the U.S. Copyright Office.
    @REM
    @REM *****************************************************************

    @echo off
    IF "%TDIPATH%" == "" (
    SET TDIPATH=E:\IBM\TDI\V7.0
    )

    IF "%TDI_CS_HOST%" == "" (
    SET TDI_CS_HOST=localhost
    )

    IF "%TDI_CS_PORT%" == "" (
    SET TDI_CS_PORT=1527
    )

  • Then open the profiles_tdi.properties file which is in the E:\IBM\LotusConnections\TDISOL\TDI directory in text editor and set following values


    source_ldap_url=ldap://directory.atech.com:1389
    source_ldap_user_login=cn=root
    source_ldap_user_password=tdsadmin
    source_ldap_search_base=dc=webspherenotes,dc=com
    source_ldap_search_filter=(objectclass=inetOrgPerson)

    source_ldap_use_ssl=false
    source_ldap_authentication_method=Simple
    source_ldap_time_limit_seconds=0
    source_ldap_required_dn_regex=
    source_ldap_collect_dns_file=collect.dns
    source_ldap_map_functions_file=profiles_functions.js
    source_ldap_page_size=0
    source_ldap_logfile=logs/PopulateDBFromSource.log
    source_ldap_debug=true
    source_ldap_sort_attribute=
    source_ldap_sort_page_size=
    source_ldap_escape_dns=false
    source_ldap_compute_function_for_givenName=
    source_ldap_compute_function_for_sn=
    source_ldap_collect_updates_file=employee.updates
    source_ldap_binary_attributes=GUID
    source_ldap_manager_lookup_field=
    source_ldap_secretary_lookup_field=
    dbrepos_jdbc_url=jdbc:db2://localhost:50000/peopledb
    dbrepos_jdbc_driver=com.ibm.db2.jcc.DB2Driver
    dbrepos_username=LCUSER
    dbrepos_password=lcuser1

    dbrepos_mark_manager_if_referenced=true
    monitor_changes_debug=false


  • Execute following task sync_all_dns.bat file which is in the E:\IBM\LotusConnections\TDISOL\TDI directory and look at the logs in the E:\IBM\LotusConnections\TDISOL\TDI\logs directory


After the command is executed you should be able to see the changes right away you can keep executing the same task repeatedly