WebSphere Portal (WP) has some specific requirements for the format and content of URL used by this application. Furthermore the WebSphere Portal URLs are not human decipherable or dependant on site taxonomy. One example of a typical WP version 6 URL might look like the following:
http://www.mycompany.com/wps/myportal/!ut/p/c1/04_SB8K8xLLM9MSSzPy8xBz9CP0os3hLRydHL1MjYwN3dyNXA6MAD3c_V2M_YwMDA30_j_zcVP2CbEdFAHUwnMg!/
The basic building blocks of this URL are defined as follows:
<protocol>://<hostname>:<port>/<portal-context>/<security-context>/[<virtual-portal-alias>]/[<portal-params>]
All elements of this URL are important to the portal server to ensure that the request is properly processed and it is very difficult to hide or manipulate any
<protocol> – This is the protocol used by the request in our case HTTP or HTTPS
<hostname> - This is the DNS resolvable host name of the entry point to our portal application
<port> - This is the port that the WebSphere Portal HTTP listener will be bound to and is often left off on a browser URL designating the port as either the default HTTP port 80 or HTTPS port 443. Any other port would need to be properly designated in the URL
<portal-context> - Portal Context is the part of the URL that determines which application on the WebSphere Server will service the request. The default for WebSphere Portal is wps
<security-context> - Security Context is the part of the URL that determines whether the user is request the anonymous or secure view of a given portal navigational element like a page. The default contexts are portal for the anonymous version and myportal for the secure version
<virtual-portal-alias> - Virtual Portal Alias (VP alias) is only relevant when the WebSphere Portal environment uses Virtual Portals. The Cisco Enterprise Portal (CEP) environment leverages the VP alias to do routing of requests to applications based on predefined service level agreement rules and
Portlet Wiring Tool
The Portlet Wiring Tool allows you to configure connections, or wires, between cooperative portlets. You can access the Portlet Wiring tool for a page by going to Edit Layout section of a page and then going to Wires tab. You should get a screen like this
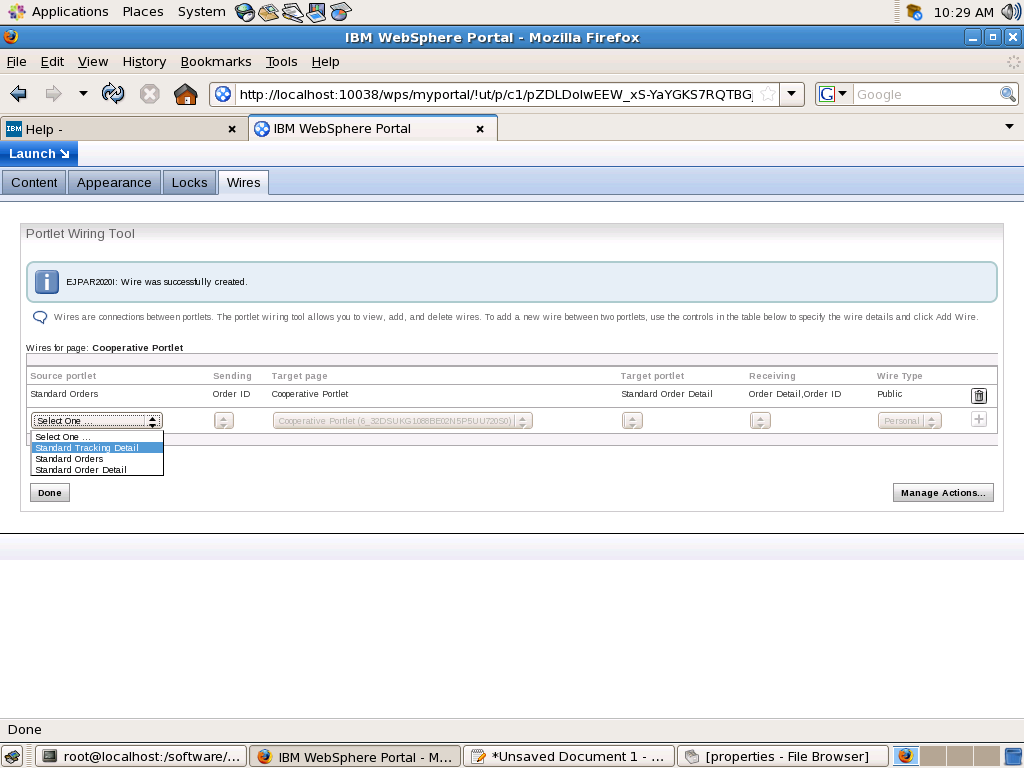
The Portlet Wiring Tool allows you to view the properties that portlets on the page can send or receive. If a match is available between two portlets, you can create a
wire between the two portlets. Existing wires may also be deleted using the tool..
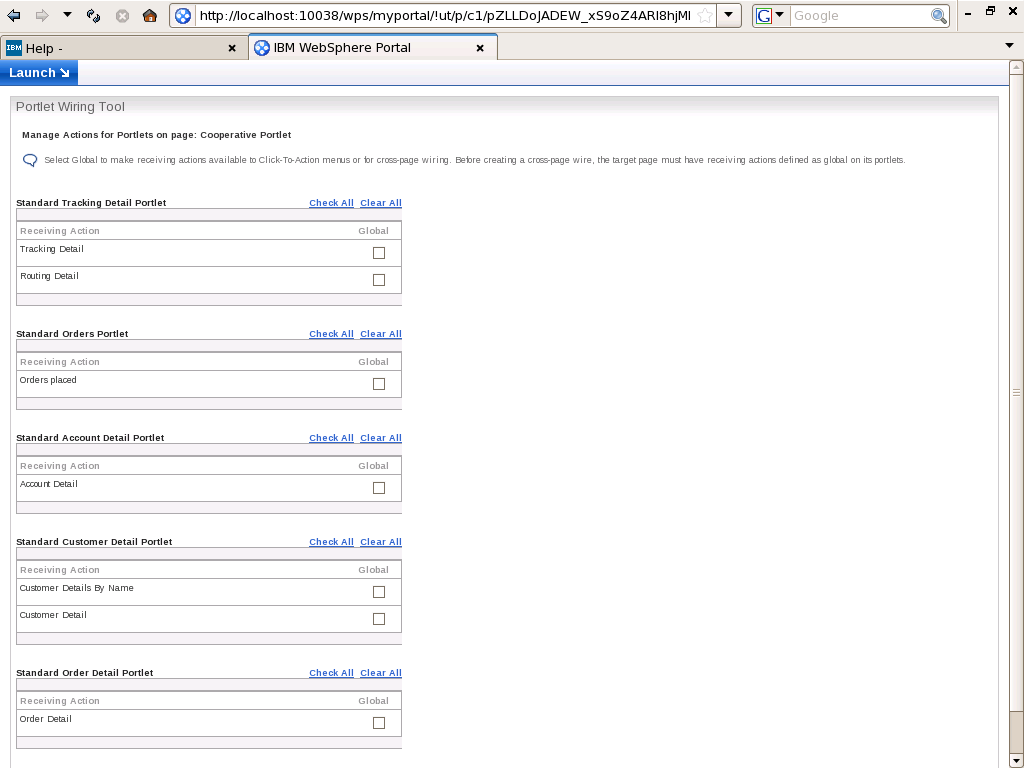
The Portlet Wiring Tool also provides the functionality to implement cross-page portlet communication. Cross-page wires allow portlets to exchange properties across pages. Before creating a cross-page wire, the target page must have receiving actions defined as global on its portlets. Setting an action as global will also make that action available to Click-to-Action menus. To set an action as global, navigate to the target page and select Edit Page Layout from the drop-down menu on the title bar. Then select the Wires tab and click on Manage Actions. This will bring up a listing of the portlets on a page and their corresponding receiving actions.
As an alternative to the Portlet Wiring Tool, wires can also be created interactively in the portlet. Depending on the browser, users with sufficient permissions can create wires by holding either the CTRL or ALT keys and clicking an icon or hotspot in the portlet that is already associated with a Click-to-Action function. A dialog is displayed that allows the user to create a wire to other portlets on the page.
In order to view the tool itself, users must possess at least "User" role permissions on the page and the portlet. Further access checks are performed before allowing the user to view, create, or delete wires between portlets. The user must possess at least "User" role permissions on a page and the wired portlets on it to be able to view wires for the page. Users may also be able to create or delete personal wires, which affect their view of the page, or create or delete public wires, which affect all users' view of the page. Users must possess at least "Privileged User" role permissions on the page and "User" permissions on the portlets to be able to create or delete personal wires, while at least "Editor" role permissions are required on the page and "User" permissions on the portlets to be able to create or delete public wires.

The Portlet Wiring Tool allows you to view the properties that portlets on the page can send or receive. If a match is available between two portlets, you can create a
wire between the two portlets. Existing wires may also be deleted using the tool..
The Portlet Wiring Tool also provides the functionality to implement cross-page portlet communication. Cross-page wires allow portlets to exchange properties across pages. Before creating a cross-page wire, the target page must have receiving actions defined as global on its portlets. Setting an action as global will also make that action available to Click-to-Action menus. To set an action as global, navigate to the target page and select Edit Page Layout from the drop-down menu on the title bar. Then select the Wires tab and click on Manage Actions. This will bring up a listing of the portlets on a page and their corresponding receiving actions.

As an alternative to the Portlet Wiring Tool, wires can also be created interactively in the portlet. Depending on the browser, users with sufficient permissions can create wires by holding either the CTRL or ALT keys and clicking an icon or hotspot in the portlet that is already associated with a Click-to-Action function. A dialog is displayed that allows the user to create a wire to other portlets on the page.
In order to view the tool itself, users must possess at least "User" role permissions on the page and the portlet. Further access checks are performed before allowing the user to view, create, or delete wires between portlets. The user must possess at least "User" role permissions on a page and the wired portlets on it to be able to view wires for the page. Users may also be able to create or delete personal wires, which affect their view of the page, or create or delete public wires, which affect all users' view of the page. Users must possess at least "Privileged User" role permissions on the page and "User" permissions on the portlets to be able to create or delete personal wires, while at least "Editor" role permissions are required on the page and "User" permissions on the portlets to be able to create or delete public wires.
Restrictions on Cooperative Portlet
These are the restrictions on the Cooperative portlets that apply to portlets developed using IBM Portlet API and Standard Portlet API
- The property broker does not support anonymous users. That is, for portlets on a page to transfer properties, the user must be logged in.
- The pop-up menu functionality requires browsers with JavaScript on the client.
- When multiple cross-page wires are triggered at the same time to different target pages, the first target page will have priority. Only the wires going to the first target page will work. The other events will be discarded.
- Wires created on a root page may not be created by default on any child derived page. They have to be recreated on the derived page.
Configure cooperative portlets
The term cooperative portlets refers to the capability of portlets on a page to interact with each other by sharing information. The WPS supports cross-page portlet communication for cooperative portlets, allowing portlets on different pages to communicate
Cooperation between source and target portlets is faciliated by by a WPS runtime entity called the property broker. The Cooperative portlets subscribe to a model of declaring, publishing and sharing information with each other using WPS property borker. Each portlet that wants to act as either producer or consumer declares its intention using a .wsdl file. At the time of installing a portlet WPS will read the .wsdl file and make entries in database about data type that portlet can either consume or produce. After installing a portlet administer should create a connection between source and target portlet using Portlet Wiring portlet. The Portlet wiring Portlet allows you to create connection only if the source and target portlet has matching data type.
There are some differences between the portlets developed using IBM Portlet API and Standard portlet API when it comes to cooperative portlets
1) You can create wire only between either two portlets developed using IBM Portlet API or two portlets developed using Standard Portlet API. You cannot create wire between a portlet developed using IBM Portlet API and a portlet developed using Standard Portlet API even if they have matching data type.
2)The Portlets developed using IBM Portlet API can publish a property either decleratively i.e. if wire is created between two portlets or programmatically using the Property Broker service API. But the portlets developed using Standard Portlet API can publish property only decleratively.
3) The Portelts developed using IBM portlet API's can use Click-to-Action, What that means is they can use C2A tags in the JSP for generating markup. Once you do that when you click on property it will display a context menu with list of all the consumer portlets for that portlet. You can click on one of the items in the menu to send event to consumer or you can broadcast that event to all the portlets who can consume that property. The Standard Portlets cannot use C2A JSP tags for publishing.
During the event phase, the property broker delivers notifications to cooperative portlets, and the cooperative portlets can notify the property broker of property value changes. An action may be delivered on one portlet as the result of a user clicking on an action link generated by the portlet in its markup. If cooperative portlets are used, this may result in other actions being triggered on other portlets. At any point during the event phase, a portlet may publish the value of an output property to the property broker. The portlet may provide a value at any time during the event phase. The property broker determines what needs to be done with the values. If wires exist for this property, the property broker will deliver the property value to the actions specified by the target end of the wires. This process may continue recursively; the property broker detects loops and breaks them. The property broker guarantees the completion of all property value notifications to target portlets by the end of the event phase.
Portlet deployment in clustered environment
If your WebSphere Portal server is installed on top of WAS ND or WAS XD, which most probably would be the case in non development environment then deployment of portlet would be little different than how you work on DEV environment.
When you deploy portlet on cluster using Portal Admin Console or XMLAccess first changes would be made in the portal database and then the portal server would forward control to Deployment manager which will push changes to all the servers in that portal once the changes are copied to all the nodes the portlet should be activated.
In case of clustered environment follow this procedure for either installing or updating the portal.
Second approach of installing portlets would be to first install it as Enterprise application using WAS and then allow DMGR to synchronize changes to all the nodes once that is done then inform Portal server about the portlet using XMLAccess pre deployed command. This approach is useful when you want to combine your portlet with other resources such as EJB, Web Services or other web modules. Follow these steps for deploying portlet
When you deploy portlet on cluster using Portal Admin Console or XMLAccess first changes would be made in the portal database and then the portal server would forward control to Deployment manager which will push changes to all the servers in that portal once the changes are copied to all the nodes the portlet should be activated.
In case of clustered environment follow this procedure for either installing or updating the portal.
- Deploy your portlets using either the WebSphere Portal Administration page or the XML configuration interface utility (xmlaccess command).
- Activate the deployed portlets in the cluster by running the "WPSconfig.bat activate-portlets" command. In addition to activating the portlets, this step causes the deployment manager to synchronize the changes across the cluster members.
Second approach of installing portlets would be to first install it as Enterprise application using WAS and then allow DMGR to synchronize changes to all the nodes once that is done then inform Portal server about the portlet using XMLAccess pre deployed command. This approach is useful when you want to combine your portlet with other resources such as EJB, Web Services or other web modules. Follow these steps for deploying portlet
- Install the EAR through Deployment Manager, using either the Applications > Install New Application option within the Administration Console, or the AdminApp install command within the wsadmin scripting client
- Map the application to each cluster where it is to run, using either the MapModulesToServers option of the AdminApp install command within the wsadmin scripting client, or the Map modules to servers option under that application’s entry under Applications > Enterprise Applications .
- Synchronize the new application with each node in all clusters, and start the application in each cluster. By default, synchronization will automatically occur with each node hosting servers and cluster members, or both, to which the enterprise application is mapped.
- Use the XMLAccess application to import a portlet definition into each portal cluster using the predeployed attribute, where the
element of the points to the binaries directory where the portlet application's WAR contents are contained. Choose only one cluster member in a cluster against which to run the XMLAccess import, and as a result all cluster members receive the update.
Manage deployment and removal of portal application
When you deploy a portlet on WPS two things happen first that portlet gets installed as Enterprise application on the underlying WebSphere Application Server and in addition to that WPS reads the portlet.xml and stores the configuration information in the database.
Now there are two different approaches of deploying portlet
Now there are two different approaches of deploying portlet
- Deploy portlet using WPS: In this approach you can deploy a portlet through the WPS infrastructure either by using the Manage Web Modules portlet or using XMLAccess script. When you deploy portlet through WPS, it first takes whatever configuration information it needs from the portlet’s WAR file, and then it generates a unique object ID for this portlet. WebSphere Portal then wraps the portlet’s WAR within an EAR definition, giving it a name based on the portlet’s display name, suffixed with the generated object ID. This guarantees that the portlet’s underlying enterprise application name is unique to this portal.
- Deploy portlet using WAS: Other approach of deploying portlet is first deploying EAR file using WAS Admin Console and then using XMLAccess script to inform WPS about the portlet i.e. activating portlet. This approach is useful if you want your portlet to access an EJB, in that case create EAR file containing EJB and portlet. Or second approach is you want to package more than one portlet applications into one EAR file(might be useful if those applications share some third party jar)
Copying Portlet and Portlet Application
One of the common business requirement is ability to copy a Portlet or Portlet application. Ex. Lets say you have a RSS Portlet you want two different instances of that portlet so that user can add either WebSphere RSS Portlet or CNN News Portlet to page, first one pointing to IBM Developerworks WebSphere Section feed and second one pointing to CNN news feed.
The administrator of portal can achieve this by first installing IBM RSS Portlet then go to Manage Portlet or Manage Application portlet and click on Copy. When you copy a Portlet application all portlets in that application gets copied. When you click on Copy portlet you will get a screen like this, here you can set different title for the copied portlet
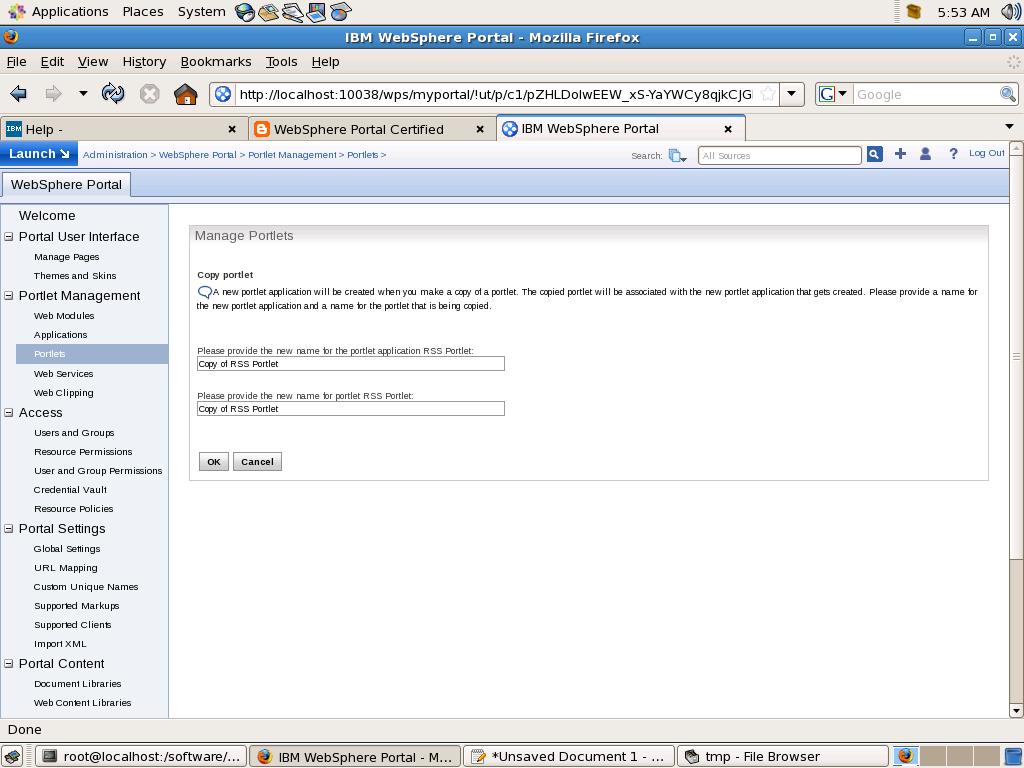
When you copy a portlet or portlet application the portlet data also gets copied. But after copying the portlet the administrator can change preferences of copy without affecting the original portlet.
One of the common cases for copying portlet is that you want say Virtual Portal specific settings. Ex. Lets say you have company news portlet by default it displays latest news for USA. You want to change it so that in case of Europe the Company News Portlet displays news for Europe. If thats the case make copy of Company News Portlet change preferences to display Europe news and make changes in ACL so that only users from Europe has access to it and also European users do not have access to main Company News Portlet.
About XMLAccess Interface
The XML configuration interface provides a batch processing interface for portal configuration updates. It allows you to export an entire portal confiugration or parts of configuration to XML file. Then you can import this XML file in someother portal server to recreate configuration.
You access the XML configuration interface using a command line tool. This command line client is a small separate program that connects to the portal server using HTTP/HTTPS connection. You can use it for configuring portal remotely.
To be able to use the XML Configuration interface you need to have the manager role on the virtual resource XML_ACCESS and the security administrator role on the virtual resource PORTAL. This implies that you must be a super administrator of the portal who can perform any action. Therefore there is no further access control.
Following types of requests that can be sent to the XML Configuration interface
Requets to and response from XML configuration interface use the same XML format. An export request generates an XML response that contains all the configuration data required to re-create the exported configuration part. This means that you can export a portal configuration, save the XML output file and, without modification, send it to another portal to re-create the same configuration there.
You access the XML configuration interface using a command line tool. This command line client is a small separate program that connects to the portal server using HTTP/HTTPS connection. You can use it for configuring portal remotely.
To be able to use the XML Configuration interface you need to have the manager role on the virtual resource XML_ACCESS and the security administrator role on the virtual resource PORTAL. This implies that you must be a super administrator of the portal who can perform any action. Therefore there is no further access control.
Following types of requests that can be sent to the XML Configuration interface
- Export Request: An export request triggers the export of complete or partial portal configuration into XML. It does not modify the configuration of the portal. it results in a response file
<request
    xmlns:xsi="http://www.w3.org/2001/XMLSchema-instance"
    xsi:noNamespaceSchemaLocation="PortalConfig_1.4.xsd"
    type="export"
    export-users="false">
</request> - Update request: An update request modifies the configuration of portal according to values found in the XML script.
<request build="wp6014_010_01" type="update" version="6.0.1.4" xsi:noNamespaceSchemaLocation="PortalConfig_6.0.1_2.xsd">
// Configuration that you want to import
</request> - Export orphaned data request: It exports the complete portal configuration into XML including orphaned data.
<request build="wp6014_010_01" type="Export-orphaned-data" version="6.0.1.4" xsi:noNamespaceSchemaLocation="PortalConfig_6.0.1_2.xsd">
</request>
Requets to and response from XML configuration interface use the same XML format. An export request generates an XML response that contains all the configuration data required to re-create the exported configuration part. This means that you can export a portal configuration, save the XML output file and, without modification, send it to another portal to re-create the same configuration there.
Administer the page security
One of the common uses of portal scripting interface is to use it for controlling access control. The Portal Scripting interface provides two different beans that allows you to manipulate the access control.
Lets say you want to modify the access control for "Test Page" page(Unique name for page is testpage). If thats the case then you should follow this procedure
Lets say you want to modify the access control for "Test Page" page(Unique name for page is testpage). If thats the case then you should follow this procedure
- Load the access control object for this page using
set acl [$Access getacl Content [$Content find page uniquename testpage]]
This will load all the access control information for this is acl object. - Once the access information for a resource is loaded in acl bean then you can decide if you want to either only view the information or edit the information. In our case since we want to edit the page information call
$PacList edit $acl - In the next step we can actual grant or revoke of the user role.
Ex.$PacList grant User special Authenticated
This will assign All authenticated users User role on the page$PacList revoke PrivilegedUser special Authenticated
This will remove Privileged Usre role for all authenticated users on this page.$PacList grant Editor name "johndoe"
This will assign Editor role to John Doe on this page - Once your done manipulating the access control information then you can commit your changes by calling
$PacList done
This command would write back your changes in Portal Access Control
Subscribe to:
Posts (Atom)