Showing posts with label iwidget. Show all posts

Adding facebook iwdiget on the Connections Home page

YOu can add iWidgets to either Home, Profile or Communities page in the Connections. If you go to the IBM Lotus and WebSphere Portal Business Solutions Catalog and search for Lotus Connections, you will find bunch of iWidgets that you can use, there is iWidget for LinkedIn, Facebook, Twitter, Flickr,...

I wanted to try the iWidget for Facebook and these are the steps that i followed

  • First i did download the Facebook iWidget from the Solution Catalog

  • When i looked inside the .zip file i could see that it contains a FacebookGoogleGadget.xml (iWidget .xml file) and GoogleFacebook.html (Google gadget html file), i want to host this on my HTTP server so i did unzip it into the document root of my HTTP server at E:\IBM\HTTPServer\htdocs

  • Then i verified that i can access the FacebookGoogleGadget.xml at


  • The last step was to use the steps defined in Deploying custom widget on Connections Home Page for adding Facebook widget to HomePage, If you want to add the widget to the profiles page use Adding widget on profiles page for more information

  • After the widget is added to home page i went to home page and it did prompt me for my facebook login and once i supply my login information i could see my facebook page


Using Facebook iWidget turned out to be really easy.

Adding widget on profiles page

I was trying to add LinkedIn iWidget to my Connection's Homepage and as part of that process i had to figure out how to add custom iWidget to the profiles page, during the process i learned that the process for adding custom iWidget on profiles page is very similar to adding iWidget on the communities page.

The configuration for the iWidget is stored in widgets-config.xml file, This file has two sections one for profiles and other for communities. While adding iWidget first i had to add the definition of the iWidget, by that i mean point to the URL, define preferences,... The widget-config.xml file also has page definition in xml format, so i had to add the widget definition to the suitable position on the page, i followed these steps to add LinkedIn iWidget


  • Connect to Deployment manager of your lotus connection server using wsadmin client

    wsadmin.bat -lang jython -username wasadmin -password wasadmin -port 8879


  • The profilesAdmin.py has some jython functions that make administration of the profiles functionality easier, you should execute that file to make the functions available in the wsadmin console by calling

    execfile("profilesAdmin.py")


  • Checkout the currents widgets-config.xml in c:/temp using following command

    ProfilesConfigService.checkOutWidgetConfig("c:/temp", "wpconnectionsCell01")


  • Open the widgets-config.xml file using a text editor, you will notice that it has two top level resource elements one for profiles and other for communities. Expand the profiles related related element. You will find bunch of widgetDef elements in that file add following widgetDef element at the end pointing to HelloWorld widget

    <widgetDef defId="HelloWorld" url="/hellowidget.xml">
    </widgetDef>

    In my case the hellowidget.xml is available on HTTP server at the root. Once widget is defined next step is to add it to one or more pages, under the layout element you will have multiple page elements, you can add the widget definition to one of the pages here, In my case i want to add HelloWorld widget to 3rd column on the profilesView page, so i did add it to the page like this

    <page pageId="profilesView">
    <widgetInstance uiLocation="col2" defIdRef="multiWidget"/>
    <widgetInstance uiLocation="multiWidget" defIdRef="board"/>
    <widgetInstance uiLocation="multiWidget" defIdRef="contactInfo"/>
    <widgetInstance uiLocation="multiWidget" defIdRef="backgroundInfo"/>
    <widgetInstance uiLocation="multiWidget" defIdRef="multiFeedReader"/>
    <widgetInstance uiLocation="col1" defIdRef="socialTags"/>
    <widgetInstance uiLocation="col1" defIdRef="sand_thingsInCommon"/>
    <widgetInstance uiLocation="col1" defIdRef="LinkedIn"/>
    <widgetInstance uiLocation="col3" defIdRef="sand_socialPath"/>
    <widgetInstance uiLocation="col3" defIdRef="reportStructure"/>
    <widgetInstance uiLocation="col3" defIdRef="friends"/>
    <widgetInstance uiLocation="col3" defIdRef="linkRoll"/>
    <widgetInstance uiLocation="col3" defIdRef="HelloWorld"/>
    </page>


  • Once your done making changes to the widgets-config.xml file you can check it in by executing following wsadmin command

    ProfilesConfigService.checkInWidgetConfig()


  • You can synchronize your changes across the nodes by executing following wsadmin function

    synchAllNodes()


  • Restart the Profiels application using the WAS Admin console for changes to take effect


Deploying custom widget on Connections Home Page

I wanted to learn how to add a custom iwidget to my HomePage in the Connections so i followed these steps


  • First i did create hellowidget.xml file that will display Hello lotus connections widget message in the view mode, this is how my hellowidget.xml file looks like


    <?xml version="1.0" encoding="UTF-8" ?>
    <iw:iwidget id="MyWidgets"
    xmlns:xsi="http://www.w3.org/2001/XMLSchema-instance"
    xmlns:iw="http://www.ibm.com/xmlns/prod/iWidget"
    supportedModes="view" mode="view" lang="en">
    <iw:content mode="view">
    <![CDATA[
    <div>Hello lotus connections widget</div>
    ]]>
    </iw:content>
    </iw:iwidget>

    You can find more information about the iwidget here

  • Before i could use the widget i need to make it available on http, there are few different options for doing that, you can copy it in web application and install that web application on your connections server or the simplest is to copy it to HTTP server, in my case i copied it to E:\IBM\HTTPServer\htdocs and then i did access it by going to http://wpconnections.atech.com/hellowidget.xml to make sure i can access the widget.xml like this


  • Then i logged into the Connections Home page as admin user and went to Administration tab


    On this page click on Add another widget button

  • On the next page enter values for the newly added widget such as title, URL of the widget.xml file,...etc


  • Save your changes and it will take you back to the Administration tab, by default the newly added widget appears in the Disabled Widgets column, so select the widget can click on Enable button


  • Once you enable the widget it gets displayed under the Enabled Widgets column like this


  • Now if you go to HomePage and click on the HomePage you can see the HelloConnections widget in the available widget list click on add button to add to the page


You will notice that the widget is added to page and the view mode markup is displayed like this

Using webdav-deploy-zip-file task

In the How to publish iWidget xml in the WebDav store entry i blogged about how to publish a widget xml file to WebDav store, there is one more alternative to achieve same thing

You can zip your widget xml and corresponding .js files into a .zip file, Example i did zip .xml and .js file for MyPreferences widget into c:/temp/MyPreferences.zip file

Then i used following configuration task to deploy the widget .xml and .js file onto WebDav


ConfigEngine.bat webdav-deploy-zip
-file -DZipFilePath=c:/temp/MyPreferences.zip -DTargetURI=dav:fs-type1/iwidgets/
MyPreference/


After deployment i used the AnyClient WebDav client to see the content of the WebDav and i could see that content of MyPreferences.zip file was expanded on WebDav folder like this


Now i can use following configuration task to register the MyPreferences widget


ConfigEngine.bat register-iwidget-
definition -DIWidgetDefinition=dav:fs-type1/iwidgets/MyPreference/MyPreferences.
xml -DPorteltUniqueName=webspherenotes.MyPreferences

How to publish iWidget xml in the WebDav store

In the Using iWidgets in portlet entry i blogged about how to use a iWidget as a portlet in websphere portal. In that example i did create a .war file containing widget and installed it on the portal server using WAS Admin console, basic idea was to make that widget xml URL addressable.

But you have one other option which is to upload the widget.xml file to WebDave store of your portal server and then use the WebDav URL for registering widget. I wanted to try that option so i started by creating a simple MyWidgets.xml file like this


<?xml version="1.0" encoding="UTF-8" ?>
<iw:iwidget id="MyWidgets"
xmlns:xsi="http://www.w3.org/2001/XMLSchema-instance"
xmlns:iw="http://www.ibm.com/xmlns/prod/iWidget"
supportedModes="view" mode="view" lang="en">
<iw:content mode="view">
<![CDATA[
<div>Hello World - Published in WebDav Store</div>
]]>
</iw:content>
</iw:iwidget>


The MyWidget is very simple, it supports only VIEW mode and in VIEW mode it displays Hello World - Published in WebDav Store as markup to the user.

I did create this file in c:\temp\MyWidget folder. After that i used the AnyClient to create WebDav connection to http://localhost:!0039/wps/mycontenthandler/dav/fs-type1 URL like this


Then i used the client to copy the MyWidgets.xml to fs-types/iwidget folder like this


After copying the MyWidget.xml file to the WebDav repository i used the following configuration task to create a wrapper portlet for the widget


ConfigEngine.bat register-iwidget-
definition -DIWidgetDefinition=dav:fs-type1/iwidgets/MyWidgets.xml -DPorteltUniq
ueName=webspherenotes.MyWidget


Once the task is executed i can add the portlet to page and view it like this

Creating wires between iWidget on Portal page

In the Inter iWidget Communication entry i talked about how to create a iWidget that can publish an event as well as create iWidget that can subscribe event. Now i wanted to test this inter iWidget communication inside WebSphere Portal Server. We have two options for using widgets in WebSphere portal, first is we can directly use widgets on the Mashup Page of portal, or we can wrap the widgets in portlet and then add those portlets on a portal page.

I followed the steps in the Using iWidgets in portlet to wrap both SampleEventPublisher and SampleEventSubscriber widget into portlet and then i did add it to a portal page like this


Then i followed following steps to create wire between the portlets

Click on the Widget Edit Wire sub menu of the SampleEventSubscriber portlet


Go to receive event section and you will notice that i can not find any matching event to receive, the problem is that both events have different name


So i clicked on setting to get this dialog box where i said use portlet event types


After making changes save those changes and now you should be able to see both publisher and subscriber


After creating wire we can test it like this

Creating wires between iWidget on Mashup Page

In the Inter iWidget Communication entry i talked about how to create a iWidget that can publish an event as well as create iWidget that can subscribe event. Now i wanted to test this inter iWidget communication inside WebSphere Portal Server. We have two options for using widgets in WebSphere portal, first is we can directly use widgets on the Mashup Page of portal, or we can wrap the widgets in portlet and then add those portlets on a portal page.

I used the steps outlined in http://wpcertification.blogspot.com/2011/02/how-to-register-iwidget-for-use-on.html, to register and add widget on the Portal Mashup page


Then i followed few steps to create the wire between both widgets, these are the screen shots that i took along the way


Once the wires were create i could use them for inter widget communication like this

Inter iWidget communication

The iWidget specification has concept of Events similar to the Events in the portlet, the events allow widgets to communicate with each other. The Rational Application Developer iWidget wizard has a template for creating a iWidget that is capable fo publishing event as well as creating a iWdget that can subscribe to event.


I used the the RAD iWidget wizard to create a SampleEventPublisher widget, this widget is capable of publishing a event

<?xml version="1.0" encoding="UTF-8" ?>
<iw:iwidget id="SampleEventPublisher" xmlns:xsi="http://www.w3.org/2001/XMLSchema-instance"
xmlns:iw="http://www.ibm.com/xmlns/prod/iWidget" supportedModes="view"
mode="view" iScope="SampleEventPublisherScope">


<iw:eventDescription id="sendName" payloadType="String" description="Event to send data" lang="en" />

<iw:event id="sendEvent" description="sendName" published="true" />


<iw:resource src="SampleEventPublisher.js" id="SampleEventPublisherId" />

<iw:content mode="view">
<![CDATA[
<div> Name: <span id="name"></span></div>
<div>
<span id="nameField" class="nameField">
<input type="text" dojoType="dijit.form.TextBox"
maxlength="32" name="nameBox" id="nameBox" />
</span>
</div>
<div><input type="button" name="send" value="Send Name"
onclick="iContext.iScope().sendName()"/> </div>
]]>
</iw:content>
</iw:iwidget>


The eventDescription element declares the event that this widget can publish it also defines type of the event. The event element defines if this widget can publish event or subscribe event.

The SampleEventPublisher widget supports only view mode, in the view mode it displays a form where you can enter a name and click on Send Name button, when you do that it will pass control to the sendName() method. This is how the SampleEventPublisher.js looks like


dojo.declare("SampleEventPublisherScope", null,{
sendName:function(){
var data = {};

this.iContext.iEvents.fireEvent("sendEvent",null,data.value);

}
});


The 
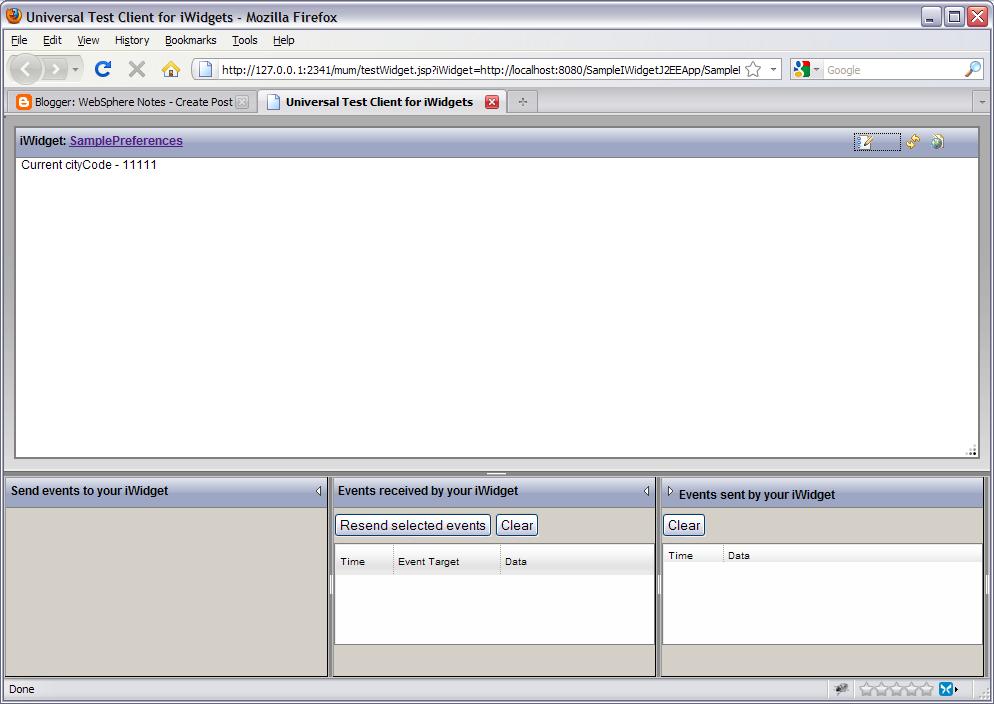
iEvents.fireEvent() method is used for publishing the event. The Universal Test Client for iWidget provides a nice UI for check if you event publishing.


When i enter a name can click on Send Name button i can see that the data being sent in Events sent by your iWidget window.

Similarly i used the RAD iWidget wizard for creating SampleEventSubscriber.xml widget, this is how the widget xml looks like

<?xml version="1.0" encoding="UTF-8" ?>
<iw:iwidget id="SampleEventSubscriber"
xmlns:xsi="http://www.w3.org/2001/XMLSchema-instance"
xmlns:iw="http://www.ibm.com/xmlns/prod/iWidget" supportedModes="view"
mode="view" iScope="SampleEventSubscriberScope">

<iw:eventDescription id="receiveName" payloadType="String"
description="Event to receive data" lang="en" />

<iw:event id="receiveEvent" description="receiveName" handled="true"
onEvent="onReceiveName" />

<iw:resource src="SampleEventSubscriber.js" id="SampleEventSubscriberId" />

<iw:content mode="view">
<![CDATA[
<span id="helloSpan"><h1>Hello World</h1></span>
]]>
</iw:content>
</iw:iwidget>


The SampleEventSubscriber widget defines one receiveEvent of String type. In the view mode it displays Hello World message which will be changed to display value of event. The value of onEvent attribute defines name of the JavaScript method that will get called when this event receives event. This is how the JavaScript for the SampleEventSubscriber looks like


dojo.declare("SampleEventSubscriberScope", null,{
onReceiveName:function(iEvent){
var data = iEvent.payload;
if (dojo.isString(data))
var name = data;
else if (dojo.isString(data.value))
var name = data.value;
else
return;

var element = this.iContext.getElementById("helloSpan");
element.innerHTML = "

Hello " + name + "

";
}
});


The onReceiveName() will get called when this widget receives event. The widget container will pass object iEvent to the onReceiveName() method, inside this method we are reading payload of the event and displaying it to the user by changing markup of the view mode.

The Univeral test client for iWidget has a UI that lets you publish the widget and test event receiving part of your widget

Working with preferences in iWidget

The iWidget's have concept of preferences similar to portlet preferences that you can use to set and get values. I wanted to try this feature so i decided to create a simple iWidget, that will display the zipCode in the view mode and in the edit mode, it will let user change the zipCode so that the value gets saved as preference and in the view mode i will read and display the value of zipCode from preference.

This is how my SamplePreferences.xml the widget.xml file looks like

<?xml version="1.0" encoding="UTF-8" ?>
<iw:iwidget id="SamplePreferences" xmlns:xsi="http://www.w3.org/2001/XMLSchema-instance"
xmlns:iw="http://www.ibm.com/xmlns/prod/iWidget"
supportedModes="view edit" mode="view" lang="en" iScope="SamplePreferencesScope">
<iw:itemSet id="pref">
<iw:item id="zipcode" description="The zipcode "
value="94536"/>
</iw:itemSet>
<iw:resource src="SamplePreferences.js" id="SamplePreferences" />
<iw:content mode="view">
<![CDATA[
<div >Current cityCode - <span id="zipCode">notset</span></div>

]]>
</iw:content>

<iw:content mode="edit">
<![CDATA[<div>
<div> New Zip Code: <span id="name"></span></div>
<div>
<span id="zipCodeField" class="nameField">
<input type="text" dojoType="dijit.form.TextBox"
maxlength="32" name="zipCode" id="zipCode" />
</span>
</div>
<div><input type="button" name="changeZipCode" value="Change ZipCode"
onclick="iContext.iScope().changeZipCode()"/> </div>
</div>]]>
</iw:content>
</iw:iwidget>


The SamplePreferences widget supports 2 modes view and edit, the view mode markup is pretty simple it just displays the zipCode, with default value of notset. In the edit mode it is displaying a form that will take zipCode as input and once user clicks on submit button it will pass control to changeZipCode() javascript method.

The SamplePreferences has SamplePreferences.js resource associated with it, which looks like this

dojo.declare("SamplePreferencesScope", null,{
changeZipCode:function(){
console.log("Entering SamplePreferencesScope.changeZipCode()");
var zipCodeStr = this.iContext.getElementById("zipCode").value;
this.iContext.getItemSet("pref", true).setItemValue("zipcode",zipCodeStr)
console.log(this.iContext.getItemSet("pref", true));
console.log("Exiting SamplePreferencesScope.changeZipCode() " + zipCodeStr);
},

/*
This event signals that the mode for the iWidget has changed to VIEW
*/
onView:function() {
console.log("Entering SamplePreferencesScope.onView()");
this.iContext.getElementById("zipCode").innerHTML =
this.iContext.getItemSet("pref", true).getItemValue("zipcode");
console.log("Exiting SamplePreferencesScope.onView()");

}

});


The JavaScript has 2 methods one is changeZipCode() which gets called when user enters a value of zipCode in edit mode and clicks submit. In this method i am reading value submitted by user and setting it in itemSet, which is equivalent of preferences in iWidget.

The onView() is the callback method that gets called when widget is getting rendered in the VIEW mode, i am using this method to read the zipCode set by user in the edit mode and displaying it to user.

This is how the widget looks like in the EDIT mode


This is how the widget looks like in the VIEW mode

What is IWidget Wrapper portlet

The WebSphere Portal Server has a dedicated IWidget Wrapper portlet for easy integration with iWidgets. The portal unique name of this portlet is wp.p.IWidgetWrapper. Whenver you register a iWidget with portal it creates a portlet instance of the IWidget wrapper portlet.

When you register a new iWidget definition URI in your portal, the portal infrastructure loads the corresponding iWidget definition XML file and maps the information provided by the referenced iWidget definition into corresponding portlet meta data. This includes information about events and modes that the iWidget supports. The title and description of the created IWidget Wrapper clone are derived from the corresponding values of the iWidgets idescriptor item set.

I used the register-iwidget-definition task to register 3 widgets as portlets. THen i used the Manage Web Modules portlet to find the wp.resolver.iwidget.portlet.war file and inside that there were 4 instances of IWidgetWrapper portlet, one for default IWidgetWrapper portlet and 3 instances were created for three portlets that i registered.


I wanted to check what preferences get set for widget defined by following HelloWorldIWidget.xml


<?xml version="1.0" encoding="UTF-8" ?>
<iw:iwidget id="HelloWorldIWidget" xmlns:xsi="http://www.w3.org/2001/XMLSchema-instance"
xmlns:iw="http://www.ibm.com/xmlns/prod/iWidget"
supportedModes="view edit" mode="view" lang="en">
<iw:content mode="view">
<![CDATA[<div>Hello World - View Mode</div>]]>
</iw:content>
<iw:content mode="edit">
<![CDATA[<div>Hello World - Edit Mode</div>]]>
</iw:content>
</iw:iwidget>


When i checked the preferences for the portlet this is what i saw


As you can see the actual markup is stored in a preference

How to register a iWidget for use on Portal Mashup Page

YOu have two options to use iWidget in Portal 7.0, one either you can wrap a iWidget into portlet and then add the wrapped portlet on a portal page or you can use iWidget on the portal mash up page.

I wanted to add the widget on the Mashup Page inside the portal so these are the steps that i followed for that

  1. First install the J2EE application that contains the widgets as .war file using WAS Admin Console, while installing select WebSphere Portal as the server. Take a note of the context root of the web application

  2. Once the J2EE application is installed start the application

  3. After installing web application make sure that you can view the widget.xml files by going to the url


  4. Once the application is installed you should register it with the the portal by executing the following configuration task

    ConfigEngine.sh|bat register-mashup-module
    -DApplicationName='SampleIWidgetJ2EEApp_war'
    -DWasPassword=wasadmin
    -DPortalAdminPwd=wasadmin

    In my case the SampleIWidgetJ2EEApp_war is name of the application

  5. Next step is to change the catalog.xml file for for the toolbox to add name of the newly installed widget. To do that first you should copy the \WebSphere\PortalServer\base\wp.mmi.deploy\config\binaries\catalogs\catalog_default.xml file somewhere on your machine say c:/work.

  6. Then you should add one entry each for each of the widget like this

    <entry id="helloIWidget" unique-name="helloIWidget">
    <title>
    <!--@feedreader.title@-->
    <nls-string lang="en">Hello World iWidget</nls-string>
    </title>
    <description>
    <!--@feedreader.description@-->
    <nls-string lang="en">Displays content from a specified feed URL</nls-string>
    </description>
    <definition>/sampleiwidget/HelloWorldIWidget.xml</definition>
    <content>http://www.webspherenotes.com</content>
    <preview>http://www.webspherenotes.com</preview>
    <icon>/feedReader/feedreader.png</icon>
    <metadata name="com.ibm.lotus.widget.renderer">priority</metadata>
    </entry>

    Add the entry under the category where you want it to appear.

  7. Once the mycatalog.xml file is modified with your widget definition, you can register it with was by executing following configuration task

    ConfigEngine.bat import-config-fil
    e -DMMImportFile=c:\work\mycatalog.xml -DMMImportFilePropertyName="mashups.catal
    og_default.xml"


  8. Now restart the portal server and when you try to access the Mashup page you should be able to see the HelloWorldiWidget widget added to Demo category, you can drag and drop it on the mashup page


Ajax Test server in the RAD 8.0

The Rational Application Developer 8.0 has a Ajax Test Server, The AJAX test server is a lightweight Jetty-based server ideally suited for developing and testing AJAX applications. It quickly performs module publishing and server restart. It supports basic web artifacts such as servlets, JSP files, HTML, XML, JavaScript™ and CSS files.

You can use the AJAX test server when you want to compile, test and run resources quickly in an AJAX application, for example a Dojo-enabled web project or an iWidget project. You can test static or dynamic web projects on a AJAX test server.

In the Creating iWidget project using RAD 8 entry i mentioned the steps that you can follow to create a iWidget. Once your iWidget is ready you can test it by creating a Ajax Test Server definition and adding your iWidget application to it.


As you can see in my case i am adding SampleIWidgetJ2EEApp application to the Ajax Test Server, after adding the project you can test your application using Universal Test Client for iWidget by right clicking on the iWidget.xml and saying Run on the Server, in the server select Ajax Test Server.


The way it works is you pass the URL of your widget.xml file to the http://127.0.0.1:2341/mum/testWidget.jsp.

In my case the SampleIWidgetJ2EEApp has 3 widget definitions and they are available at http://localhost:8080/SampleIWidgetJ2EEApp/ directory so i can test each of them by passing the URL to the testWidget.jsp like this
http://127.0.0.1:2341/mum/testWidget.jsp?iWidget=http://localhost:8080/SampleIWidgetJ2EEApp/SampleEventSubscriber.xml&debug=false for testing SampleEventSubscriber.xml

Enabling mashup ui on portal

Starting from version 7.0, the WebSphere portal ships with Mashup integration, you can use the Mashup to execute iwidgets. The Mashups are not installed in the base portal installation so you will have to enable them

You can enable the mashup ui by executing ConfigEngine.sh|bat deploy-portal-mashup-ui -DWasPassword=was_password -DPortalAdminPwd=portal_password task. After enabling mashups restart the portal and now when you login you should see My Mashups link on the top next to Home page like this


If you click on the Mashup's link it will take you to Mashup's page which looks like this


You should be able to add iWidgets to this page and wire them to each other.

Using iWidgets in portlet

For easy handling of iWidgets WebSphere Portal provides a dedicated IWidget Wrapper portlet(Unique name for the portlet is wp.p.IWidgetWrapper). As name suggests this portlet wraps a iWidget into a portlet.

I wanted to try how the IWidgets Wrapper portlet works so these are the steps that i followed

  • Create a iWidget application. In my case i used RAD 8.0 to create simple Hello iWidget portlet
  • , if you want you can directly download the sample application from here
  • Install the HelloWidget.war file as J2EE application using WAS Admin Console, While installing make sure that you select WebSPhere Portal as target server and use /HelloIWidget as the context root

  • Start the HelloWidget.war file after installing it and make sure that you access the the http://localhost:10039/HelloIWidget//HelloWidget.xml url


  • The last step would be to register this iWidget with the IWidgetWrapperPortlet, you will have to execute register-iwidget-definition ConfigEngine task for that

    /ConfigEngine.sh register-iwidget-definition -DIWidgetDefinition=/HelloIWidget/HelloWidget.xml

    Execute this task and wait for it to complete successfully. This task downloads the HelloWidget.xml and parses it to find some values and then makes use of those values to create a clone of IWidgetWrapperPortlet, you can see this task executing few xmlaccess scripts

  • After the portlet is created you should be able to add it to any page using HelloIWidget as portlet name


  • If you take full export of your portal server and search for /HelloIWidget/HelloWidget.xml you should find following portlet definition

    <portlet action="update" active="true" defaultlocale="en" domain="rel"
    name="IWidgetWrapper.$cloned.Z3_8000CB1A008RE0IQCHVQBR20G0"
    objectid="Z3_8000CB1A008RE0IQCHVQBR20G0" provided="false" servletref="ZV_CGAH47L0085810IAHU76SD2OK1">
    <localedata locale="en">
    <title>HelloIWidget</title>
    </localedata>
    <preferences name="com.ibm.portal.iw:content:edit:value" update="set">
    <value><![CDATA[<div>Hello From WebSpherenotes.com - Edit Mode</div>]]></value>
    </preferences>
    <preferences name="com.ibm.portal.iw:content:view:value" update="set">
    <value><![CDATA[<div>Hello From WebSpherenotes.com</div>]]></value>
    </preferences>
    <preferences name="com.ibm.portal.iw:itemSet:idescriptor:iw:item:mode:value" update="set">
    <value><![CDATA[en]]></value>
    <value><![CDATA[view]]></value>
    </preferences>
    <preferences name="com.ibm.portal.iw:itemSet:idescriptor:private" update="set">
    <value><![CDATA[true]]></value>
    </preferences>
    <preferences name="com.ibm.portal.iw:iwidget:allowInstanceContent" update="set">
    <value><![CDATA[false]]></value>
    </preferences>
    <preferences name="com.ibm.portal.iw:iwidget:base" update="set">
    <value><![CDATA[res:/HelloIWidget/HelloWidget.xml]]></value>
    </preferences>
    <preferences name="com.ibm.portal.iw:iwidget:id" update="set">
    <value><![CDATA[HelloIWidget]]></value>
    </preferences>
    <preferences name="com.ibm.portal.iw:iwidget:lang" update="set">
    <value><![CDATA[en]]></value>
    </preferences>
    <preferences name="com.ibm.portal.iw:iwidget:sandbox" update="set">
    <value><![CDATA[false]]></value>
    </preferences>
    <preferences name="com.ibm.portal.iw:iwidget:supportedModes" update="set">
    <value><![CDATA[view edit_defaults]]></value>
    </preferences>
    <preferences name="com.ibm.portal.iw:iwidget:supportedWindowStates" update="set">
    <value><![CDATA[normal]]></value>
    </preferences>
    <preferences name="com.ibm.portal.iwidget.definition.expiration" update="set">
    <value><![CDATA[1285168645750]]></value>
    </preferences>
    <access-control externalized="false" owner="uid=wasadmin,o=defaultwimfilebasedrealm" private="false"/>
    </portlet>


Creating iWidget project using RAD 8

Starting from Version 8.0, Rational Application Developer provides support for creating iWidget project. It provides Create iWidget project wizard as well as wizard for creating iWidget.

  • Click on File -< New -< Web -< iWidget Project.


  • First screen in the wizard will ask you what type of technology you want to use Web Technology, means the project will not be a J2EE application instead it will be simple project that will let you package .xml,.css and other files in archive the Web And JavaEE Technology option will create a Dynamic web project with WEB-INF/web.xml file, which you can use for creating servlet,..


  • On the next screen it will ask you for name of the project and what type of wizard you want it to generate, i selected HelloIWidget and Simple Wizard like this


  • Once the wizard is completed it will create a project with HelloIWidget.xml which has sample source code for the wizard like this


I also tried creating a Widget project with J2EE component and compared it with wizard project without J2EE component

What is iWidget ?

IBM has introduced widget technology similar to Google's gadget technology. The basic idea behind widget is that you develop them using client side technologies such as HTML, JavaScript,.. and then you can place that dynamic content on any web page. Widgets can be as simple as displaying static HTML on a page and they can be complex in which they can take input from user, make REST call to get data, communicate with other widgets on a page

In other words, an iWidget is an XML file. It can contain markup that is rendered and can be supported by JavaScript files for dynamic client-side scripting and CSS files for styling the markup. JSP, HTML, or HTML fragments can also contain markups, which can also be written in Ajax. Once the iWidget is in the framework, it can generate and receive client-side events, as specified in the widget wrapper. This is a sample HelloWorld iwidget


<?xml version="1.0" encoding="UTF-8" ?>
<iw:iwidget id="HelloIWidget" xmlns:xsi="http://www.w3.org/2001/XMLSchema-instance"
xmlns:iw="http://www.ibm.com/xmlns/prod/iWidget"
supportedModes="view edit" mode="view" lang="en" name="Hello iWidget" >
<iw:content mode="view">
<![CDATA[
<div>Hello From WebSpherenotes.com</div>
]]>
</iw:content>

<iw:content mode="edit">
<![CDATA[
<div>Hello From WebSpherenotes.com - Edit Mode</div>
]]>
</iw:content>
</iw:iwidget>


This XML file defines Hello iWidget, you can develop it using either RAD 8 or you can use notepad.

Widget xml file will have at least one iw:content element, this element defines what content should be displayed to the user. In my case i have two iw:content elements one with mode="view", and other with mode="edit". The markup inside the CDATA section of iw:content mode="view" will be displayed to the user during normal operation of the widget and the markup inside the iw:content mode="edit" would be displayed to the user when he switches mode to edit for configuring widget settings.

Once your widget definition is ready you can execute it any iwidget runtime. There are multiple IBM products that provide iWidget runtime environment such as Project Zero, IBM WebSphere Mashup Center, WebSphere Portal,... WebSphere Portal 7.0 allows you to wrap a widget in a Portlet and add it on portal page along with other portelts or you can add it on dedicated mash up page.

This is how the view mode of the widget looks like when wrapped inside a portlet


If you click on Edit Shared Settings link it will take you to the edit mode of the widget and display content under iw:content mode="edit", this is how it looks like