Showing posts with label lotusconnection3. Show all posts
Showing posts with label lotusconnection3. Show all posts
Connections solution catalog
The IBM Lotus and WebSphere Portal Business Solutions Catalog provides some ready made components that you might be interested in. It has some of the useful iWidgets such as iWidget for LinkedIn, facebook,... It also has plugings for Microsoft Outlook, Lotus Notes,...


Deploying custom widget on Connections Home Page
I wanted to learn how to add a custom iwidget to my HomePage in the Connections so i followed these steps
You will notice that the widget is added to page and the view mode markup is displayed like this

- First i did create hellowidget.xml file that will display
Hello lotus connections widgetmessage in the view mode, this is how my hellowidget.xml file looks like
<?xml version="1.0" encoding="UTF-8" ?>
<iw:iwidget id="MyWidgets"
xmlns:xsi="http://www.w3.org/2001/XMLSchema-instance"
xmlns:iw="http://www.ibm.com/xmlns/prod/iWidget"
supportedModes="view" mode="view" lang="en">
  <iw:content mode="view">
      <![CDATA[
      <div>Hello lotus connections widget</div>
      ]]>
</iw:content>
</iw:iwidget>
You can find more information about the iwidget here - Before i could use the widget i need to make it available on http, there are few different options for doing that, you can copy it in web application and install that web application on your connections server or the simplest is to copy it to HTTP server, in my case i copied it to
E:\IBM\HTTPServer\htdocsand then i did access it by going tohttp://wpconnections.atech.com/hellowidget.xmlto make sure i can access the widget.xml like this
- Then i logged into the Connections Home page as admin user and went to Administration tab

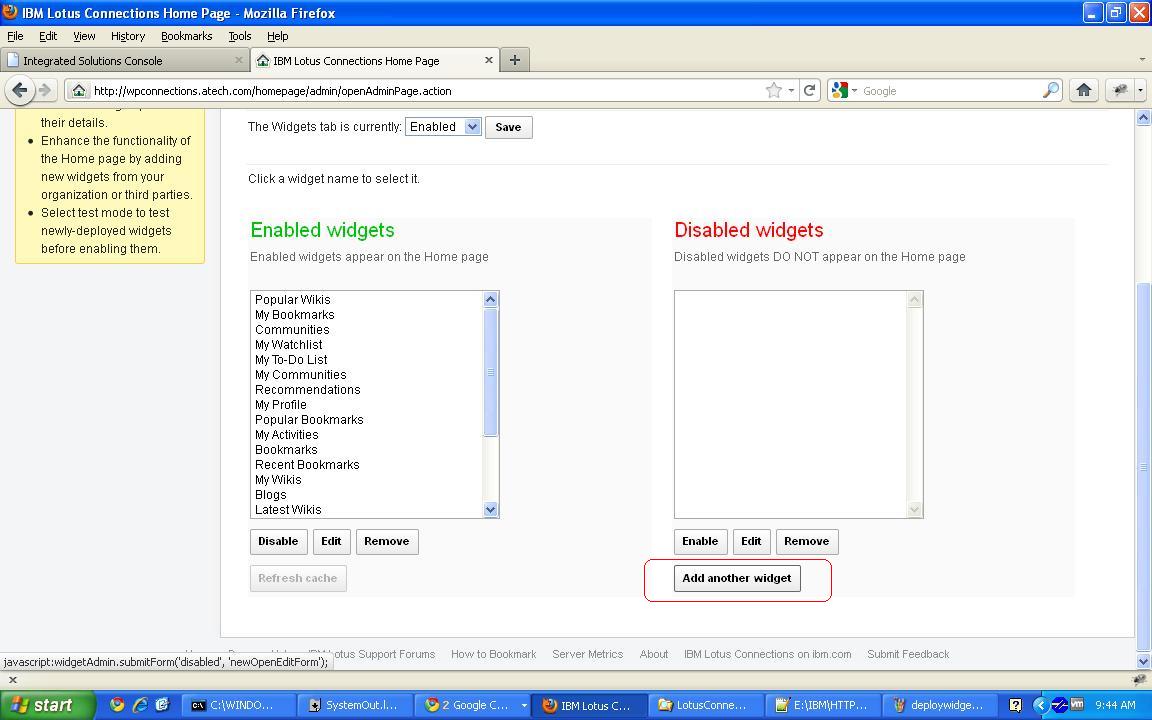
On this page click on Add another widget button - On the next page enter values for the newly added widget such as title, URL of the widget.xml file,...etc

- Save your changes and it will take you back to the Administration tab, by default the newly added widget appears in the Disabled Widgets column, so select the widget can click on Enable button

- Once you enable the widget it gets displayed under the Enabled Widgets column like this

- Now if you go to HomePage and click on the HomePage you can see the HelloConnections widget in the available widget list click on add button to add to the page




You will notice that the widget is added to page and the view mode markup is displayed like this

Assigning administrator role to HomePage application in connections
I want to add custom widgets to my home page but for that i need to assign Administrative rights for HomePage application to one of the users, i followed these steps to assign admin rights
- Every application in the Lotus Connections make use of J2EE security for managing user roles. For example if i open the web.xml file for the HomePage.war i can see that it defines few roles, this is how the Admin role is defined
<security-constraint>
 <web-resource-collection>
  <web-resource-name>
   Secure Catalog Administration
  </web-resource-name>
  <url-pattern>
   /admin/*
  </url-pattern>
  <http-method>
   GET
  </http-method>
  <http-method>
   POST
  </http-method>
  <http-method>
   PUT
  </http-method>
  <http-method>
   DELETE
  </http-method>
 </web-resource-collection>
 <auth-constraint>
  <role-name>
   admin
  </role-name>
 </auth-constraint>
</security-constraint>
If you look into the web.xml you will notice that it defines following roles- person
- everyone
- reader
- metrics-reader
- admin
- Login into WAS admin console to assign admin role to the user
- In the WAS Admin console go to Applications -< WebSphere Enterprise applications and you will see list of applications deployed on the server

Click on the HomePage link to view the details of HomePage enterprise applications like this
- CLick on Security roles to users/group mapping link to view the current mappings

In my case all other roles have some assignment but Admin role is not assigned to any one, so i did select the admin role and click on map users (Its better to map admin role to a group) - Search for the user that you want to assign to the admin role, in my case wasbind and save your changes and restart the Lotus Connections server

- After server is restarted login as the admin user and on the home page you should see Administration tab like this

- When you switch to Administration tab you will notice that your allowed to enable disable widgets, publish new widgets on this tab


Changing connections configuration
The Connections configuration is stored in xml files. You can find all the configuration files in the config directory of your deployment manager

Even though you can change these files manually and start the server, its not recommended (I never tried changing the config files manually so not sure if the server would pick them up) because you can change the file to be invalid and which could prevent server from coming up.
But if you want to change anything in the connections configuration, you should first checkout the file to your local directory, modify the file and then check it in. I wanted to try this so i followed these steps


Even though you can change these files manually and start the server, its not recommended (I never tried changing the config files manually so not sure if the server would pick them up) because you can change the file to be invalid and which could prevent server from coming up.
But if you want to change anything in the connections configuration, you should first checkout the file to your local directory, modify the file and then check it in. I wanted to try this so i followed these steps
- First i went to the DMGR machine and i did execute this command to connect to DMGR using wsadmin command
wsadmin.bat -lang jython -username wasadmin -password wasadmin -port 8879
Important note: Make sure that your actually connecting to DMGR and the value of port is the SOAP port for DMGR, When i was trying this i mistakenly used the SOAP port of App server and when i tried checking out the config file i got this error
wsadmin>LCConfigService.checkOutConfig("c:/temp","wpconnectionsCell01")
Exception - com.ibm.ws.scripting.ScriptingException com.ibm.ws.scripting.Scripti
ngException: WASX7070E: The configuration service is not available.
wsadmin>exit - After connecting to DMGR, next step is to initialize the connection to lotus connection server for that we have to execute the connectionsConfig.py file which is located in the
E:\IBM\WebSphere\AppServer\profiles\Dmgr01\bindirectory, You can execute that file by executing following command on the wsadmin console
wsadmin>execfile("E:\IBM\WebSphere\AppServer\profiles\Dmgr01\bin\connectionsConfig.py")
If you open this file on your machine you will notice that it defines set of admin functions to check out and check in config files,... The checkin function takes care of validation configuration,... - Next step is to checkout the configuration file to your local drive by executing following command
wsadmin>LCConfigService.checkOutConfig("c:/temp","wpconnectionsCell01")
This will checkout set of files into your c:/temp directory
- Once the file is checked out you can open it in text editor and make changes and once your done making changes save the file
- Next step is to check in the changes back into the server that you can do by executing following command
LCConfigService.checkInConfig() - After checking in your changes in deployment manager you can push them to nodes by executing
wsadmin>synchAllNodes() - Last step is to restart the server for changes to take effect


Static resource serving in connections
In the Customizing styles used in the Connections entry i blogged about how you can change the header color from black to red by making changes in the styles. But one problem is that i had to clear browser cache for my changes to take effect. Now this might be ok in development but you cannot ask end users to clear browser cache every time you change your static resources, so i wanted to figure out why the changes are not getting reflected right away.
If you look at the URL of the theme.css
- When i checked which file has the definition of lotusBanner class i noticed that it is defined in the
http://wpconnections.atech.com/activities/static/20101018.200549/nav/common/styles/defaultTheme/theme.cssand when i looked at the resource using the firebug i can see following caching headers
These two are the caching headers. The value of cache-control header is set to 315360000 milliseconds which is equal to 10 years. Also the Expires header is set to explicit date of 16 Apr 2021 16:57:21 GMT, which is equal to 10 years.
Expires Fri, 16 Apr 2021 16:57:21 GMT
Cache-Control public, max-age=315360000, s-maxage=315360000 - Then i checked the Firefox cache and i could see that the response of
http://wpconnections.atech.com/activities/static/20101018.200549/nav/common/styles/defaultTheme/theme.cssis cached for next 10 years and what that means is firefox is not even going to check if server has new version of the theme.css for next 10 years
Note: It seems that Connection follows the most important client side performance improvement guideline which is to cache the static resources for as long as possible, that must be the reason why connection is fast even though the pages are ritch.


If you look at the URL of the theme.css
http://wpconnections.atech.com/activities/static/20101018.200549/nav/common/styles/defaultTheme/theme.css you will notice that it has a time stamp. This time stamp comes from LotusConnections config file, there is a versionStamp element in the LotusConnections-config.xml file its value is used in creating URL to the theme.css. Take a look at the LotusConnections-config.xml file on my machine. If you want to force browser to download new resource you will have to change the value of versionStamp element which will change URL to the resource and as a result the browser will download new version of theme.css from server.
<languageSensitive enabled="false"/>
<ignorePunctuation enabled="false"/>
<transactionSetting>
<attribute key="Transaction_Max" value="20"/>
<attribute key="Queue_Max" value="10"/>
</transactionSetting>
<useRichTextEditorInBookmarklet enabled="false"/>
<dynamicHosts enabled="false">
<host href="admin_replace" ssl_href="admin_replace"/>
</dynamicHosts>
<resources>
</resources>
<versionStamp value="20101018.200549"/>
</config>
- Use the steps defined in Changing connections configuration for checking out the LotusConnections-config.xml file
- Then you can either change the value of the
versionStamp element manually or execute the following command to generate new value for the versionStamp element
LCConfigService.updateConfig("versionStamp","")
After executing the above command you can see the value of versionStamp element in LotusConnections-config.xml file is changed like this
<useRichTextEditorInBookmarklet enabled="false"/>
<dynamicHosts enabled="false">
<host href="admin_replace" ssl_href="admin_replace"/>
</dynamicHosts>
<resources>
</resources>
<versionStamp value="20110419.173153"/>
</config>
Next step is to check in your changes and synchronize them between nodes using the steps defined in Changing connections configuration
Restart the server and now try accessing the page you will notice that the page has red header and you dont have to clear the browser cache. If you look at the resource using firebug you will notice the URL of the theme.css is changed like this


Customizing styles used in the Connections
You might want to customize the connections UI by changing the CSS styles, For example by default the lotus banner is black but i wanted to see if i can change it to red. I followed these steps to make the change.
After saving my changes i did cleanup my browser cache and when i refreshed the page again i could see the banner being rendered in red like this.

- I used the firebug to figure out what CSS class has the color definition for the banner and i figure that the
lotusBannerdefines the background color for the header
.lotusBanner{
 padding:0 10px;
 background-color:#000000;
 background-image:-moz-linear-gradient(top, #525252 0%,#000000 100%);
 -webkit-gradient(linear, left top, left bottom, from(#525252), to(#000000));
}
I did search to find out which css file contains the definition for thelotusBannercss class and in case of Activities applicationE:\IBM\WebSphere\AppServer\profiles\AppSrv01\installedApps\wpconnectionsCell01\Activities.ear\oawebui.war\nav\common\styles\defaultTheme\defaultTheme.cssfile defines the lotusBanner class - Then i did create a custom.css file under
E:\IBM\LotusConnections\data\shared\customization\common\nav\common\styles\defaultTheme, (in my case E:\IBM\LotusConnections\data\shared\customization is lotus shared data directory) and i copied thelotusBannerclass in it. - I made changes in the lotusBanner class to change value of background color from black to FireBrick red(B22222) so that my
lotusBannercss style class looks like this
.lotusBanner{
 padding:0 10px;
 background-color:#B22222;
 background-image:-moz-linear-gradient(top, #525252 0%,#B22222 100%);
 -webkit-gradient(linear, left top, left bottom, from(#525252), to(#B22222));
}
After saving my changes i did cleanup my browser cache and when i refreshed the page again i could see the banner being rendered in red like this.

Customizing Lotus Connection look and feel
One of the common requirements of Lotus Connection would be to customize the look and feel so that it confirms to the overall look and feel of the client. I wanted to figure out how to customize the default lotus connection look and feel by adding few lines of text in header(Basic idea was to figure out which .jsp file gets picked up) and i followed these steps. Please note that i used Customizing the user interface document for instructions on what steps to follow
Every feature in lotus connection is separate .ear file and you can either change look and feel for each feature or you can change look and feel for all the features. By default every feature .war file has nav directory that contains the look and feel information like this

The nav directory has set of jsp such as header, footer, login that decides how the header or footer should look like, you can directly change the .jsp file in the .war file ex.

In my case its value is

I did change the header.jsp to add this one line of text to it at the end
Then i went to connections page to see if the changes were effected and this is what i see

Then i copied the header.jsp to
After saving the changes i went to home page and this is what i see

Every feature in lotus connection is separate .ear file and you can either change look and feel for each feature or you can change look and feel for all the features. By default every feature .war file has nav directory that contains the look and feel information like this

The nav directory has set of jsp such as header, footer, login that decides how the header or footer should look like, you can directly change the .jsp file in the .war file ex.
WebSphere\AppServer\profiles\AppSrv01\installedApps\wpconnectionsCell01\Homepage.ear\homepage.war\nav\templates\header.jsp for changing the header of HomePage and the changes get reflected on the UI, but this approach wont work in the multi-node environment and also your changes could get overwritten when you apply fix pack to your server. Instead we are supposed to store our changes in the customization directory (It is shared directory that is used across the nodes). If you dont remember the shared directory path that you set during the installation then you can find it out using WAS Admin Console, its stored in CONNECTIONS_CUSTOMIZATION_PATH websphere environment variable path.
In my case its value is
E:\IBM\LotusConnections\data\shared\customization, when i went to that directory i can see one empty directory for each of the feature. In my case i want to change the header to add one line of text to header so i copied the E:\IBM\WebSphere\AppServer\profiles\AppSrv01\installedApps\wpconnectionsCell01\Homepage.ear\homepage.war\nav\templates\header.jsp to the E:\IBM\LotusConnections\data\shared\customization\common\nav\templates directory like this
I did change the header.jsp to add this one line of text to it at the end
<h3>Sample text in homepage.ear\header.jsp</h3>
Then i went to connections page to see if the changes were effected and this is what i see

Then i copied the header.jsp to
E:\IBM\LotusConnections\data\shared\customization\homepage\nav\templates to see if i can have customized header at HomePage level, i change the line in it to
<h3>Sample Text in homepage\nav\templates\header.jsp</h3>
After saving the changes i went to home page and this is what i see

Installation log files for Lotus Connections
Installing Lotus Connections is multiple step process, you have to install different software and it generates logs in different places, so if something goes wrong you will have to open corresponding log file to figure out what went wrong and fix the problem
- WebSphere Application Server:When your installing WebSphere application server it will generate the install logs file in the
WebSphere\AppServer\logs\installdirectory
Take a look at Trouble shooting was installation for more information on how to trouble shoot was installation - WebSphere HTTP Server:When you install HTTP server the log files get created in the
E:\IBM\HTTPServer\logs\installdirectory
- Http Server plug-in installation:The logs for HTTP server plugin installations get created in the
E:\IBM\HTTPServer\Plugins\logs\installdirectory like this
- Database creation: Before you start the Lotus Connections install you will have to create Lotus Connections database using dbwizard.bat or dbwizard.sh, this step creates different databases and populates them by running set of SQL scripts. YOu can find the main log in
C:\Documents and Settings\lcuser\lcWizard\log\dbWizard
Each of the log files has detailed list of SQL commands that it is executing. Also the dbWizard lets you save the list of SQL files that it is going to execute, you should save it before starting dbWizard, you might want to manually re-execute the SQL if something fails, in my case it failed on last grantApps.ddl for forums so i executed it manually and it worked. - Migrating User population: After creating database first step is to import the user population from the LDAP server into database and for that we execute the populationWizard.bat, when you do that it generates log file files in
C:\Documents and Settings\lcuser\lcWizard\log\tdidirectory like this
- Lotus Connections install: The last step in Lotus Connections install is installing Lotus connection, which installs bunch of ear files and executes some wsadmin scripts, you can find the logs for install in
E:\IBM\LotusConnections\logsdirectory like this


Subscribe to:
Posts (Atom)