- First i stated my Android Emulator with my application running on it
- Once my application is launch on desktop i opened my Chrome browser and clicked on Tools -< Inspect Devices like this

-
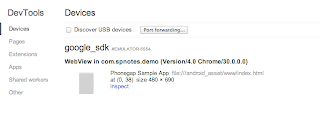
On the next tool it should display list of Devices available and here you should see name of the android emulator like this, click on inspect link
-
It opens a new window pointing to your PhoneGap page, you can use that screen for debugging, looking at console messages,... etc

Showing posts with label phonegap. Show all posts
Showing posts with label phonegap. Show all posts
Debugging Cordova/PhoneGap applications running on Android
Being able to debug your code is always a big help, I wanted to debug PhoneGap/Cordova application and i used the Google Chrome Developer tools that make it really easy to debug web application running on Android


Problems with Android LogCat
When i was working with Android application every now and then i was running into problem that logcat would not work. i.e. if i ran  For first few times i did restart my machine to get it working. But then i found this solution. In that you restart your adb by executing following 2 commands
 Make sure that you get daemon started successfully message, if not try stopping and starting adb again. Once your adb started, start emulator and then you should be able to execute
  Now if you run
adb logcat it would just seat there saying - waiting for devices - like this

adb kill-all
adb start-server

adb devices and it should show name of your emulator.

adb logcat command it should work
Using localStorage/sessionStorage in PhoneGap application
The HTML 5 specification introduced 2 objects that can be used for storing data in key-value format on the client side, i wanted to try this feature out so i did create this simple Todo list web page that can be used to create a TO DO list.
This is how my Todo list application looks like
 This is the HTML page that i created for working with

 <!DOCTYPE html>
<html manifest="storage.appcache">
  <head>
    <title>Offline Application Example</title>
    <script type="text/javascript" charset="utf-8"
 src="jquery.js"></script>
    <script type="text/javascript" charset="utf-8">
    var storage = window.localStorage;
    $(document).ready(function(){
      console.log('Inside document.ready');
      initTodoList();
      $("#clearStorage").click(function(){
        console.log('Entering clearstorage');
        storage.clear();
        $('li').remove();
        console.log('Exiting clearstorage');
      });
    });
    function remove_item(key){
      console.log('Entering remove_item');
      storage.removeItem(key);
      console.log('Find and remove element with id = ' + key)
      $('#'+key).remove();
      console.log('Exiting remove_item');
    }
    function add_item() {
      console.log('Entering add_item');
      var d = new Date();
      var key = d.getTime();
      var value = $('#new_item').val();
      storage.setItem(key,value);
      createToDoListItem(key,value);
      $("#new_item").val('');
      console.log('Exiting add_item');
    }
    function initTodoList(){
      console.log("Entering initTodoList " + storage.length);
      for(var i = 0; i < storage.length; i++){
        var key = storage.key(i);
        var value = storage.getItem(key);
        createToDoListItem(key,value);
      }
    }
    function createToDoListItem(key, value){
      var html = '<li  data-key="'+key+'" id="'+key+'">'
      +value+'<button onclick="javascript:remove_item(\''+ key+ '\')"
   >Delete</button></li>';
      console.log('Appending html ' + html)
      $("#todo_list").append(html);
    }
    </script>
  </head>
  <body>
    <input type="text" id="new_item">
  <button onclick="add_item()">
  Add
  </button>
  <ul id="todo_list">
  </ul>
    <br/>
  <button id="clearStorage">Clear storage</button>
  </body>
</html>
You can use either localStorage, in which case the data is storage across browser restarts or you can use the sessionStorage in which case you will loose the TODO list once the browser is closed. All you have to do is change the value of var storage = either window.localStorage or window.sessionStorage

Chrome developer tools allows us to look at the data stored in the localStorage as well as remove that data.


PhoneGap/Cordova network connectivity information
The PhoneGap/Cordova framework allows us to get information about the device network status, i wanted to try this feature out so i used the following code in index.html
 I tried to test the network status related API in the android simulator but i could only test connected and disconnected status. To get the disconnected status i had to go to Setting and switch to airplane mode without wi-fi
<!DOCTYPE html>
<html>
  <head>
    <meta charset="utf-8" />
    <meta name="viewport" content="width=device-width,
  initial-scale=1.0, maximum-scale=1.0, minimum-scale=1.0, user-scalable=0" />
    <title>Hello Cordova</title>
    <link rel="shortcut icon" href="images/favicon.png" />
    <link rel="apple-touch-icon" href="images/apple-touch-icon.png" />
    <link rel="stylesheet" href="css/reset.css" />
    <link rel="stylesheet" href="css/HelloWorklightApp.css" />
  </head>
  <body >
  <h1>Hello Cordova</h1>
  <button id="networkStatus" >Get network statusind</button>
  <script src="js/cordova.js"></script>
  </body>
</html>
Get network status button and when you click on it the following JavaScript function gets executed which displays the current network status as alert.
$("#networkStatus").click(function(){
   var networkState = navigator.network.connection.type;
    var states = {};
    states[Connection.UNKNOWN]  = 'Unknown connection';
    states[Connection.ETHERNET] = 'Ethernet connection';
    states[Connection.WIFI]     = 'WiFi connection';
    states[Connection.CELL_2G]  = 'Cell 2G connection';
    states[Connection.CELL_3G]  = 'Cell 3G connection';
    states[Connection.CELL_4G]  = 'Cell 4G connection';
    states[Connection.NONE]     = 'No network connection';
    alert('Connection type: ' + states[networkState]);
});
 I tried to test the network status related API in the android simulator but i could only test connected and disconnected status. To get the disconnected status i had to go to Setting and switch to airplane mode without wi-fi
PhoneGap/Cordova batter status
The PhoneGap/Cordova framework has 3 events that your application can listen to get battery related information those events are 
batterystatus, batterylow, batterycritical
This is sample code that i have to listen to battery related events
document.addEventListener("deviceready", function(){
  window.addEventListener("batterystatus", function(info){
    console.log("Inside document.addeventlistener -batterystatus ");
    console.log("Battery level " + info.level);
    console.log("isPlugged " + info.isPlugged);
  }, false);
  window.addEventListener("batterylow", function(info){
    console.log("Inside document.addeventlistener -batterylow " );
    console.log("Battery level " + info.level);
    console.log("isPlugged " + info.isPlugged);
  }, false);
  window.addEventListener("batterycritical", function(info){
    console.log("Inside document.addeventlistener -batterycritical " );
    console.log("Battery level " + info.level);
    console.log("isPlugged " + info.isPlugged);
  }, false);
 }, false);

Events in PhoneGap/Cordova
The PhoneGap/Cordova framework allows us to listen to quite few different events, you can attach your event handler to event by using code like this

document.addEventListener("deviceready", function(){
 console.log("Inside document.addeventlistener -deviceready");
}, false);
document.addEventListener("pause", function(){
 console.log("Inside document.addeventlistener - pause");
}, false);
document.addEventListener("resume", function(){
 console.log("Inside document.addeventlistener - resume");
}, false);
document.addEventListener("online", function(){
 console.log("Inside document.addeventlistener - online");
}, false);
document.addEventListener("offline", function(){
 console.log("Inside document.addeventlistener - offline");
}, false);
document.addEventListener("backbutton", function(){
 console.log("Inside document.addeventlistener - backbutton");
}, false);
document.addEventListener("menubutton", function(){
 console.log("Inside document.addeventlistener - menubutton");
}, false);
document.addEventListener("searchbutton", function(){
 console.log("Inside document.addeventlistener - searchbutton");
}, false);
document.addEventListener("startcallbutton", function(){
 console.log("Inside document.addeventlistener - startcallbutton");
}, false);
document.addEventListener("endcallbutton", function(){
 console.log("Inside document.addeventlistener - endcallbutton");
}, false);
document.addEventListener("volumeupbutton", function(){
 console.log("Inside document.addeventlistener - volumeupbutton");
}, false);
document.addEventListener("volumedownbutton", function(){
 console.log("Inside document.addeventlistener - volumedownbutton");
}, false);
wlCommonInit() can play the same role and it works quite ok in worklight

Posting data to REST service in PhoneGap/Cordova
In the Consuming REST service from PhoneGap/Cordova entry i talked about how you can consume a REST service in PhoneGap/Cordova application using JQuery. In that application i was making a HTTP GET request to get data from REST service, i wanted to figure out how to make a HTTP POST call to REST service to create a new contact. You can download the index.html for my application from here
This is screen shot of how my form looks like

This is screen shot of success message that i get if the contact insertion is successful

I followed these steps to build the CordovaManageContact application

This is screen shot of success message that i get if the contact insertion is successful

I followed these steps to build the CordovaManageContact application
- I followed the instructions in Getting Started with Android to build application that points to index.html inside the application, i tried it once to make sure that it works
- Then i changed the index.html file for my application to look like this
When the user clicks on submit button control goes to<!DOCTYPE html> <html> <head> <title>Manage Contact</title> <script type="text/javascript" charset="utf-8" src="cordova-1.7.0.js"></script> <script src="http://code.jquery.com/jquery-1.6.4.min.js"></script> <script type="text/javascript" charset="utf-8"> $(document).ready(function(){ $("#submit").click(insertContact); }); function insertContact(){ console.log("Entering insertContact()"); $.post("http://192.168.1.101:9000/ManageContact/rest/contact", $("#insertContact :input").serializeArray(), function(json){ if(json== null || json == 'undefined') alert("Insert failed"); else alert("Insert successful"); }); return false; } </script> </head> <body> <h3>Insert Contact</h3> <form id="insertContact"> <table> <tr> <td>Contact Id</td> <td><input type="text" name="contactId" /></td> </tr> <tr> <td>First Name</td> <td><input type="text" name="firstName" /></td> </tr> <tr> <td>Last Name</td> <td><input type="text" name="lastName" /></td> </tr> <tr> <td>Email</td> <td><input type="text" name="email" /></td> </tr> <tr> <td><input type="submit" id="submit" name="submit" value="Submit" /></td> </tr> </table> </form> </body> </html>insertContact()method., In this method i am using jQuery$.post()call to submit the form tohttp://192.168.1.101:9000/ManageContact/rest/contactURL. I am using jQuery to collect all the values entered by the user into form and encode them by calling$("#insertContact :input").serializeArray()method. After the post request control goes to the anonymous function which is third parameter of the$.post()method. In that method i am checking if i got response if yes that means insert was successful if not that means insert failed, that is because my REST service is structured not to send anything back in case of insert failure.
Consuming REST service from PhoneGap/Cordova
In the Using JPA in REST web application deployed in Jetty entry i blogged about how to build a ManageContact JPA service which will allow me to perform CRUD operations on CONTACT table using a REST service. I wanted to figure out how i can consume this service from PhoneGap/Cordova application so i built this sample application which will call  I followed these steps to build the CordovaManageContact application
http://localhost:9000/ManageContact/rest/contact rest service, read the contact list returned in XML format, parse it and display contact list to the user, you can download the sample application from here
This screen shot displays the list of contacts that i got from the REST service
 I followed these steps to build the CordovaManageContact application
- I followed the instructions in Getting Started with Android to build application that points to index.html inside the application, i tried it once to make sure that it works
- Then i changed the index.html file for my application to look like this
When i click on the<!DOCTYPE html> <html> <head> <title>Device Properties Example</title> <script type="text/javascript" charset="utf-8" src="cordova-1.7.0.js"></script> <script src="js/jquery.js"></script> <script type="text/javascript" charset="utf-8"> $(document).ready(function(){ $("#getContactBtn").click(getContactList); }); function onDeviceReady() { console.log("Entering index.html.onDeviceReady"); getContactList(); console.log("Exiting index.html.onDeviceReady"); } function getContactList(){ console.log("Entering getContactList()"); $.ajax({ url : "http://192.168.1.101:9000/ManageContact/rest/contact", dataType:"xml", cache: false, error:function (xhr, ajaxOptions, thrownError){ debugger; alert(xhr.statusText); alert(thrownError); }, success : function(xml) { console.log("Entering getContactList.success()"); $(xml).find("contact").each(function() { var html = '<li>' + $(this).find("firstName").text() + ' ' + $(this).find("lastName").text() +'</li>'; $('#contactList').append(html); }); console.log("Exiting getContactList.success()"); } }); console.log("Exiting getContactList()"); } </script> </head> <body> <h3>Contact List</h3> <button id="getContactBtn">Get Contact</button> <ul id="contactList"></ul> </body> </html>Get Contactbutton thegetContactList()method gets called, it uses the jquery$.ajax()method to make a call and once the result is returned, it uses logic in thesuccessmethod to parse the xml and get all the contact records and adds each one of them as list item in thecontactListlist. I have the REST service running on my machine along with the Android emulator which has the PhoneGap application but when i tried to access the service athttp://localhost/ManageContact/rest/contact,http://127.0.0.1/ManageContact/rest/contactit did not work. I tried to map the ip address192.168.1.101todemohost.comin my host file but Android did not understand that mapping either. I had to use ipconfig command to figure out the ip address of the machine and then use it.
Using native alerts and cofirmations of mobile using Cordova
The PhoneGap/Cordova framework allows you to display native dialog box of the device, which allows you to use say custom title and better control on number of buttons on the dialog box. In addition to that it also allows you to beep or vibrate the device(Both beep and vibrate feature dont seem to work in the Android emulator). I wanted to try these features so i built this sample application, which allows you to play with different notifications.
This is how the native alert box looks like
 This is how the native confirmation box looks like
 I followed these steps to build Android PhoneGap application
 This is how the native confirmation box looks like
 I followed these steps to build Android PhoneGap application
- I followed the instructions in Getting Started with Android to build application that points to index.html inside the application, i tried it once to make sure that it works
- Then i used the following index.html code
The HTML of the page shows 5 different links each pointing to one JavaScript function. Each of the functions uses Phone Gap native feature to display native dialog boxes.<!DOCTYPE html> <html> <head> <title>Google Map Example</title> <meta name="viewport" content="width=device-width, initialscale=1.0, user-scalable=no"></meta> <script type="text/javascript" charset="utf-8" src="cordova-1.7.0.js"></script> <script type="text/javascript" charset="utf-8"> function alertDismissed() { console.log("Inside alertDismissed"); } function onConfirm(){ console.log("Inside onConfirmation"); } function showAlert() { navigator.notification.alert( 'Sample native alert message', alertDismissed, 'Sample native alert title', 'alert' ); } function showConfirmation(){ navigator.notification.confirm( 'Sample native confirmation', onConfirm, 'Sample confirmation title', 'Confirm' ); } function playBeep() { navigator.notification.beep(3); } function vibrate() { navigator.notification.vibrate(2000); } </script> </head> <body > <ul> <li><a href="#" onclick="alert('Browser alert'); return false;">Show browser Alert</a></li> <li><a href="#" onclick="showConfirmation(); return false;">Show Confirmation</a></li> <li><a href="#" onclick="showAlert(); return false;">Show Alert</a></li> <li><a href="#" onclick="playBeep(); return false;">Play Beep</a></li> <li><a href="#" onclick="vibrate(); return false;">Vibrate</a></li> </ul> <p></p> </body> </html>
Google Map in PhoneGap/Cordova application
I wanted to figure out how to use Google Maps API in the Phone GAP application so i built this sample application that lets you enter address and it displays that address on the Map, you can download the sample application from here
This is a screen shot of how my application looks like
 This is how the index.html page for my application looks like

<!DOCTYPE html>
<html>
  <head>
    <title>Google Map Example</title>
 <style type="text/css">
      html { height: 100% }
      body { height: 100%; margin: 0; padding: 0 }
      #map_canvas { height: 100% }
    </style>
    <script type="text/javascript" charset="utf-8" src="cordova-1.7.0.js"></script>
    <script type="text/javascript" charset="utf-8" src="jquery.js"></script>
    <script src="http://maps.google.com/maps/api/js?sensor=true"></script>
    <script type="text/javascript" charset="utf-8">
    function displayCurrentLocation(){
     console.log("Entering displayCurrentLocation()");
  try{
   var currentLocationLatAndLong = new google.maps.LatLng(37.422006,-122.084095);
   var mapOptions ={
    zoom:8,
    center:currentLocationLatAndLong,
    mapTypeId: google.maps.MapTypeId.ROADMAP
   };
   var mapDiv = document.getElementById("map");
   map = new google.maps.Map(mapDiv,mapOptions);
  }catch(e){
   console.log("Error occured in ConsultantLocator.displayMap() " + e);
  }
     console.log("Exiting displayCurrentLocation()");
    }
    function addMarker(latLng,title,contentString){
  console.log("Entering addMarker()");
  var markerOptions = new google.maps.Marker({
    map: map,
    position: latLng,
    title:title,
    clickable:true
   });
  var marker = new google.maps.Marker(markerOptions);
  var infoWindowOptions = {
   content: contentString,
   position: latLng
  };
  var infoWindow = new google.maps.InfoWindow(infoWindowOptions);
  google.maps.event.addListener(marker, "click", function(){
   infoWindow.open(map);
  });
  console.log("Exiting addMarker()");
 }
    function getLatLangFromAddress(address){
     console.log("Entering getLatLangFromAddress()");
     var geocoder = new google.maps.Geocoder();
     geocoder.geocode( { 'address': address}, function(results, status) {

      if (status == google.maps.GeocoderStatus.OK) {
    var returnedValue =results[0].geometry.location;
       console.log("Address found is " + returnedValue);
       addMarker(returnedValue);
      }else{
       alert("Geocode was not successful for the following reason: " + status);
      }
        });
     console.log("Exiting getLatLangFromAddress()");
    }
    function addMarkerForAddress(){

     console.log("Entering addMarkerForAddress()");
     var address = $("#address").val();
     console.log($("#address"));
     var latLangForLocation = getLatLangFromAddress(address);
     console.log("Value returned by getLatLangFromAddress " +latLangForLocation);
     addMarker(latLangForLocation,address,address);
     console.log("Exiting addMarkerForAddress()");
    }
 document.addEventListener("deviceready", displayCurrentLocation, false);
    </script>
  </head>
  <body >
   <p>
    <input type="text" name="address" id="address" />
    <input type="button" id="getLocation" onclick="addMarkerForAddress()" value="Get Location"/>
   </p>
    <div id="map" style="width:100%; height:100%"></div>
  </body>
</html>
Using ripple mobile browser emulator for testing PhoneGap
One of the biggest pain point for testing PhoneGap application is deploying it on emulator and testing it, that process takes long time. So i started using the Ripple which is Google Chrome extension and it makes testing PhoneGap application really easy.
- Install Ripple extension in Chrome
- Start the Google Chrome browser with its access to local file system by executing
chrome.exe -–allow-file-access-from-files - Then Right click on the Ripple symbol and say Manage Google Extensions, on the next screen check
Allow access to file URLscheck box
- Now open index.html from the phoneGap application using file URL and enable Ripple for it

- Now you can test the geolocation application like this. With Ripple advantage is you can directly open the HTML in browser and then set geolocation directly using Ripple


Using Geolocation API in Android Emulator
In the Getting address of the current location using GeoLocation API and Google MAP api entry i talked about how to use the GeoLocation API provided as part of HTML 5 to get the current address of the user. Now Phone Gap also provides support for geolocation which means it checks if the browser on the device has support for geolocation if yes it lets it work if not it will call the native API of the underlying browser to get the the location and return it to browser. I wanted to try that so i took the content of

geolocation.html and copied it in the index.html file that my phonegap application for android is using, you can download that app from here
I followed these steps to build Android PhoneGap application
- I followed the instructions in Getting Started with Android to build application that points to index.html inside the application, i tried it once to make sure that it works
- Then i copied the content of Geolocation.html in the index.html page
- Change the AndroidManifest.xml file to allow application to use the mock location
<?xml version="1.0" encoding="utf-8"?> <manifest xmlns:android="http://schemas.android.com/apk/res/android" package="com.webspherenotes.phonegap" android:versionCode="1" android:versionName="1.0" > <uses-sdk android:minSdkVersion="8" /> <uses-permission android:name="android.permission.CAMERA" /> <uses-permission android:name="android.permission.VIBRATE" /> <uses-permission android:name="android.permission.ACCESS_COARSE_LOCATION" /> <uses-permission android:name="android.permission.ACCESS_FINE_LOCATION" /> <uses-permission android:name="android.permission.ACCESS_LOCATION_EXTRA_COMMANDS" /> <uses-permission android:name="android.permission.ACCESS_MOCK_LOCATION" /> <uses-permission android:name="android.permission.READ_PHONE_STATE" /> <uses-permission android:name="android.permission.INTERNET" /> <uses-permission android:name="android.permission.RECEIVE_SMS" /> <uses-permission android:name="android.permission.RECORD_AUDIO" /> <uses-permission android:name="android.permission.MODIFY_AUDIO_SETTINGS" /> <uses-permission android:name="android.permission.READ_CONTACTS" /> <uses-permission android:name="android.permission.WRITE_CONTACTS" /> <uses-permission android:name="android.permission.WRITE_EXTERNAL_STORAGE" /> <uses-permission android:name="android.permission.ACCESS_NETWORK_STATE" /> <uses-permission android:name="android.permission.GET_ACCOUNTS" /> <uses-permission android:name="android.permission.BROADCAST_STICKY" /> <application android:icon="@drawable/ic_launcher" android:label="@string/app_name" > <activity android:name=".HelloPhoneGapActivity" android:label="@string/app_name" android:configChanges="orientation|keyboardHidden" > <intent-filter> <action android:name="android.intent.action.MAIN" /> <category android:name="android.intent.category.LAUNCHER" /> </intent-filter> </activity> </application> </manifest> - The android emulator does not know how to find out current location of the user, so we have to setup mock location i.e. hard code a location for the user. For that you have two options either use the DDMS perspective in your Eclipse and after your emulator is started select it and enter value of longitude and latitude and click on send like this.

-
Or open a Telnet session to the emulator by executing
telnet localhost 5554(you can get port number 5554 from the emulator window it would be in title bar) and then in the telnet window usegeo fix -121.9754144 37.5669038command to set the longitude and latitude like this


Using JQuery Mobile in PhoneGap/Cordova application
JQuery Mobile is one of the most popular Mobile UI frameworks, i wanted to figure out how to use it in Cordova application so i built a sample application that uses JQuery Mobile and also the Cordova device API to display device related properties in JQuery Mobile UI. You can download the sample application from here. I followed these steps to build this application

- I followed the instructions in Getting Started with Android to build application that points to index.html inside the application, i tried it once to make sure that it works
- I did download the
jquery.mobile-1.1.0.zipfrom JQuery Mobile Download page - I did unzip the
jquery.mobile-1.1.0.zipinc:\softwarefolder - Next i copied the css, docs and js folder from
C:\software\jquery.mobile-1.1.0\demosinto assets/www folder of my web application. - If your just starting with JQuery mobile or playing around then you can even directly point to the CDN URL of JQuery Mobile without actually downloading it in your application, in that case you can skip step 2 and 3. You can simply add these lines in your HTML page
<link rel="stylesheet" href="http://code.jquery.com/mobile/1.1.0/jquery.mobile-1.1.0.min.css" /> <script src="http://code.jquery.com/jquery-1.6.4.min.js"></script> <script src="http://code.jquery.com/mobile/1.1.0/jquery.mobile-1.1.0.min.js"></script> - Next change your index.html page to look like this
My application has one JQuery Mobile page whose content is defined using<!DOCTYPE html> <html> <head> <title>Device Properties Example</title> <script type="text/javascript" charset="utf-8" src="cordova-1.7.0.js"></script> <!-- <link rel="stylesheet" href="http://code.jquery.com/mobile/1.1.0/jquery.mobile-1.1.0.min.css" /> <script src="http://code.jquery.com/jquery-1.6.4.min.js"></script> <script src="http://code.jquery.com/mobile/1.1.0/jquery.mobile-1.1.0.min.js"></script> --> <link rel="stylesheet" href="css/themes/default/jquery.mobile-1.1.0.css" /> <script src="js/jquery.js"></script> <script src="js/jquery.mobile-1.1.0.js"></script> <script type="text/javascript" charset="utf-8"> document.addEventListener("deviceready", onDeviceReady, false); function onDeviceReady() { console.log("Entering index.html.onDeviceReady"); //var element = document.getElementById('deviceProperties'); var html = ""; html = html + "<li>" + 'Device Name: ' + device.name + "</li>"; html = html + "<li>" + 'Device Cordova: ' + device.cordova + "</li>"; html = html + "<li>" + 'Device Platform: ' + device.platform + "</li>"; html = html + "<li>" + 'Device UUID: ' + device.uuid + "</li>"; console.log(html); $("#deviceProperties").html(html); $("#deviceProperties").listview('refresh'); console.log("Exiting index.html.onDeviceReady"); } </script> </head> <body> <div data-role="page" id="page1"> <div data-theme="a" data-role="header"> <h3>Hello JQuery Mobile</h3> </div> <div data-role="content"> Device Properties <ul data-role="listview" data-inset="true" id="deviceProperties"> </ul> </div> <div data-theme="a" data-role="footer"> <h3>Copyright stuff</h3> </div> </div> </body> </html>divwith id equal topage1. The div with data-role equal to content defines the content of the page. By default it only has emptyulelement, i am usingonDeviceReady()JavaScript function to read device property and add them to the list.

Accessing external website from PhoneGap application
I wanted to create a PhoneGap application, which instead of pointing to a HTML page inside the application should open my blog site

http://wpcertification.blogspot.com these are the steps that i followed to build the application, you can download it from here
- I followed the instructions in Getting Started with Android to build application that points to index.html inside the application, i tried it once to make sure that it works
- Then i changed the HelloCordovaActivity like this so that it points to
http://wpcertification.blogspot.com
Thepackage com.webspherenotes.cordova.sample; import org.apache.cordova.DroidGap; import android.app.Activity; import android.os.Bundle; public class HelloCordovaActivity extends DroidGap { /** Called when the activity is first created. */ @Override public void onCreate(Bundle savedInstanceState) { super.onCreate(savedInstanceState); super.loadUrl("http://wpcertification.blogspot.com"); } }onCreate()method is callingsuper.loadUrl("http://wpcertification.blogspot.com");so thathttp://wpcertification.blogspot.compage is opened in the WebView as soon as application starts - The default configuration of the PhoneGap application disallows opening of any external URL so i had to change the cordova.xml like this to allow access to
http://wpcertification.blogspot.com
Take a look at XML comments in this file for syntax on how to allow access to external URLs<?xml version="1.0" encoding="utf-8"?> <cordova> <!-- access elements control the Android whitelist. Domains are assumed blocked unless set otherwise --> <access origin="http://127.0.0.1*"/> <!-- allow local pages --> <access origin="http://wpcertification.blogspot.com" /> <!-- <access origin="https://example.com" /> allow any secure requests to example.com --> <!-- <access origin="https://example.com" subdomains="true" /> such as above, but including subdomains, such as www --> <!-- <access origin=".*"/> Allow all domains, suggested development use only --> <log level="DEBUG"/> <preference name="classicRender" value="true" /> </cordova>

Setting up Android PhoneGap 1.7 development environment
Before few days i did blog about Setting up Android PhoneGap development environment in that case i had PhoneGap 1.6 working on Android 2.2. But then PhoneGap 1.7 came along and the Getting started document document talks about how to setup PhoneGap 1.7 which is now called Apache Cordova with Android 4.0.3.
I followed the steps in the document and was able to get it working, one strange thing was after i said run as Android application it did not work as expected for first couple of times but after couple of times it started working, i am still trying to figure out what happened.
I built this simple application that uses the device API to print device and Cordova related information. This is how my HTML looks like, you can download the source code for the application from here

<!DOCTYPE html>
<html>
  <head>
    <title>Device Properties Example</title>

    <script type="text/javascript" charset="utf-8"
 src="cordova-1.7.0.js"></script>
    <script type="text/javascript" charset="utf-8">

    // Wait for Cordova to load
    //
    document.addEventListener("deviceready", onDeviceReady, false);

    // Cordova is ready
    //
    function onDeviceReady() {
        var element = document.getElementById('deviceProperties');

        element.innerHTML = 'Device Name: '     + device.name     + '<br />' +
                            'Device Cordova: '  + device.cordova  + '<br />' +
                            'Device Platform: ' + device.platform + '<br />' +
                            'Device UUID: '     + device.uuid     + '<br />' +
                            'Device Version: '  + device.version  + '<br />';
    }

    </script>
  </head>
  <body>
    <p id="deviceProperties">Loading device properties...</p>
  </body>
</html>
deviceready event i am reading different device properties and displaying them in the page. This is how the page looks like

Worklight Phone Gap Android application
I just created my first Worklight Phone Gap application for Android. The process is pretty easy you just add support for Android environment and then WorkLight creates/generates Android project for you. Once your project is ready you just right click on it and say Run as Android application to get a view like this
 I wanted to see what is going on so i looked at the generated project, but before that this is how my Worklight application is structured
 When you add support for Android, WorkLight generates PhoneGap Android project that is similar to Getting Started with PhoneGap on Android project, the Generated Java class looks like this


package com.HelloWorkLightPhoneGap;

import android.os.Bundle;

import com.worklight.androidgap.WLDroidGap;

public class HelloWorkLightPhoneGap extends WLDroidGap {
 @Override
 public void onCreate(Bundle savedInstanceState) {
    super.onCreate(savedInstanceState);
    super.loadUrl(getWebMainFilePath());
 }
}
wlServerProtocol = http
wlServerHost = 192.168.94.131
wlServerPort = 8080
wlAppId = HelloWorkLightPhoneGap
wlAppVersion = 1.0
wlC2DMEmailSender = ${wlC2DMEmailSender}
wlMainFilePath = HelloWorkLightPhoneGap.html
enableSettings = true

Creating multi page application with JQuery Mobile
JQuery Mobile makes creating multi-page application very easy, I think its much better than using Worklight for creating multi-page application
Take a look at this simple html page that i built which has 3 pages page1, page2 and page3, every page has link to the next page.

<!DOCTYPE html>
<html>
<head>
<meta charset="utf-8" />
<meta name="viewport"
  content="width=device-width, initial-scale=1.0, maximum-scale=1.0,
  minimum-scale=1.0, user-scalable=0" />
<title>HelloWorkLightPhoneGap</title>
<link rel="shortcut icon" href="images/favicon.png" />
<link rel="apple-touch-icon" href="images/apple-touch-icon.png" />
<link rel="stylesheet" href="css/reset.css" />
<link rel="stylesheet" href="css/HelloWorkLightPhoneGap.css" />
<link rel="stylesheet" href="css/jquery.mobile-1.0.min.css" />
<script src="js/jquery-1.7.1.min.js"></script>
<script>
  var jq = jQuery.noConflict();
</script>
<script src="js/jquery.mobile-1.0.min.js"></script>
<script type="text/javascript"
  src="http://maps.google.com/maps/api/js?sensor=false"></script>
</head>
<body onload="WL.Client.init({})" id="content" style="display: none">
  <div data-role="page" id="page1">
    <div data-theme="a" data-role="header">
      <h3>First Page</h3>
    </div>
    <div data-role="content" id="pagePort">
      <a href="#page2">Go to second page</a>
    </div>
    <div data-theme="a" data-role="footer">
      <h3>Copyright stuff</h3>
    </div>
  </div>

  <div data-role="page" id="page2" >
    <div data-theme="a" data-role="header">
      <h3>Second Page</h3>
    </div>
    <div data-role="content" id="pagePort">
      <a href="#page3">Go to third page</a>
    </div>
    <div data-theme="a" data-role="footer">
      <h3>Copyright stuff</h3>
    </div>
  </div>

  <div data-role="page" id="page3">
    <div data-theme="a" data-role="header">
      <h3>Third page</h3>
    </div>
    <div data-role="content" id="pagePort">
      <a href="#page1">Go to first page</a>
    </div>
    <div data-theme="a" data-role="footer">
      <h3>Copyright stuff</h3>
    </div>
  </div>

  <script src="js/HelloWorkLightPhoneGap.js"></script>
  <script src="js/messages.js"></script>
  <script src="js/auth.js"></script>
</body>
</html>

Setting up Android PhoneGap development environment
Before couple of days i was trying to setup Android Phone Gap environment on my machine, by following instructions at Getting started guide for Android environment on PhoneGap site, I was using PhoneGap 1.5 version and i had a problem of not being able to start the application.
The solution was to use Android 2.2 SDK using the latest Android SDK some how does not work.


Subscribe to:
Posts (Atom)