Understand Web Application Integration

Web Application Integrator for IBM WebSphere Portal (WebAppIntegrator) provides a simple and effective solution for integrating web applications into Portal. The Using the Web Application Integrator for IBM WebSphere Portal link has some introductory information about what is Web Application Integrator.


You can download the Web Application Integrator portlet. Once you download it expand the .zip file in wps6.1 folder it has detailed documentation on how to install, configure it.


I tried creating the sample web application for Web Application integrator following instructors in the .zip file


  • Create test.html file in the wps.war folder

  • Paste this code to test.html file

    <!DOCTYPE HTML PUBLIC "-//W3C//DTD HTML 4.01//EN" "http://www.w3.org/TR/html4/strict.dtd">
    <html>
    <head>
    <!-- BEGIN PORTAL NAVIGATION INTEGRATION -->
    <!-- END PORTAL NAVIGATION INTEGRATION -->
    </head>
    <body>
    <h1> Test Page: Integration with WebAppIntegrator</h1>
    </body>
    </html>


  • Create a URL using the Manage Pages portlet in WebSphere Portal Admin Console pointing to http://localhost:10040/wps/test.html

  • Copy unique id of this URL in the Web Application Integrator portlet and it will create script tag like this

    <script type="text/javascript" src="http://localhost:10040/wps/portal/!ut/p/c5/04_SB8K8xLLM9MSSzPy8xBx9v_LUJMeCAs-8ktT0osSS_CJVA3QR_YJ0RUUA0glfLw!!/?Portal_Page_ID=com.ibm.webapp.test">
    </script>

    I used com.ibm.webapp.test as the unique name for the URL

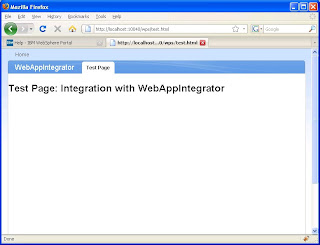
  • Copy this URL and paste it as first child of body tag in test.html page. Then try accessing the http://localhost:10040/wps/test.html page. It should look something like this

    Please note one very important point that you should be logged in into portal first in order to get this header.


If you want to add this menu to external application that is not under SSO with portal or you dont want to login into portal first then you will have to follow some additional steps

  1. Go to Portal Manage pages portlet. Change the URL that you created in the portal to allow access to anonymous users

  2. Come back to test.html page and change the script tag that you copied in it to change URL from /myportal to /portal or anonymous URL in your case

  3. Now when you open a new browser window and try accessing the http://localhost:10040/wps/test.html in it you should get something like this

What is Performance monitoring infrastructure

Performance monitoring infrastructure (PMI) is the core monitoring infrastructure for WebSphere Application server. The performance data provided by WebSphere PMI helps to monitor and tune application server performance.

When tuning the WebSphere Application Server for optimal performance, or fixing a poorly performing Java 2 Platform, Enterprise Edition (J2EE) application, it is important to understand how the various run time and application resources are behaving from a performance perspective. PMI provides a comprehensive set of data that explains the runtime and application resource behavior. For example, PMI provides database connection pool size, servlet response time, Enterprise JavaBeans (EJB) method response time, Java virtual machine (JVM) garbage collection time, CPU usage, and so on. This data can be used to understand the runtime resource utilization patterns of the thread pool, connection pool, and so on, and the performance characteristics of the application components like servlets, JavaServer Pages (JSP), and enterprise beans.

Using PMI data, the performance bottlenecks in the application server can be identified and fixed. For instance, one of the PMI statistics in the Java DataBase Connectivity (JDBC) connection pool is the number of statements discarded from prepared statement cache. This statistic can be used to adjust the prepared statement cache size in order to minimize the discards and to improve the database query performance. PMI data can be monitored and analyzed by Tivoli Performance Viewer (TPV), other Tivoli tools, your own applications, or third party tools. TPV is a graphical viewer for PMI data that ships with WebSphere Application Server. Performance advisors use PMI data to analyze the run-time state of the application server, and provide tuning advice to optimize the application server resource utilization.

PMI data can also be used to monitor the health of the application server. Some of the health indicators are CPU usage, Servlet response time, and JDBC query time. Performance management tools like Tivoli Monitoring for Web Infrastructure and other third party tools can monitor the PMI data and generate alerts based on some predefined thresholds.

Demonstrate enabling Portlet PMI

Debugging performance problems in WebSphere Portal is really difficult. Lets one of your page is taking long time to render that page has 3 portlets. How do you find out which portlet is creating problem. The WebSphere Application Server provides way to find out how much time does portlet take to process action, render or resource request. By default these metrics are disabled but you can enable them by following these steps.


  • Log Into the WebSphere Application Server Admin Console.

  • Go to Monitoring and Tunning -> Performance Monitoring Infrastructure page. Check if "Enable Performance Monitoring Infrastructure " is checked or not. If not check it and restart server.


  • Once the Performance monitoring is enabled, next step would be to enable portlet specific metrics. So Select the Custom radio button on Performance Monitoring Infrastructure page and click on Custom link. It will take you to the Custom Monitoring Level page.


  • Switch to runtime tab so that the changes that you make become effective immediately. Click On WebSphere Portal ->Web Applications. It will show you quite few metrics that are available at web application level. Select the Portlet related metrics and click on Enable button. You can disable everything else. At end filter records to check what all metrics are enabled. You should see all portlet related metrics in the list like this


  • Now lets enable the portlet metrics only for the portlets on your test page.

  • On the WAS Admin Console go to Monitoring and Tuning -> Performance Viewer -> Current Activity. Select the WebSphere Portal. You should see the current performance metrics.


  • Click on Performance Modules -> Web Application. It will list out all the .war files installed on your portlet. Only the portlets that you have accessed so far would be enabled. Select the war files that your interested in expand it, it should list out all the portlets in that application. Select the one that your intereste in. I am selecting XHRSample portlet


  • Similar select portlet metrics for other portlets on that page.


  • Once portlet related metrics are enable go to portal page and hit it few times or may be you can run your load test.

  • Now comeback to WAS Admin Console click on Current activity and you should see the performance data like this.


Take a look at Exploiting the WebSphere Application Server V6.1 portlet container for more information on Enabling Portlet PMI.

Caching portlet output

The Portlet Specification 2.0 as well as Portlet Specification 2.0 define how your portlet can request portlet container to cache its output.

The way it works is if you want portal container to cache output of your portlet then you can add expiration-cache element to your portlet.xml like this.

<expiration-cache>-1</expiration-cache>

Value of expiration cache means this to portal

  1. -1: Value of -1 tells portal server that the output of portlet never expires

  2. 0: Value of 0 is equivalent of not adding the expiration-cache element at all. It means that dont cache the output of the portlet.

  3. positive no.: Value of more than 0 means cache output of portlet for those many mil-seconds


If you set the expiration cache element for portlet then on the first request to portlet the portlet container will pass request to doView() method and cache its output. There after whenever portal server gets request it will return content from cache instead of passing control to doView() method of the portlet. The cache will get expired if either it is expired or you perform some action on the portlet. In that case the doView() method would get called again. Clicking on renderURL in the portlet does not result in doView() method being called again.

Please note that if you go to say either Edit or HELP mode of the portlet then the cache wont be discarded also content generated in doEdit() or doHelp() method does not get cached.

If you have cachemonitor.ear installed on your portal server then you can look at the content that is being cached like this.


I am using the SampleCachePortlet.war Portlet for testing fragment cache. This portlet writes time stamp when output was generated. As you can see the portal server is caching the output generated by portlet for every user under different entry.

You can use Cache Monitor to verify the cached content. This is a sample entry

/wps/PA_SampleCache/SampleCachePortlet:7_6RUKKSU31G8I602VFOAQ3710G3
/wps/PA_SampleCache/SampleCachePortlet:7_6RUKKSU31G8I602VFOAQ3710G3:sunil:text/html:en-AU, en;q=0.9, en-US;q=0.8:Mozilla/5.0 (Windows; U; Windows NT 5.1; en-US; rv:1.9.0.7) Gecko/2009021910 Firefox/3.0.7 (.NET CLR 3.5.30729):UTF-8:normal::UTF-8:requestType=GET
none 7_6RUKKSU31G8I602VFOAQ3710G3:sunil
None 1

As you can see the value of
Template: <urloftheportlet>:<portletinstanceid>
CacheId:<urloftheportlet>:<portletinstanceid>:<username>:<contenttype>
Timeout (seconds): Time when cache expires. It is saying none in our case because we set expiration-cache to -1
Dependency IDs: <portletinstanceid>:<username>

If you try accessing the portlet with different users then you will see one entry for each user. Now if you dont want that instead you want portal to cache output across users. Ex. Company news portlet should display same data to all the users then add value of cache-scope equal to public like this in portlet.xml


<cache-scope>public</cache-scope>


Once you do that portal will keep only one copy of the portlet output across the users, your cache entry will look like this in the cache monitor

/wps/PA_SampleCache/SampleCachePortlet:7_6RUKKSU31G8I602VFOAQ3710G3 /wps/PA_SampleCache/SampleCachePortlet:7_6RUKKSU31G8I602VFOAQ3710G3:public:text/html:en-US, en;q=0.9:Mozilla/5.0 (Windows; U; Windows NT 5.1; en-US; rv:1.9.0.7) Gecko/2009021910 Firefox/3.0.7 (.NET CLR 3.5.30729):UTF-8:normal::UTF-8:requestType=GET none 7_6RUKKSU31G8I602VFOAQ3710G3:public None 1


As you can see the Cache Id does not include userName this time instead it says public same thing with the dependencyId it says <portletinstanceid>:public.

Enabling Potlet Fragment caching

WebSphere Portal server can cache output of the portlet at either the application server level or at the remote proxy server. Portlet output caching is turned off by default so you will have to turn it on by following these steps


  1. Make sure that Dynamic Caching Service is enabled to server startup


  2. Enable the servlet caching using the WAS Admin console like this


  3. Now enable the Portlet Fragment caching using the WAS Admin Console like this


  4. Restart your WebSphere Portal server for these changes to take effect


Now if you deploy a portlet that asks WPS to cache its output then portal will do that.

Understand the differences and advantages between Client Side Aggregation (CSA) and Server Side Aggregation

WPS 6.1 includes two new themes

  • Portal: Is new look and feel for the portal. It is traditional JSP Server side aggregation theme

  • PortalWeb2: Is based on Portal theme but enabled to use Client side aggregator.
    These two themes can serve as examples of what is required to add the CSA aggregator to an existing Server Side Aggregation (SSA) theme


This picture represents all the parts that are generated dynamically in the page in red color.


With Client Side Aggregation theme when you go to portal page first it will generate skeleton page with place holders for dynamic parts. Once the page is loaded the com.ibm.aggregation.Aggregator takes care of making Ajax calls to get different fragments of the page and once the fragment is fetched applies XSL to convert it into HTML and inserts that HTML into the place holders.

Attribute based administration

Attribute Based Administration provides a facility to customize the layout of a page for individual user by using rules to show or hide pages or page. You can create a visiblity rule that will check value of "department" attribute stored in LDAP and use it either show or hide particular page or portlet. You can also use values such as todays date or day to show or hide content.

Access Control and Visibility Rules both impact what appears on a portal page or portlet. Access Control determines what a user is allowed to see on a page or in a portlet. In order to see pages and portlets, a user must be explicitly defined as a member of the group that has access. The groups are arranged in a hierarchy and each group is assigned roles such as administrators or editors.

Access Control takes precedent over visibility rules. You must have access to a page or portlet before visibility rules can be applied. Access Control also determines if a page or portlet will be returned in a search; if a user does not have access, he will not be able to see the portlet or page in search results. If a user has access to a portlet or page, but has the visibility rule set to hide the page or portlet, it will show up in search results.

There are two ways to assign a visibility rules to either page or portlet.

Using Portal Admin Console


You can show or hide portal page using the Page properties portlet like this


You can show or hide portlet using the Edit Layout portlet like this


Using XML Access COnfiguration


Using the XML configuration interface, you can assign a rule to a page or portlet. Set the parameter com.ibm.portal.navigation.rule to indicate the rule to assign to the page or portlet. The value of the parameter should be the unique id or UUID of the rule. The UUID can be found by exporting the rule in the Personalization user interface and inspecting the exported XML for the jcr:uuid parameter.

For example, to assign a rule with the UUID 7ce9d5004ee31f41b0d3b944c9f7965c to a page or portlet, add the following parameter to the content-node in the XML access script:

<parameter name="com.ibm.portal.navigation.rule" type="string" update="set"><![CDATA[7ce9d5004ee31f41b0d3b944c9f7965c]]</parameter>

Theme Customizer

Starting from Version 6.1, WPS provides a Theme Customizer portlet, that lets you change the appearance and behavior of a theme. You can select colors, fonts, graphics, turn areas of the page on and off, and adjust the settings for areas of the page such as the navigation. Customizations are saved as Theme Styles that are applied to pages by editing the page properties in the Manage Pages portlet. Some themes do not support all of the choices available in this portlet.

You can either edit the existing theme policy or add new theme policy using the Theme Customizer portlet. You can access Theme Customizer portlet from Portal Adminstartion Console like this


The Theme Customizer functionality is divided into 5 main parts.

  • Page: The page tab related functionality can be further subdivided into 3 parts

    1. Page Settings: Select the background image and/or background color for the page and decide how the background image should be displayed

    2. Page Content: Allows you to decide what content should be displayed on the page. Ex Show or hide the Search Control, Portlet Links,..etc

    3. Breadcrumb Trail Settings: Control if you want to display breadcrumb or not as well as look and feel of the bread crumb


  • Banner: Lets you control the banner section of the portal page.

    1. Branding: Allows you to set company logo that displays in the top left hand side corner and the title for the Portal Site, as well as font and style for the Title text

    2. Banner Settings: Let you select the background image or color for banner area of the page. It also lets you decide if you want to display quick links in banner or not

  • Navigation: The Navigation part allows you to control Navigation both top and side level navigation of portal

    1. Navigation Style: This part allows you to choose what type of navigation do you want, side only or combination of side and top,..

    2. Top Level Style: Controls if you want to display top level navigation in the banner area or not, if yes then control look and feel of Top level navigation

    3. Side Navigation Style: Control look and feel of the side navigation bar


  • Portlet Area: This section lets you control the Portlet Area of the page.

    1. Portlet Area Header Settings: The header section is the area between banner and body which is rendered using screenRender tag. You can set image for that area and look and feel.Default portal theme does not show anything in this area

    2. Portlet Area Settings: You can set background image and background color for the mainContent section

    3. Default portlet skin settings: Controls the look and feel of the default portlet skin


  • Footer: Controls the footer of the portal page.

    1. Quick Links Shelf Settings: This section allows you to control if you want to display quick links shelf and if yes how.

    2. Footer quick links settings: Display quick links in footer or not and if yes how.


Once you start customizing the theme you will also get the Customize theme button in the banner of the page and when you click on it that will open a Theme Customizer portlet in modal dialog like this

Adding custom attribute to theme policy

Follow these steps if you want to add renderTestAttribute custom attribute to the theme policy

  • The root theme policy which is the first <policy> element node in the exported policies must have the renderTestAttribute attribute as well as lock attribute so add theme to theme policy like this.

    <policyValue
    Name="renderTestAttribute"
    Factory="com.ibm.wps.policy.parse.BooleanFactory">
    <value>true</value>
    </policyValue>
    <policyValue
    Name="renderTestAttributeLock"
    Factory="com.ibm.wps.policy.parse.BooleanFactory">
    <value>false</value>
    </policyValue>


  • By default every theme policy will inherit values from the root theme policy, so if you want a policy which requires different value of renderTestAttribute then true then add one attribute to that theme policy like this

    <policyValue
    Name="renderTestAttribute"
    Factory="com.ibm.wps.policy.parse.BooleanFactory">
    <value>false</value>
    </policyValue>


  • Inside your code you should use value of the renderTestAttribute to generate different content like this

    <% boolean isTestAttribute = themePolicy.getValueAsBoolean("renderTestAttribute", false);
    if(isTestAttribute){%>
    <p> Display this paragrah if renderTestAttribute is true. </p>
    <%}%>


Theme Policy

Theme policy allows you to control how a theme is rendered on a page. If you want two different versions of the theme one that needs bread crumb and other that does not then you can create a theme policy with isBreadCrumbRequired flag create two different theme policies one with value of this flag true and other with value equal to false and apply that policy correspondingly. You will also have to change your theme implementation i.e. jsp or .jspf pages so that it reads value of isBreadCrumbRequired flag from the ThemePolicy on the page and uses it display or hide bread crumb.

IBM's Server side as well as client side aggregation theme makes heavy use of Theme Policies. And portal ships ten different policies that you can use with IBM theme to control there look and feel

You can create a policy file using either the Theme Customizer portlet or open the existing theme policy in notepad modify it and import it into portal using XMLAccess.

You can apply theme policy to portlet using two options
XML Configuration Interface: Using the page metadata attribute com.ibm.portal.ThemePolicy
Properties Portlet: You can choose the Theme policy that you want to apply to the page from the Theme Style select box.
Theme policy is inherited so it only needs to be set on a page which requires a different policy than its parent.

A theme policy is made up of several attributes. Each attribute controls one aspect of the theme. For example, the Boolean renderBreadCrumb attribute controls whether the bread crumb will be displayed while the breadCrumbMaxLevels attribute controls the number of steps listed in the bread crumb when it is displayed.

You can look at all the theme policies that are installed on your server by exporting them using this xmlaccess script

<?xml version="1.0" encoding="UTF-8"?>
<request xsi:noNamespaceSchemaLocation="PortalConfig_1.4.xsd"
create-oids="true" type="export"
xmlns:xsi="http://www.w3.org/2001/XMLSchema-instance">

<portal action="locate">
<policy-node action="export" label="WebPage"
type="theme" path="">
<url>file:///c:/temp/exportThemePolicies.xml</url>
</policy-node>
</portal>
</request>

All the theme policies will be exported into c:/temp/exportThemePolicies.xml file.