Developing JPA application for use in WebSphere

In the Developing JPA application for use in Java SE entry i blogged about how to develop a simple JPA application using RAD and execute it outside the application server. But the more common use case for JPA would be how to use it inside Application Server.

I wanted to learn how to develop an JPA application that runs inside WebSphere Application Server so i build this simple HelloJPA1Portlet application which is essentially same as that of the HelloJPA1 application that i built in the In the Developing JPA application for use in Java SE , with difference that this one runs inside in application container.

Follow these steps to add support for JPA inside a portlet

  1. First create a HelloJPA1Portlet in RAD and deploy it in the WPS 7.0. Once the basic thing is working you can right click on the project and click on Properties. Select Project Facets like this

    Select JPA and version 1.0

  2. Next configure a JDBC Datasource connecting to the same database that we used in the last project and use jdbc/hellojpa as the JNDI name for the data source make sure the database actually works


  3. Follow the same steps that i mentioned in Developing JPA application for use in Java SE for generating entities accessing Customer table or you might want to simply copy the code from there.

  4. One step that is different is change persistence.xml to use the data source configured at jdbc/hellojpa JNDI location instead of directly connecting to database. You can do that by right clicking on project and then selecting JPA Tools -< Configure project for JDBC Deployment


    As you can see i am using the JNDI name of the data source instead of database properties

  5. When you click on the Finish button, your persistence.xml file will get updated to look like this

    <?xml version="1.0" encoding="UTF-8"?>
    <persistence version="1.0" xmlns="http://java.sun.com/xml/ns/persistence"
    xmlns:xsi="http://www.w3.org/2001/XMLSchema-instance"
    xsi:schemaLocation="http://java.sun.com/xml/ns/persistence
    http://java.sun.com/xml/ns/persistence/persistence_1_0.xsd">
    <persistence-unit name="HelloJPA1" >
    <jta-data-source>jdbc/hellojpa</jta-data-source>
    <class>com.webspherenotes.jpa.Customer</class>
    <properties>
    <property name="openjpa.jdbc.Schema" value="ADMIN"/>
    </properties>
    </persistence-unit>
    </persistence>


  6. Your portlet code would be same as that of the standalone client like this

    package com.webspherenotes.jpa;

    import java.io.*;
    import java.util.List;

    import javax.persistence.EntityManagerFactory;
    import javax.persistence.Persistence;
    import javax.portlet.*;

    import com.webspherenotes.jpa.controller.CustomerManager;

    /**
    * A sample portlet
    */
    public class HelloJPA1Portlet extends javax.portlet.GenericPortlet {
    /**
    * @see javax.portlet.Portlet#init()
    */
    public void init() throws PortletException{
    super.init();
    }

    /**
    * Serve up the view mode.
    *
    * @see javax.portlet.GenericPortlet#doView(javax.portlet.RenderRequest,
    javax.portlet.RenderResponse)
    */
    public void doView(RenderRequest request, RenderResponse response)
    throws PortletException, IOException {
    // Set the MIME type for the render response
    response.setContentType(request.getResponseContentType());

    EntityManagerFactory entityManagerFactory = Persistence
    .createEntityManagerFactory("HelloJPA1");
    CustomerManager manager = new CustomerManager(entityManagerFactory);

    List customerList = manager.getCustomers();
    for(Customer c : customerList){
    System.out.println(c);
    }

    super.getPortletContext().getRequestDispatcher("/index.jsp").include(request, response);

    }
    }


Now when you try to access the portlet you should be able to see list of customers being printed in the SystemOut.log file

Developing JPA application for use in Java SE

These are the steps that i followed to create a JPA project using Rational Application Developer 8.0 and executing it. I am executing this project outside application server. In the next entry i will blog about how to use JPA in J2EE application running inside the WebSphere Application Server.

I am assuming that you already have a CUSTOMER table in your database and now you want to use JPA to work with that table. If you dont have Customer table you can use this DDL to create it

CREATE TABLE CUSTOMER (
CUST_ID INTEGER NOT NULL ,
FIRST_NAME VARCHAR(50) NOT NULL,
LAST_NAME VARCHAR(50),
STREET VARCHAR(50),
APPT VARCHAR(20),
CITY VARCHAR(25),
ZIP_CODE VARCHAR(10) NOT NULL,
CUST_TYPE VARCHAR(10) NOT NULL ,
WEBSITE VARCHAR(100),
LAST_UPDATED_TIME TIMESTAMP
);


ALTER TABLE CUSTOMER ADD CONSTRAINT CUSTOMER_PK Primary Key (CUST_ID);

Follow these steps to create JPA project and execute it.

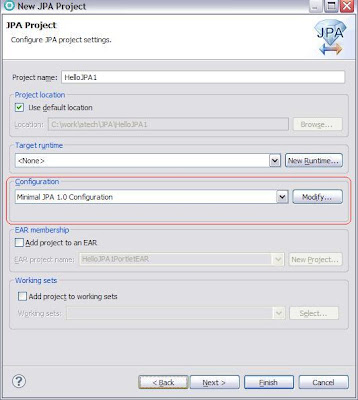
  1. Open RAD and click on Create new Project -< JPA -< JPA Project. On the next screen enter HelloJPA as project name and click on next next. Make sure to select value of Configuration to Minimal JPA 1.0 Configuration


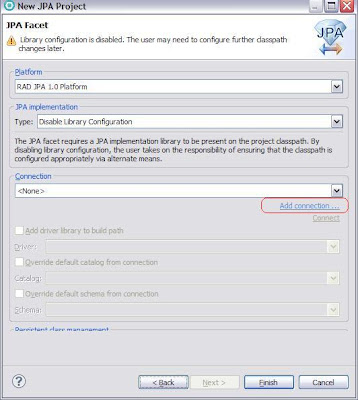
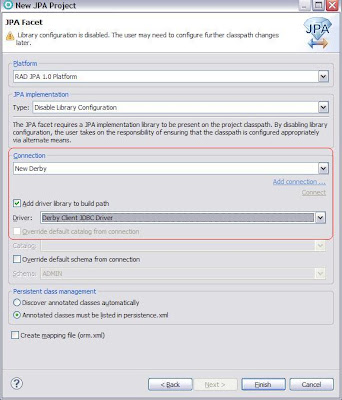
  2. Next on the JPA Facet dialog box, you can select the existing database connection that you have in RAD. In my case i dont have the connection to the Apache Derby Sample database configured so i need to click on Add Connection


  3. Use the steps provided in Accessing Database using Eclipse/ Rational Application Developer for configuring connection to the database

  4. Once your database connection is configured it will bring you back to the Create JPA Project screen like this, In my case name of the connection that i just configured is "New Connection"


  5. With this your JPA project will be ready, the project generated by RAD does not have anything but the persistence.xml.

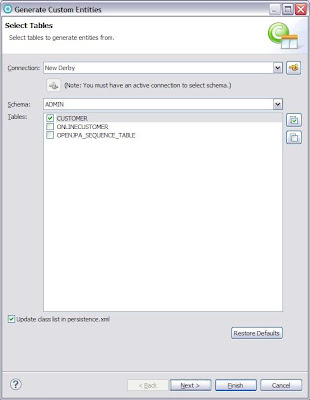
  6. In my case i already have a database table that i want to interact with. Now i want to generate JPA code for working with project. So right click on the project and click on JPA Tools -< Generate Entities from table. It will open a dialog box like this. As you can see the New Connection is selected in the Connection select box and you can see the tables in that database. I am only interested in CUSTOMER table so select it.


  7. On the next screen it will ask you few more options for generating entity. Change value of Key Generation to auto and change package name to com.webspherenotes.jpa and click next


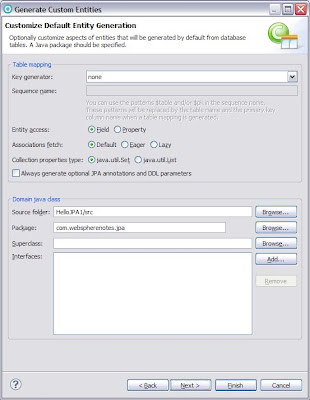
  8. In the last screen it will ask you for some information related to customer table things like what should be name of the entity class,.. Keep default values like this


  9. If you look at the HelloJPA project you will notice that RAD has generated a Customer.java class which is entity class (Java object representing Customer table) like this

    'package com.webspherenotes.jpa;

    import java.io.Serializable;
    import javax.persistence.*;
    import java.sql.Timestamp;

    /**
    * The persistent class for the CUSTOMER database table.
    *
    */
    @Entity
    public class Customer implements Serializable {
    private static final long serialVersionUID = 1L;

    @Id
    @GeneratedValue(strategy = GenerationType.AUTO)
    @Column(name = "CUST_ID")
    private int custId;

    private String appt;

    private String city;

    @Column(name = "CUST_TYPE")
    private String custType;

    @Column(name = "FIRST_NAME")
    private String firstName;

    @Column(name = "LAST_NAME")
    private String lastName;

    @Column(name = "LAST_UPDATED_TIME")
    private Timestamp lastUpdatedTime;

    private String street;

    private String website;

    @Column(name = "ZIP_CODE")
    private String zipCode;

    public Customer() {
    }

    public int getCustId() {
    return this.custId;
    }

    public void setCustId(int custId) {
    this.custId = custId;
    }

    public String getAppt() {
    return this.appt;
    }

    public void setAppt(String appt) {
    this.appt = appt;
    }

    public String getCity() {
    return this.city;
    }

    public void setCity(String city) {
    this.city = city;
    }

    public String getCustType() {
    return this.custType;
    }

    public void setCustType(String custType) {
    this.custType = custType;
    }

    public String getFirstName() {
    return this.firstName;
    }

    public void setFirstName(String firstName) {
    this.firstName = firstName;
    }

    public String getLastName() {
    return this.lastName;
    }

    public void setLastName(String lastName) {
    this.lastName = lastName;
    }

    public Timestamp getLastUpdatedTime() {
    return this.lastUpdatedTime;
    }

    public void setLastUpdatedTime(Timestamp lastUpdatedTime) {
    this.lastUpdatedTime = lastUpdatedTime;
    }

    public String getStreet() {
    return this.street;
    }

    public void setStreet(String street) {
    this.street = street;
    }

    public String getWebsite() {
    return this.website;
    }

    public void setWebsite(String website) {
    this.website = website;
    }

    public String getZipCode() {
    return this.zipCode;
    }

    public void setZipCode(String zipCode) {
    this.zipCode = zipCode;
    }

    public String toString() {
    StringBuffer sb = new StringBuffer();
    sb.append("custId : " + custId);
    sb.append(" First Name : " + firstName);
    sb.append(" Last Name : " + lastName);
    sb.append(" customer type : " + custType);

    return sb.toString();
    }
    }

    I copied the toString() method. You can also get RAD to generate the toString() method for you

  10. Now next step will be to configure database connection properties. For that right click on the HelloJPA project say JPA tools -< Configure Project for JDBC Deployment and select "Set Connection Directly Via properties" radio box. This will copy the connection properties that you used for connecting to DB inside your persistence.xml file like this

    <?xml version="1.0" encoding="UTF-8"?>
    <persistence version="1.0" xmlns="http://java.sun.com/xml/ns/persistence"
    xmlns:xsi="http://www.w3.org/2001/XMLSchema-instance"
    xsi:schemaLocation="http://java.sun.com/xml/ns/persistence
    http://java.sun.com/xml/ns/persistence/persistence_1_0.xsd">
    <persistence-unit name="HelloJPA1">
    <class>com.webspherenotes.jpa.Customer</class>
    <properties>
    <property name="openjpa.ConnectionDriverName"
    value="org.apache.derby.jdbc.ClientDriver"/>
    <property name="openjpa.ConnectionURL"
    value="jdbc:derby://localhost:1527/C:/work/webspherenotes/db;create=true"/>
    <property name="openjpa.ConnectionUserName" value="admin"/>
    <property name="openjpa.ConnectionPassword" value="admin"/>
    </properties>
    </persistence-unit>
    </persistence>


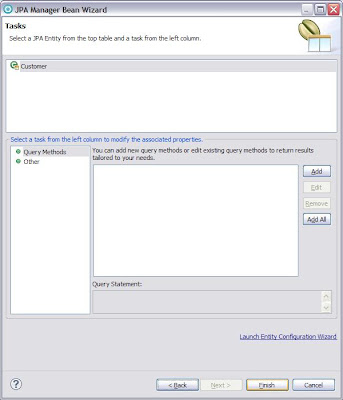
  11. Now your JPA code is ready you can use it directly. But you can also ask RAD to create Managed Bean which will generate basic JPA methods for performing CRUD operation on the table. FOr that right click on the HelloJPA project -< JPA Tools -< Add JPA Managed Beans it will open a screen like this

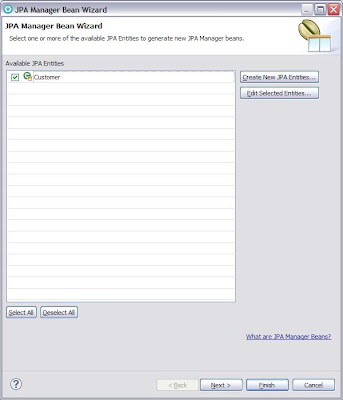
    This list the entities in your project. In my case i have only Customer table so select that and click on next.

  12. Here it will allow you to create few more methods like this


  13. Once you click on finish the RAD will generate CustomerManager.java class like this

    package com.webspherenotes.jpa.controller;

    import java.util.List;

    import com.ibm.jpa.web.JPAManager;
    import javax.persistence.EntityManager;
    import javax.persistence.EntityManagerFactory;
    import javax.persistence.Query;

    import com.ibm.jpa.web.Action;
    import com.webspherenotes.jpa.Customer;

    @SuppressWarnings("unchecked")
    @JPAManager(targetEntity = com.webspherenotes.jpa.Customer.class)
    public class CustomerManager {

    private EntityManagerFactory emf;

    public CustomerManager() {

    }

    public CustomerManager(EntityManagerFactory emf) {
    this.emf = emf;
    }

    public void setEntityManagerFactory(EntityManagerFactory emf) {
    this.emf = emf;
    }

    private EntityManager getEntityManager() {
    if (emf == null) {
    throw new RuntimeException(
    "The EntityManagerFactory is null.
    This must be passed in to the constructor or
    set using the setEntityManagerFactory() method.");
    }
    return emf.createEntityManager();
    }

    @Action(Action.ACTION_TYPE.CREATE)
    public String createCustomer(Customer customer) throws Exception {
    EntityManager em = getEntityManager();
    try {
    em.getTransaction().begin();
    em.persist(customer);
    em.getTransaction().commit();
    } catch (Exception ex) {
    try {
    if (em.getTransaction().isActive()) {
    em.getTransaction().rollback();
    }
    } catch (Exception e) {
    ex.printStackTrace();
    throw e;
    }
    throw ex;
    } finally {
    em.close();
    }
    return "";
    }

    @Action(Action.ACTION_TYPE.DELETE)
    public String deleteCustomer(Customer customer) throws Exception {
    EntityManager em = getEntityManager();
    try {
    em.getTransaction().begin();
    customer = em.merge(customer);
    em.remove(customer);
    em.getTransaction().commit();
    } catch (Exception ex) {
    try {
    if (em.getTransaction().isActive()) {
    em.getTransaction().rollback();
    }
    } catch (Exception e) {
    ex.printStackTrace();
    throw e;
    }
    throw ex;
    } finally {
    em.close();
    }
    return "";
    }

    @Action(Action.ACTION_TYPE.UPDATE)
    public String updateCustomer(Customer customer) throws Exception {
    EntityManager em = getEntityManager();
    try {
    em.getTransaction().begin();
    customer = em.merge(customer);
    em.getTransaction().commit();
    } catch (Exception ex) {
    try {
    if (em.getTransaction().isActive()) {
    em.getTransaction().rollback();
    }
    } catch (Exception e) {
    ex.printStackTrace();
    throw e;
    }
    throw ex;
    } finally {
    em.close();
    }
    return "";
    }

    @Action(Action.ACTION_TYPE.FIND)
    public Customer findCustomerByCustId(int custId) {
    Customer customer = null;
    EntityManager em = getEntityManager();
    try {
    customer = (Customer) em.find(Customer.class, custId);
    } finally {
    em.close();
    }
    return customer;
    }

    public List getAllCustomers(){
    List customerList = null;
    EntityManager em = getEntityManager();
    try {
    Query q= em.createQuery("SELECT x from Customer x");
    customerList =(List)q.getResultList();
    System.out.println(customerList.size());
    } finally {
    em.close();
    }
    return customerList;
    }

    @Action(Action.ACTION_TYPE.NEW)
    public Customer getNewCustomer() {

    Customer customer = new Customer();

    return customer;
    }

    }


  14. Now you want to create your own class to test your JPA configuration so create a CustomerTest.java class like this

    package com.webspherenotes.jpa;

    import java.util.List;

    import javax.persistence.EntityManagerFactory;
    import javax.persistence.Persistence;

    import com.webspherenotes.jpa.controller.CustomerManager;

    public class CustomerTest {

    /**
    * @param args
    */
    public static void main(String[] args) {
    try {
    EntityManagerFactory entityManagerFactory = Persistence
    .createEntityManagerFactory("HelloJPA1");

    CustomerManager manager = new CustomerManager(entityManagerFactory);
    Customer customer = new Customer();
    customer.setFirstName("James");
    customer.setLastName("Bond");
    customer.setStreet("845 JB Ave");
    customer.setAppt("153");
    customer.setCity("JBCity");
    customer.setZipCode("007");
    customer.setCustType("test");
    customer.setWebsite("http://www.webspherenotes.com");
    manager.createCustomer(customer);

    System.out.println("Customer with id 1 " + manager.findCustomerByCustId(0));

    } catch (Exception e) {
    e.printStackTrace();
    }

    }

    }

    In this class i am using JPA code to get the EntityManagerFactory but after that i am delegating control to CustomerManager for creating new record in CUSTOMER table

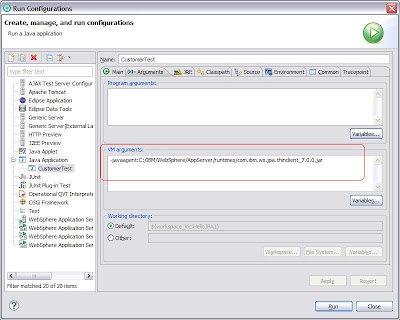
  15. Since we want to execute this code outside application server we will have to make one change, At the runtime you will have to make one configuration change which is to set the value of javaagent to the JPA implementation provided by WebSphere Application server like this
    -javaagent:C:/IBM/WebSphere/AppServer/runtimes/com.ibm.ws.jpa.thinclient_7.0.0.jar


Java Persisence API in WebSphere

Starting from J2EE 5, the Java Persistence API is part of the J2EE specification. The basic idea is you develop data access application by creating POJO classes like Hibernate and then the container specific implementation takes care of interacting with the database.

The WebSphere Application Server V7.0 has support for JPA (I believe JPA 1.0) and i remember reading that WebSphere Application Server V8.0 supports JPA 2.0 and also provides second level caching. Since IBM will provide as well as support JPA i think WebSphere customer's might move towards it so i started spending some time learning about it and i am planning to blog about my experiences with JPA

The Rational Application Developer has support for developing JPA applications. You can execute JPA applications both inside and outside the container.


Uploading file to particular directory

You can configure the File Upload support in servlet specification 3.0 so that it uploads files to particular directory on your server.


package com.webspherenotes.j2ee6.servlet;

import java.io.BufferedReader;
import java.io.IOException;
import java.io.InputStreamReader;
import java.util.Collection;
import java.util.Iterator;

import javax.servlet.ServletException;
import javax.servlet.annotation.MultipartConfig;
import javax.servlet.annotation.WebServlet;
import javax.servlet.http.HttpServlet;
import javax.servlet.http.HttpServletRequest;
import javax.servlet.http.HttpServletResponse;
import javax.servlet.http.Part;

/**
* Servlet implementation class HelloFileUploadAnnotationServlet
*/
@WebServlet("/hellofileupload")
@MultipartConfig(location="c:/temp/upload")
public class HelloFileUploadAnnotationServlet extends HttpServlet {
private static final long serialVersionUID = 1L;


protected void doPost(HttpServletRequest request, HttpServletResponse response)
throws ServletException, IOException {
System.out.println("Entering HelloFileUploadAnnotationServlet.doPost()");
response.setContentType("text/html");
response.getWriter().println("Hello from FileUploadServlet");
Collection fileParts = request.getParts();
Iterator filePartIt = fileParts.iterator();
while(filePartIt.hasNext()){
Part filePart = filePartIt.next();
System.out.println("File Name " + filePart.getName());
System.out.println("File Size " + filePart.getSize());

System.out.println("File Content ");
BufferedReader fileReader =
new BufferedReader(new InputStreamReader(filePart.getInputStream()));
String line = null;
while(( line = fileReader.readLine()) != null){
System.out.println(line);
}
}
System.out.println("Exiting HelloFileUploadAnnotationServlet.doPost()");
}

}


In my case i am setting value of location to c:/temp/upload and then i tried uploading couple of files and now i can see that every time i upload a file a .tmp file gets created in c:/temp/upload

Setting limit on filesize to be uploaded

When your handling the file upload you might want to set limit on the file size that can be uploaded you can do that by setting value of maxFileSize. The value of maxFileSize is in bytes,

@WebServlet("/hellofileupload")
@MultipartConfig(maxFileSize=1000 )
public class HelloFileUploadAnnotationServlet extends HttpServlet {
private static final long serialVersionUID = 1L;


protected void doPost(HttpServletRequest request, HttpServletResponse response)
throws ServletException, IOException {
System.out.println("Entering HelloFileUploadAnnotationServlet.doPost()");
response.setContentType("text/html");
response.getWriter().println("Hello from FileUploadServlet");
Collection fileParts = request.getParts();
Iterator filePartIt = fileParts.iterator();
while(filePartIt.hasNext()){
Part filePart = filePartIt.next();
System.out.println("File Name " + filePart.getName());
System.out.println("File Size " + filePart.getSize());

System.out.println("File Content ");
BufferedReader fileReader =
new BufferedReader(new InputStreamReader(filePart.getInputStream()));
String line = null;
while(( line = fileReader.readLine()) != null){
System.out.println(line);
}
}
System.out.println("Exiting HelloFileUploadAnnotationServlet.doPost()");
}

}


So in my sample application if i try to upload a file bigger than 1000 bytes it will throw a java.lang.IllegalStateException exception like this

[12/19/10 20:24:23:765 PST] 00000019 servlet E com.ibm.ws.webcontainer.servlet.ServletWrapper service
SRVE0068E: An exception was thrown by one of the service methods of the servlet [com.webspherenotes.j2ee6.servlet.HelloFileUploadAnnotationServlet]
in application [HelloServletAnnotationEAR]. Exception created : [java.lang.IllegalStateException:
SRVE8021E: The file being uploaded is too large.
at com.ibm.ws.webcontainer.srt.SRTServletRequest.parseMultipart(SRTServletRequest.java:3504)
at com.ibm.ws.webcontainer.srt.SRTServletRequest.prepareMultipart(SRTServletRequest.java:3413)
at com.ibm.ws.webcontainer.srt.SRTServletRequest.getParts(SRTServletRequest.java:3394)
at com.webspherenotes.j2ee6.servlet.HelloFileUploadAnnotationServlet.doPost(HelloFileUploadAnnotationServlet.java:31)
at javax.servlet.http.HttpServlet.service(HttpServlet.java:595)
at javax.servlet.http.HttpServlet.service(HttpServlet.java:668)
at com.ibm.ws.webcontainer.servlet.ServletWrapper.service(ServletWrapper.java:1133)
at com.ibm.ws.webcontainer.servlet.ServletWrapper.handleRequest(ServletWrapper.java:708)
at com.ibm.ws.webcontainer.servlet.ServletWrapper.handleRequest(ServletWrapper.java:435)
at com.ibm.ws.webcontainer.servlet.ServletWrapperImpl.handleRequest(ServletWrapperImpl.java:178)
at com.ibm.ws.webcontainer.filter.WebAppFilterManager.invokeFilters(WebAppFilterManager.java:1012)
at com.ibm.ws.webcontainer.webapp.WebApp.handleRequest(WebApp.java:3598)
at com.ibm.ws.webcontainer.webapp.WebGroup.handleRequest(WebGroup.java:303)
at com.ibm.ws.webcontainer.WebContainer.handleRequest(WebContainer.java:950)
at com.ibm.ws.webcontainer.WSWebContainer.handleRequest(WSWebContainer.java:1624)
at com.ibm.ws.webcontainer.channel.WCChannelLink.ready(WCChannelLink.java:197)
at com.ibm.ws.http.channel.inbound.impl.HttpInboundLink.handleDiscrimination(HttpInboundLink.java:445)
at com.ibm.ws.http.channel.inbound.impl.HttpInboundLink.handleNewRequest(HttpInboundLink.java:504)
at com.ibm.ws.http.channel.inbound.impl.HttpInboundLink.processRequest(HttpInboundLink.java:301)
at com.ibm.ws.http.channel.inbound.impl.HttpInboundLink.ready(HttpInboundLink.java:275)
at com.ibm.ws.tcp.channel.impl.NewConnectionInitialReadCallback.sendToDiscriminators(NewConnectionInitialReadCallback.java:214)
at com.ibm.ws.tcp.channel.impl.NewConnectionInitialReadCallback.complete(NewConnectionInitialReadCallback.java:113)
at com.ibm.ws.tcp.channel.impl.AioReadCompletionListener.futureCompleted(AioReadCompletionListener.java:165)
at com.ibm.io.async.AbstractAsyncFuture.invokeCallback(AbstractAsyncFuture.java:217)
at com.ibm.io.async.AsyncChannelFuture.fireCompletionActions(AsyncChannelFuture.java:161)
at com.ibm.io.async.AsyncFuture.completed(AsyncFuture.java:138)
at com.ibm.io.async.ResultHandler.complete(ResultHandler.java:204)
at com.ibm.io.async.ResultHandler.runEventProcessingLoop(ResultHandler.java:775)
at com.ibm.io.async.ResultHandler$2.run(ResultHandler.java:905)
at com.ibm.ws.util.ThreadPool$Worker.run(ThreadPool.java:1618)
]

Handling file upload in Servlet 3.0

Ability to handle file upload is one of the common requirements for web application. Before Servlet Specification 3.0 if you wanted to handle file upload you would have to use external library such as Apache Commons File upload to handle the file upload.

But starting from Servlet Specification 3.0 you dont need external library instead there is a native support. I wanted to try this so i followed these steps


  1. First i did create a index.jsp file like this

    <!DOCTYPE HTML PUBLIC "-//W3C//DTD HTML 4.01 Transitional//EN">
    <%@page
    language="java" contentType="text/html; charset=ISO-8859-1"
    pageEncoding="ISO-8859-1"%>
    <html>
    <head>
    <title>index</title>
    <meta http-equiv="Content-Type" content="text/html; charset=ISO-8859-1">
    </head>
    <body>
    <form action="hellofileupload" method="post" enctype="multipart/form-data" >
    <table>
    <tr>
    <td>File</td>
    <td><input type="file" name="samplefile" /></td>
    </tr>
    <tr><td><input type="submit"></td></tr>
    </table>
    </form>

    </body>
    </html>


    If you want to upload a file to the server you will have to set form encoding type to multipart/form-data. The index.jsp will submit form to the hellofileupload url and thats where our HelloFileUploadAnnotationServlet will come in

  2. Next create a HelloFileUploadAnnotationServlet like this

    package com.webspherenotes.j2ee6.servlet;

    import java.io.BufferedReader;
    import java.io.IOException;
    import java.io.InputStreamReader;
    import java.util.Collection;
    import java.util.Iterator;

    import javax.servlet.ServletException;
    import javax.servlet.annotation.MultipartConfig;
    import javax.servlet.annotation.WebServlet;
    import javax.servlet.http.HttpServlet;
    import javax.servlet.http.HttpServletRequest;
    import javax.servlet.http.HttpServletResponse;
    import javax.servlet.http.Part;

    /**
    * Servlet implementation class HelloFileUploadAnnotationServlet
    */
    @WebServlet("/hellofileupload")
    @MultipartConfig
    public class HelloFileUploadAnnotationServlet extends HttpServlet {
    private static final long serialVersionUID = 1L;


    protected void doPost(HttpServletRequest request, HttpServletResponse response)
    throws ServletException, IOException {
    System.out.println("Entering HelloFileUploadAnnotationServlet.doPost()");
    response.setContentType("text/html");
    response.getWriter().println("Hello from FileUploadServlet");
    Collection fileParts = request.getParts();
    Iterator filePartIt = fileParts.iterator();
    while(filePartIt.hasNext()){
    Part filePart = filePartIt.next();
    System.out.println("File Name " + filePart.getName());
    System.out.println("File Size " + filePart.getSize());

    System.out.println("File Content ");
    BufferedReader fileReader =
    new BufferedReader(new InputStreamReader(filePart.getInputStream()));
    String line = null;
    while(( line = fileReader.readLine()) != null){
    System.out.println(line);
    }
    }

    System.out.println("Exiting HelloFileUploadAnnotationServlet.doPost()");
    }
    }

    In order to use the file upload first you will have to mark the Servlet using MultipartConfig annotation, indicating that instances of the Servlet expect requests that conform to the multipart/form-data MIME type.
    Then inside the doPost() method you can use the method of HttpServletRequest to get access to the uploaded file.

Whats new in Servlet Specification 3.0

The Servlet Specification 3.0 has lot of new features such as


  1. Annotations

  2. Web Fragments

  3. Defining new servlet/filter using ServletContext API

  4. Async Servlet support


I want to try some of the features and i am planning to blog about them

Create profile in WAS 8 (Problem in creating profile as part of installation )

In the How to install WebSphere Application Server 8.0 Beta entry i blogged about the steps to install WebSphere Application Server 8.0 beta. On the last page of the WAS 8 installation wizard it asks you to create profile and it can launch profile creating wizard for you. I did select "Profile management tool to create an application server profile for development environment", but that profile management tool never came up. So i had to follow these steps to create application server profile


  • I went to the "\WebSphere\AppServer\bin\ProfileManagement" directory and executed the PMT.exe tool to start the profile management tool


  • On the next screen select Profile Management Tool and click on Launch tool and it will show you a profiles dialog box like this


  • On this dialog box click on Create button to get Create profile dialog box like this select Application Server as profile and click on Next button and follow next few screens to finish the creation of wizard


How to install WebSphere Application Server 8.0 Beta

It seems that there are quite a few new features in Java EE 5 and Java EE 6 and i wanted to start trying some of them. So i decided to install WebSphere Application Server 8 -Beta, which implements Java EE 6, in addition to many new IBM specific features. These are the steps that i used to install WAS 8 on my machine

  • Download WAS 8.0 Beta installable from IBM WebSite.I had to download 3 .zip from IBM website

  • After downloading the .zip file i did extract them in the same folder. I could see following folder structure


  • After unzipping the files i tried searching for launchpad.exe/setup.exe in all the three folders but i could not find it, so it took me some time to figure out that the procedure for installing the WAS 8.0 is changed. Now we have to use the Installation Manager(Same component that we use for installing Rational Application Developer) for installing the product using GUI

  • Since i use Rational Application Developer 8.0 on my machine i do have the installation manager for it. I decided to use the same installation manager. If you dont have the installation manager already on your machine, you can download it as part of WAS 8.0 installable

  • After starting the IBM Installation Manager and on the first screen click on Install button


  • Since the Installation Manager does not know about the location of your WAS 8 repository, it will open a screen like this, click on the Repository link


  • It will open a Repository preference dialog box like this


  • On this dialog box click "Add Repository" button, it will open a Add a Repository dialog box, use this to select the repository.config file that you unzipped from the WAS 8 installable like this and click Ok


  • Once the new repository is configured Installation Manager will show you WebSphere Application Server 8.0 as installation package, select it and click on Next to start the installation wizard

  • Go through the wizard and at the end select the packages that you want to install like this


The installation manager will take few minutes and once the installation is done it will show a dialog box for creating profile like this

Test LOT-915: IBM WebSphere Portal 7.0 Solution Development

Architecting a Portal Solution


  • Demonstrate familiarity with WebSphere Portal Web 2.0 features

  • Demonstrate knowledge of WebSphere Portal Platform features

  • Identify supported portlet frameworks/APIs

  • Identifying scope for custom portlets

  • Understand communications between portlets and widgets

  • Understand how portal features and portlets use user identity to personalize

  • Understand patterns and methods for application integration with WebSphere Portal

  • Understand portal page aggregation modes

  • Use out-of-the-box portlets


Install, Setup and Configuration of a Developer Environment


  • Compile, packaging, and deploying portal artifacts using Rational Application Developer
  • Create portlets in Rational Application Developer

  • Diagnose problems with the development environment installation

  • Optimize the development environment


Portal Frameworks and Portlet Services


  • Apply the Tagging and rating SPI

  • Creating a custom Portlet Service

  • Develop Login, Logout, and Session validation filters

  • Understand key Service Programming (SPI) and Application Programming Interfaces (API) #Controller SPI

    #Login Service SPI
    #Portal Model SPI
    #Portal User Management SPI (PUMA)
    #Property Broker SPI
    #Resource Addressability Framework (SPI)
    #Step Up Authentication SPI

  • Use Remember Me API to provide anonymous portlet content personalization +Use REST protocol to access SPI's


Portlet Development


  • Create cooperative portlets using live text Click-2-Action and Event broker

  • Demonstrate knowledge of core Java Portlet Objects in the JSR 286 spec

  • Demonstrate the differences between, events, render parameters, public render parameters, and scoped attributes

  • Describe the portlet life cycle for JSR-286

  • Effectively use JSPs to render portlet markup

  • Have knowledge of WSRP for JSR-286 portlets

  • Identify supported portlet modes and custom portlet modes

  • Implement portlet actions and events with Java 5 annotations

  • Understand portlet descriptor files for each portlet type and utilize WebSphere Portal extend features

  • Understand the use of Standard Portlet APIs

  • Use AJAX to update state and trigger actions with JSR-286 portlets

  • Use the portlet client model

  • Utilize client profile information (JSR-188)

  • Utilize of standard portlet cascading style-sheet classes


Testing, Debugging and Performance Monitoring of Portlets


Theme Development


  • Create a custom layout template and adding it to the shelf

  • Create a new style and add it to the shelf

  • How to register an iWidget and use in the shelf

  • How to use client side logging and tracing

  • How to use the Context menu framework

  • How to use the DND configuration object and add a custom DND source

  • Understand OneUI basics

  • Understand the bootstrapping process

  • Understand the theme.html

  • Use Dynamic Content Spots in theme templates

  • Use the DecorationsManager and understand the creation of a skin.html template

  • Use the navigation widgets and understand how to extend that widget

  • Use WebDAV to create and update themes


Additional Development Concepts


  • Assembling Composite Application Templates

  • Creating custom portal search interfaces

  • Developing Personalization Resources

  • Have knowledge of Portlet Bridge Frameworks

  • Search the Business Solutions catalog

  • Use the collaborative API

  • Using and extending the Credential Vault

  • Using the widgets for blogs and wikis

  • Using Web Content Management API's

  • Writing Personalization and Visibility Rules

Test LOT-910: IBM WebSphere Portal 7.0 Deployment and Administration Update

Architecting a Portal Solution


  1. Planning security and authentication concept - using step-up authentication and remember me cookie

  2. Understand management implications of setting up wikis and blogs

  3. Understand management implications of tagging and rating

  4. Understand new installation and topology options

  5. Multiple profiles

  6. Portal farms

  7. Portal in the cloud environment

  8. VMWare support


Understand the differences and advantages between Client Side Aggregation (CSA) and Server Side Aggregation (SSA)


  1. Customization and Administration

  2. Understand Portal usage analysis capabilities

  3. Use Portal search

  4. Utilize tagging and rating

  5. Working with WebDAV


Installation and Configuration


  1. Configure Portal light mode

  2. Setup portal farms

  3. Setup/configure (options) for wikis and blogs

  4. Understand portal coexistence (mixed versions) and install options

  5. Understand improvements to the installation wizard and when to use the wizard instead of commands

  6. Understand new ConfigEngine Options

  7. Understand where files are located after installation ( e.g, theme files in a new location)


Integrating Your Business


  1. Configure mashup integration including Understand how iWidgets are added to a page

  2. Understand options for backend application integration (Unified task list portlet, for example)


Maintain and Monitor


  1. Understand changes/enhancements in site management


Migration and Other Concepts


  1. Understand how to leverage feeds using WebSphere Portal including Configuring a proxy environment for feed syndication

  2. Understand WebSphere Portal migration concepts


Portal Content


  1. Understand changes in Customized Web Content authoring (Configure the authoring portlet)

  2. Understand changes in working with Web Content Libraries (Import/Export)

  3. Understand uses of Web content integration (WCI)

  4. Understanding how tagging and rating interacts with WebSphere Content Management
    Utilize Authortime Search


Security


  1. Understand Impersonation


Troubleshooting and Serviceability


  1. Understand conditions for which Portal will use Client Side Aggregation

  2. Understand conditions for which Portal will use Server Side Aggregation

WebSphere Portal 7.0 Application Developer certification is out

I was checking the IBM's certification web site and it looks like the certifications for IBM WebSphere Portal 7.0 are out now. You can find the objectives for developer test at Test LOT-915: IBM WebSphere Portal 7.0 Solution Development


It seems that now if you want to be IBM Certified WebSphere Portal Administrator and you dont have Admin certification for 6.1 version then you will have to clear following two certifications


But if your already IBM Certified Administrator for 6.1 like me then you can take Test LOT-910: IBM WebSphere Portal 7.0 Deployment and Administration Update

I already have some information about some of the objectives, you can find it here