- First i stated my Android Emulator with my application running on it
- Once my application is launch on desktop i opened my Chrome browser and clicked on Tools -< Inspect Devices like this

-
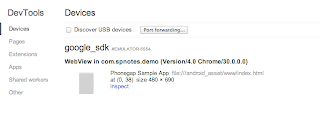
On the next tool it should display list of Devices available and here you should see name of the android emulator like this, click on inspect link
-
It opens a new window pointing to your PhoneGap page, you can use that screen for debugging, looking at console messages,... etc

Debugging Cordova/PhoneGap applications running on Android
Being able to debug your code is always a big help, I wanted to debug PhoneGap/Cordova application and i used the Google Chrome Developer tools that make it really easy to debug web application running on Android


Problems with Android LogCat
When i was working with Android application every now and then i was running into problem that logcat would not work. i.e. if i ran  For first few times i did restart my machine to get it working. But then i found this solution. In that you restart your adb by executing following 2 commands
 Make sure that you get daemon started successfully message, if not try stopping and starting adb again. Once your adb started, start emulator and then you should be able to execute
  Now if you run
adb logcat it would just seat there saying - waiting for devices - like this

adb kill-all
adb start-server

adb devices and it should show name of your emulator.

adb logcat command it should work
Changes required in serveResource to serve special characters
It seems that returning UTF-8 characters from characters from serveResource method requires some additional steps.
I created this sample portlet which returns some Chinese characters from both
It seems that in order to return valid response from
I created this sample portlet which returns some Chinese characters from both
doView() and serveResource() method. The content returned from doView() is ok, but the content returned by serveResource() returns garbage character
public void doView(RenderRequest request, RenderResponse response)
throws PortletException, IOException {
  // Set the MIME type for the render response
  response.setContentType("text/html; charset=UTF-8");
  response.getWriter().println("这是世界您好");
}

public void serveResource(ResourceRequest request,
  ResourceResponse response)
  throws PortletException, IOException {
    response.setContentType("text/html; charset=UTF-8");
    response.getWriter().println("这是世界您好");
}
It seems that in order to return valid response from
serveResource method we have to add some additional properties on the response
public void serveResource(ResourceRequest request, ResourceResponse response)
  throws PortletException, IOException {
  response.setContentType("text/html; charset=UTF-8");
  response.setCharacterEncoding("UTF-8");
  response.setProperty("Content-Type","text/html; charset=UTF-8");
  response.getWriter().println("这是世界您好");
}
Sending push notification to Android emulator
I wanted to try Push Notification on Android Emulator, so i followed these steps for setting it up. Basic idea is you need to use emulator with Google API as target and add google account in the emulator to get the Push Notification working. These are the steps for doing that

- First step is to open the Android SDK Manager and make sure that you have installed Google API, like this

- Next step is to create Android Virtual Device that uses Google API as Target like this

- After that start your Android Virtual device and go to the Settings section, in the settings section, click on Add Account and add your Google account like this

- Now your device is ready to accept the Android Push Notification, you will have to build Mobile Phone Application that supports push notification. In my case i used Urban Airship Getting started instructions to build application


Sending SMS to android simulator
Recently i was working on application that sends SMS to mobile device, I used Twillio for sending the SMS to real device but i wanted to test sending of SMS on Android simulator so i followed these steps

- First thing that i had to do was to start the Android emulator
- Once the emulator was started connect to it on telnet by executing
telnet localhost 5554command - Then on the telnet send it command to send sms using following syntax
sms send <senderphoneno> <SMS text>


Maven script for deploying project to Apache Tomcat on Amazon EC2
In the Deploying web application on remote tomcat post i listed steps for creating maven script that can install web application on remote Apache Tomcat. You could use the same concept to deploy web applications to Apache Tomcat running on Amazon EC2, by following these steps
-
First change the tomcat-users.xml to add tomcatadmin user and give him manager-gui and manager-script roles
<?xml version='1.0' encoding='utf-8'?> <tomcat-users> <role rolename="tomcat"/> <role rolename="manager-gui"/> <role rolename="manager-script"/> <user username="tomcatadmin" password="tomcatadmin" roles="tomcat,manager-gui,manager-script"/> <user username="both" password="tomcat" roles="tomcat"/> <user username="role1" password="tomcat" roles="role1"/> </tomcat-users> -
Next change your <MVN_HOME>/settings.xml file to add
AWSServerserver with tomcatadmin as username passowrd, you shoudl use the user id password that you set in your tomcat-users.xml file here<server> <id>AWSServer</id> <username>tomcatadmin</username> <password>tomcatadmin</password> </server> -
Last step is to add following plugin to you pom.xml, in this value of url will be the ec2 instance DNS name and the value of server would be equal to id of server you set in settings.xml
<plugin> <groupId>org.codehaus.mojo</groupId> <artifactId>tomcat-maven-plugin</artifactId> <configuration> <url>http://ec2-54-84-128-249.compute-1.amazonaws.com:8080/manager/text</url> <server>AWSServer</server> <path>/simplewebapp</path> </configuration> </plugin> - Now execute
mvn tomcat:redeployto deploy your code to tomcat
Install Apache Tomcat on Amazon EC2
Recently i wanted to install Apache Tomcat on my Amazon EC2 instance, i used Amazon Linux AMI for creating my Amazon Instance. Once the instance was started i had to
- While creating instance i checked the security group associated withe instance and changed it to add Custom TCP port 8080 in it. Its equivalent to opening 8080 port in firewall of your instance

-
Once the instance was started, first thing that i did was to update yum by executing
sudo yum update - Next i typed
yum list tomcat*command first to see what all tomcat packages are available for install and then i did executesudo yum install tomcat7-webapp tomcat7-admin-webappto install tomcat with deployer installed on it
- The yum installer takes care of installing Apache Tomcat and it creates a service that you can use for starting and stopping tomcat
To start tomcat
sudo service tomcat7 start

To stop tomcat
sudo service tomcat7 stop


- /usr/share/tomcat7: This is the directory where your tomcat is installed
- /var/log/tomcat7: This is the directory where all your log files go. This folder is link to <TOMCAT_HOME>/logs
- /etc/tomcat7:This is the directory where you can find content of your <TOMCAT_HOME>/conf directory
HelloWorld - Apache Storm Word Counter program
I wanted to learn Apache Storm so i started by creating this simple Hello World type Word counter program, the basic idea behind the program is it takes .txt file as input and passes it to LineReaderSpout.java, which reads the file one line at a time and passes it to Storm for further processing. Storm will pass each line to WordSpitterBolt.java, this class is responsible for splitting the line into multiple words and passing them back to Storm for further processing, The last part is WordCounterBolt.java which takes each of the word and maintains a HashMap of words with their frequency count. At the end the WordCounetrBolt.java will print all the words to the console. You can download the project from here


- First download the Apache Storm binaries from storm-project.net. In my case i did download storm-0.9.0.1, extract the content onto your local directory
-
Create HelloStorm project in eclipse, add all .jar's in
<STORM_HOME>directory as well as all the jars from<STORM_HOME>/libdirectory, it should look like this
-
Now create LineReaderSpout.java like this, implement
IRichSpoutinterface The LineReaderSpout code has three important methods- open(): This method would get called at the start and will give you context information. You read value of
inputFileconfiguration variable and read that file - nextTuple(): This method would allow you to pass one tuple to storm for processing at a time, in this method i am just reading one line from file and pass it to tuple
- declareOutputFields(): This method declares that LineReaderSpout is going to emit line tuple
- open(): This method would get called at the start and will give you context information. You read value of
-
Next create WordSpitterBolt.java which implements
WordSpitterBoltinterface like this- prepare(): This method is similar to
open()method in LineReaderSpout, it allows you to initialize your code and get access toOutputCollectorobject for passing output back to Storm - declareOutputFields(): This method is similar to
declareOutputFields()method in LineReaderSpout, it declares that it is going to returnwordtuple for further processing - execute(): This is the method where you implement business logic of your bolt, in this case i am splitting the input line into words and passing them back to Storm for further processing
- prepare(): This method is similar to
-
Next create the WordCounterBolt.java which implements the
IRichBoltinterface like this The- prepare(): In this method i am creating a HashMap that would be used for maintaining list of words to their frequency count
- declareOutputFields(): This method is empty because we dont want to return any tuples for further processing
- execute(): This method takes care of building/maintaining a HashMap for counting the frequency of the words
- cleanup(): This method would be called at the end and we are using it to print all the words with their frequency
- The HelloStorm.java is the place where everything gets tied together, it specifies how the Spouts and Bolts are related to each other,.. etc
- Now execute the HelloStorm.java and pass it name of the text file that you want to count words in.

Deploying web application on remote tomcat
I have Apache Tomcat 7.0.50 installed on my local machine and i wanted to create a Maven script that would deploy the web application to the locally installed Tomcat after deployment, these are the steps that i followed, if you want you can download the demo application from here
- First i changed the <TOMCAT_HOME>/conf/tomcat-users.xml file to allow tomcat user to deploy web applications
- Next i had to change the <USER_HOME>/.m2/settings.xml file to add server declaration pointing to Tomcat, in my case user who has rights to deploy application is tomcat so i did enter tomcat as user name and password
-
Last step is to change the pom.xml to add
tomcat-maven-pluginplugin, this plugin takes URL of the tomcat server and the name of the server as defined in settings.xml (settings.xml has the actual username and password) as argument - Now you can run
mvn tomcat:deployormvn tomcat:redeploycommand to publish the web application to remote tomcat server
Creating File using Java on Mac
JDK 7 has support for setting File attributes when create a file, So i was testing that out. When i tried to create a file and set security attributes like this
Set perms = PosixFilePermissions.fromString("rwxrwxrw");
Exception in thread "main" java.lang.IllegalArgumentException: Invalid mode
 at java.nio.file.attribute.PosixFilePermissions.fromString(PosixFilePermissions.java:128)
 at com.test.HelloPaths.readWriteFiles(HelloPaths.java:55)
 at com.test.HelloPaths.main(HelloPaths.java:23)
Subscribe to:
Posts (Atom)