Using Ajax Proxy in the Connections

The Connections server has Ajax Proxy that you can use to make cross domain calls. In order to try the Ajax proxy i did create a iWidget that makes call to http://www.atech.com from the page http://wpconnections.atech.com/. In order to test iWidget i did add it to Connections HomePage. You can download the AjaxProxy iWidget from here

This is how my AjaxProxy.xml file the iWidget xml definition file looks like

<?xml version="1.0" encoding="UTF-8" ?>
<iw:iwidget id="AjaxProxy"
xmlns:xsi="http://www.w3.org/2001/XMLSchema-instance"
xmlns:iw="http://www.ibm.com/xmlns/prod/iWidget"
supportedModes="view" mode="view" lang="en" iScope="com.webspherenotes.ajaxproxy"
allowInstanceContent="true" >
<iw:resource uri="ajaxproxy.js" />
<iw:content mode="view">
<![CDATA[
<div>Ajax proxy</div>
<span id="replacecontent">Replace content</span>
]]>
</iw:content>
</iw:iwidget>


The ajaxproxy.xml declares ajaxproxy.js as a resource, which has all the JavaScript logic for the widget. The ajaxproxy widget displays a place holder div, replacecontent

This is how my ajaxproxy.js file looks like

dojo.provide("com.webspherenotes.ajaxproxy");
dojo.declare("com.webspherenotes.ajaxproxy", [], {
onview: function(){
console.log("Inside the onView function()");
var currContext = this.iContext;
try{
dojo.xhrPost({
url: "/homepage/web/proxy/http/www.atech.com",

load: function(data, ioargs){
currContext.getElementById("replacecontent").innerHTML = data;
console.log(data);
},
error: function(error,ioargs){
alert("Error :" + data);
}
});
}catch(error){
console.log("Error in the dojo.xhrPost " + error );
}
}
});


The onview() method of the ajaxproxy widget will get called to generate the VIEW mode markup, in this method i am making HTTP POST to /homepage/web/proxy/http/www.atech.com which actually means http://www.atech.com, once the response is back i will get control in the load() method and i am using the response to display markup in the widget, which looks like this


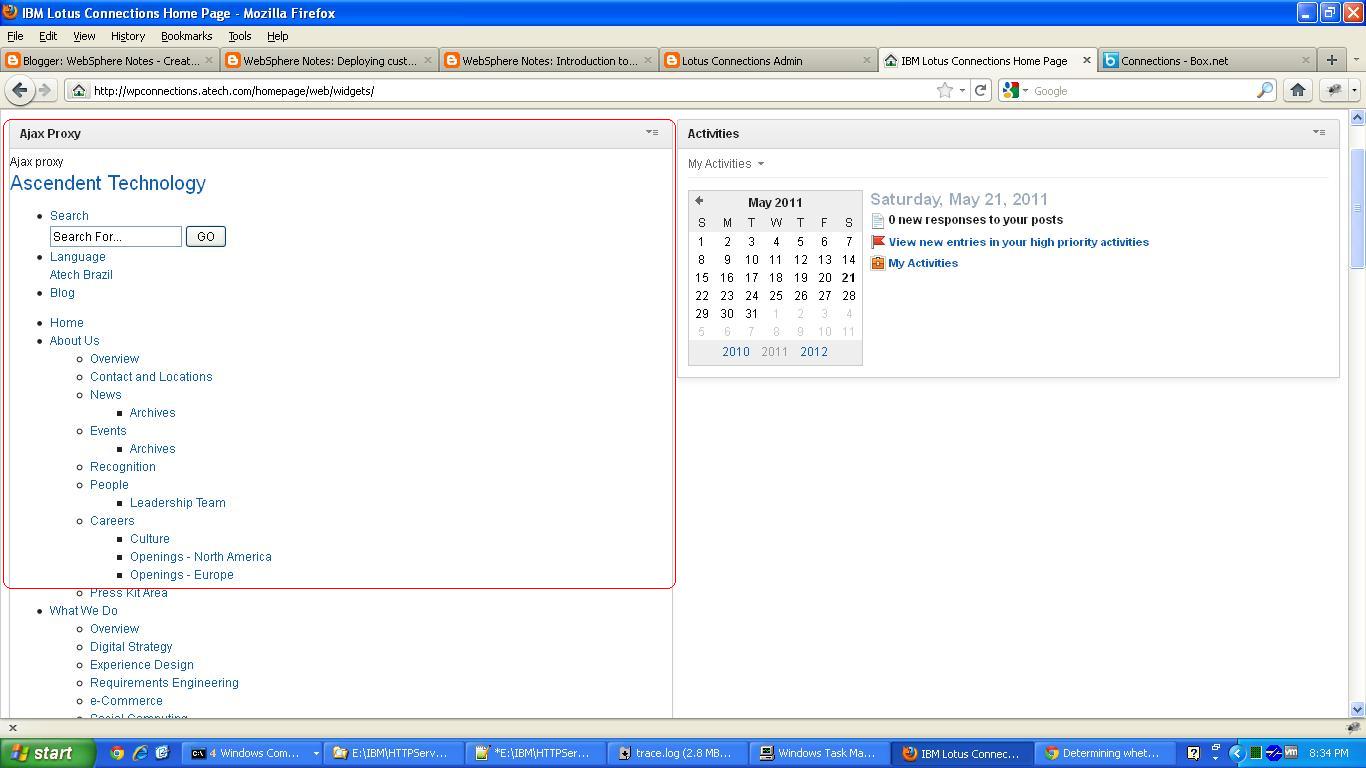
The markup looks unformatted because it does not include the necessary resources. When you deploy the widget on your server it will fail with 403 forbidden error at the time of making xhrPost() call unless your ajax proxy is configured to make POST request.

Troubleshooting Ajax Proxy

I was trying to configure the Ajax proxy in the Connections product but i ran into bunch of issues, so i had to figure out how to turn the trace for Ajax proxy by turning trace for com.ibm.ws.ajaxproxy.*=all but once i did i can see it does generate good trace like this.


[5/19/11 22:02:38:407 PDT] 00000087 ProxyServlet 3 com.ibm.ws.ajaxproxy.servlet.ProxyServlet service entering service(..)com.ibm.ws.ajaxproxy.servlet.ProxyServlet
[5/19/11 22:02:38:501 PDT] 00000087 ProxyServlet 3 com.ibm.ws.ajaxproxy.servlet.ProxyServlet service
com.ibm.ws.ajaxproxy.servlet.ProxyServlet service(..) Method:GET; URI:/homepage/web/proxy/ibm/us/en/sandbox/ver1/; QueryString:null; ContextPath:/homepage; ServletPath:/web/proxy; PathInfo:/ibm/us/en/sandbox/ver1/
[5/19/11 22:02:38:501 PDT] 00000087 ProxyServlet 3 com.ibm.ws.ajaxproxy.servlet.ProxyServlet service com.ibm.ws.ajaxproxy.servlet.ProxyServlet service(..) targetPath: http://www.ibm.com
[5/19/11 22:02:38:501 PDT] 00000087 Policy 3 com.ibm.ws.ajaxproxy.proxy.RequestBean com.ibm.ws.ajaxproxy.proxy.Policy RequestBean(URL, String, String):[Ljava.lang.Object;@6f726f72
[5/19/11 22:02:38:501 PDT] 00000087 Policy 3 com.ibm.ws.ajaxproxy.proxy.RequestBean com.ibm.ws.ajaxproxy.proxy.Policy RequestBean(URL, String, String):http://www.ibm.com/ibm/us/en/sandbox/ver1/
[5/19/11 22:02:38:532 PDT] 00000087 URINormalizer 3 com.ibm.ws.ajaxproxy.util.URINormalizer normalize com.ibm.ws.ajaxproxy.util.URINormalizer normalize(..) Orginal URI: http://www.ibm.com/ibm/us/en/sandbox/ver1/ Normalized URI: http://www.ibm.com/ibm/us/en/sandbox/ver1/
[5/19/11 22:02:38:532 PDT] 00000087 ProxyServlet 3 com.ibm.ws.ajaxproxy.servlet.ProxyServlet service com.ibm.ws.ajaxproxy.servlet.ProxyServlet service(..) Attempting to match Policy too: /http/www.ibm.com/ibm/us/en/sandbox/ver1/
[5/19/11 22:02:38:532 PDT] 00000087 ProxyServlet 3 com.ibm.ws.ajaxproxy.servlet.ProxyServlet service com.ibm.ws.ajaxproxy.servlet.ProxyServletPolicies for: *

ACF: none
Actions:
GET

Cookies:

Headers:
Users:

[5/19/11 22:02:38:532 PDT] 00000087 ProxyServlet 3 com.ibm.ws.ajaxproxy.servlet.ProxyServlet service com.ibm.ws.ajaxproxy.servlet.ProxyServlet service(..)1305867758532

[5/19/11 22:02:38:532 PDT] 00000087 ProxyServlet 3 com.ibm.ws.ajaxproxy.servlet.ProxyServlet service com.ibm.ws.ajaxproxy.servlet.ProxyServlet service(..)1305867758532
[5/19/11 22:02:38:532 PDT] 00000087 ProxyServlet 3 com.ibm.ws.ajaxproxy.servlet.ProxyServlet service com.ibm.ws.ajaxproxy.servlet.ProxyServlet service(..) HostConfiguration set too: HostConfiguration[host=http://wpconnections.atech.com]
[5/19/11 22:02:38:532 PDT] 00000087 ProxyServlet 3 com.ibm.ws.ajaxproxy.servlet.ProxyServlet service com.ibm.ws.ajaxproxy.servlet.ProxyServlet service(..) Assigning GetMethod as method
[5/19/11 22:02:38:532 PDT] 00000087 Policy 3 com.ibm.ws.ajaxproxy.proxy.Policy getValidHeaders com.ibm.ws.ajaxproxy.proxy.Policy getValidHeaders(..) entering
[5/19/11 22:02:38:532 PDT] 00000087 Policy 3 com.ibm.ws.ajaxproxy.proxy.Policy getValidHeaders com.ibm.ws.ajaxproxy.proxy.Policy getValidHeaders(..)Reusing pattern for User-Agent
[5/19/11 22:02:38:532 PDT] 00000087 Policy 3 com.ibm.ws.ajaxproxy.proxy.Policy getValidHeaders com.ibm.ws.ajaxproxy.proxy.Policy getValidHeaders(..)Reusing pattern for Accept.*
[5/19/11 22:02:38:532 PDT] 00000087 Policy 3 com.ibm.ws.ajaxproxy.proxy.Policy getValidHeaders com.ibm.ws.ajaxproxy.proxy.Policy getValidHeaders(..)Reusing pattern for Content.*
[5/19/11 22:02:38:532 PDT] 00000087 Policy 3 com.ibm.ws.ajaxproxy.proxy.Policy getValidHeaders com.ibm.ws.ajaxproxy.proxy.Policy getValidHeaders(..)Reusing pattern for Authorization.*
[5/19/11 22:02:38:532 PDT] 00000087 Policy 3 com.ibm.ws.ajaxproxy.proxy.Policy getValidHeaders com.ibm.ws.ajaxproxy.proxy.Policy getValidHeaders(..) exiting
[5/19/11 22:02:38:532 PDT] 00000087 ProxyServlet 3 com.ibm.ws.ajaxproxy.servlet.ProxyServlet service com.ibm.ws.ajaxproxy.servlet.ProxyServlet service(..) Adding Request Header [User-Agent : Mozilla/5.0 (Windows NT 5.1; rv:2.0.1) Gecko/20100101 Firefox/4.0.1]
[5/19/11 22:02:38:532 PDT] 00000087 ProxyServlet 3 com.ibm.ws.ajaxproxy.servlet.ProxyServlet service com.ibm.ws.ajaxproxy.servlet.ProxyServlet service(..) Adding Request Header [Accept-Charset : ISO-8859-1,utf-8;q=0.7,*;q=0.7]
[5/19/11 22:02:38:532 PDT] 00000087 ProxyServlet 3 com.ibm.ws.ajaxproxy.servlet.ProxyServlet service com.ibm.ws.ajaxproxy.servlet.ProxyServlet service(..) Adding Request Header [Accept-Encoding : gzip, deflate]
[5/19/11 22:02:38:532 PDT] 00000087 ProxyServlet 3 com.ibm.ws.ajaxproxy.servlet.ProxyServlet service com.ibm.ws.ajaxproxy.servlet.ProxyServlet service(..) Adding Request Header [Accept : text/html,application/xhtml+xml,application/xml;q=0.9,*/*;q=0.8]
[5/19/11 22:02:38:532 PDT] 00000087 ProxyServlet 3 com.ibm.ws.ajaxproxy.servlet.ProxyServlet service com.ibm.ws.ajaxproxy.servlet.ProxyServlet service(..) Adding Request Header [Accept-Language : en-us,en;q=0.5]
[5/19/11 22:02:38:532 PDT] 00000087 ProxyServlet 3 com.ibm.ws.ajaxproxy.servlet.ProxyServlet service com.ibm.ws.ajaxproxy.servlet.ProxyServlet service(..) Adding Request Header [Content-Type : application/x-www-form-urlencoded]
[5/19/11 22:02:38:532 PDT] 00000087 Policy 3 com.ibm.ws.ajaxproxy.proxy.Policy getFilteredCookieString com.ibm.ws.ajaxproxy.proxy.Policy getFilteredCookieString(..) rawCookieString: editMode=false; __utma=249276503.1859418337.1303153383.1303153383.1303153383.1; __utmz=249276503.1303153383.1.1.utmcsr=(direct)|utmccn=(direct)|utmcmd=(none); JSESSIONID=0000UQ_tLLLGMSwyBt5z5_Xd10t:15td46icp; LtpaToken2=VQZuwqjVCdZQtnucuRYbpDNspppYkuTG5jaRDPRMbfI89rxcJBaJ0J4qUMgkw6M3OWJ8N2DpI5zm5f+4AIM3l5IDBdt8WiI04G6MTELExy0nTdt5pBlquum/DMA8OoTYZcpADrN/dHicV8hTiiExAjyZQrOe8WQ2QvA9hFnS1IK5wZM+C7a400lcOt3pzh1T3mr65/SPKXW2LLfFIAXIzFcrqj18Af7Ak6zcb1MmX9lFTRdgopVSxVOBq+5ReL0SJkwwuuaO/WiZptOmuP/1Js4QJ60ekfn8+AQ0znWdtV8khwgV/6Searq14egNeSswzoLdtla8XmxXvT9bN+Ht/5VtXKEXkGRwNglHlbZmg74mHIjnhgf4svqYzJM6kuWK/fnHtkFfAj5iaJQ46zYUzGwMHEMaYqfU217WliF4BD5W8wSrZPc+qYseNUb9zMQ3pF0k4sVi5fkYWWkZ9G6eWNvXCinjQPq5Xt3CtJh+sERJs3zuKepD/milfm29QCsTN0klc8bLCT+x+NFx2bwrAs2hpfywQWoFguwt3pdUw71GfaCzvSU3eIj7EmWDfzm9kQtWpDYSfzhSlbDkKb4N5joSNWlOVWk7BRqkWDqx4bSY3jLUFkg8YIAqSf07ZX4LXp0S5FGkCRs8iTZAmpWuddZoWjGkh4TZwUOKd8oGz1hCqVYsaXHK6ZOX6xjpP7dBC++1NGFeuB5dRIy2swj8MA==; LtpaToken=3FQ3Cxvhqjt0NgBdBtA7adO0uhc79AJbvbc1BgkpjWBRdRevNX0wEoT9Q66qd56aALSOlleaerpij2MXbCGkCSx2cHx/SSNjxdBqYWeXIYvG+542IsczVs3w97GxmBXURp0pc/AYTDd1+ZCmep2zGqyhnKbGNdbQJ5eHMON3KLzerrgtrX9H4rrfvLZUEH3Ejq4ota4XMwrqNz2cJCUOJxig+ygmf0oAUR34kUp+8LSebTY+P8uwEGS/d4d8uh3jWR1seXu4XHUDceqV308GH1ewCMraOEJPq2/k5Cw7vHjcd3V+xdKK3PrV+0Ao65DdyMph+XZuo8yroJ730pHqSFYkAy+TsU6DfSJZm+XTcRo=; currentUserName=was bind; currentUserHandle=546b0260-6273-497e-acfa-1e898f3037d4

Synchronizing between LDAP and the profiles database

When you install connection, you will

  • Go to the E:\IBM\LotusConnections directory, there you will see two TDISOL.zip expand the platform specific version in the same directory like this


  • Open the tdienv.bat file and change value of TDIPATH to point to the location where TDI is installed on your machine, By default it is set to C:\Program Files\IBM\TDI\V7.0


    @REM *****************************************************************
    @REM
    @REM IBM Confidential
    @REM
    @REM OCO Source Materials
    @REM
    @REM Copyright IBM Corp. 2010
    @REM
    @REM The source code for this program is not published or otherwise
    @REM divested of its trade secrets, irrespective of what has been
    @REM deposited with the U.S. Copyright Office.
    @REM
    @REM *****************************************************************

    @echo off
    IF "%TDIPATH%" == "" (
    SET TDIPATH=E:\IBM\TDI\V7.0
    )

    IF "%TDI_CS_HOST%" == "" (
    SET TDI_CS_HOST=localhost
    )

    IF "%TDI_CS_PORT%" == "" (
    SET TDI_CS_PORT=1527
    )

  • Then open the profiles_tdi.properties file which is in the E:\IBM\LotusConnections\TDISOL\TDI directory in text editor and set following values


    source_ldap_url=ldap://directory.atech.com:1389
    source_ldap_user_login=cn=root
    source_ldap_user_password=tdsadmin
    source_ldap_search_base=dc=webspherenotes,dc=com
    source_ldap_search_filter=(objectclass=inetOrgPerson)

    source_ldap_use_ssl=false
    source_ldap_authentication_method=Simple
    source_ldap_time_limit_seconds=0
    source_ldap_required_dn_regex=
    source_ldap_collect_dns_file=collect.dns
    source_ldap_map_functions_file=profiles_functions.js
    source_ldap_page_size=0
    source_ldap_logfile=logs/PopulateDBFromSource.log
    source_ldap_debug=true
    source_ldap_sort_attribute=
    source_ldap_sort_page_size=
    source_ldap_escape_dns=false
    source_ldap_compute_function_for_givenName=
    source_ldap_compute_function_for_sn=
    source_ldap_collect_updates_file=employee.updates
    source_ldap_binary_attributes=GUID
    source_ldap_manager_lookup_field=
    source_ldap_secretary_lookup_field=
    dbrepos_jdbc_url=jdbc:db2://localhost:50000/peopledb
    dbrepos_jdbc_driver=com.ibm.db2.jcc.DB2Driver
    dbrepos_username=LCUSER
    dbrepos_password=lcuser1

    dbrepos_mark_manager_if_referenced=true
    monitor_changes_debug=false


  • Execute following task sync_all_dns.bat file which is in the E:\IBM\LotusConnections\TDISOL\TDI directory and look at the logs in the E:\IBM\LotusConnections\TDISOL\TDI\logs directory


After the command is executed you should be able to see the changes right away you can keep executing the same task repeatedly

Adding a Google gadget to Connection

In the Adding Facebook iWidget on the Connections Home page i talked about how you can add Facebook iWidget to the Connection page, If you look inside the Facebook iWidget you will notice that is simply wrapping the Facebook Google gadget which is hosted at , i thought i will figure out the steps that are required to wrap Google gadget into Widget. I am using the Google Weather Forcast as sample Gadget that i want to wrap into iWidget and it to the Connections Home page.


  • First i went to Google Gadgets for your Web page, to find out all the Google Gadgets that are available to be added to my page
  • Then i went to the Weather Gadget page, and i did click on Add to your webpage button, on the next screen i did get screen that would let me configure the widget before adding it to page, Ex, i can select the city that i am interested in, i can change title of the gadget,...


  • After configuring the Gadget i did click on Get the code button, which gives me a HTML script tag like this

    <script src="http://www.gmodules.com/ig/ifr?url=http://hosting.gmodules.com/ig/gadgets/file/100080069921643878012/facebook.xml&synd=open&w=320&h=400&title=&border=%23ffffff%7C3px%2C1px+solid+%23999999&output=js"></script>


  • I copied this HTML into a HTML file called GoogleWeatherGadget.html file and i did copy it on my HTTP server at E:\IBM\HTTPServer\htdocs\weather

    <script src="http://www.gmodules.com/ig/ifr?url=http://hosting.gmodules.com/ig/gadgets/file/100080069921643878012/facebook.xml&synd=open&w=320&h=400&title=&border=%23ffffff%7C3px%2C1px+solid+%23999999&output=js"></script>


  • Next i had to create a GoogleWeatherGadget.xml file which points to the GoogleWeatherGadget.html file on my HTTP server in E:\IBM\HTTPServer\htdocs\weather directory like this

    <iw:iwidget name="googleFacebook" xmlns:iw="http://www.ibm.com/xmlns/prod/iWidget">
    <iw:content mode="view">
    <![CDATA[
    <iframe scrolling="auto" width="100%" height="330" frameborder="0" src="http://wpconnections.atech.com/weather/GoogleWeather.html"></iframe>
    ]]>
    </iw:content>
    </iw:iwidget>

    In this the value of iframe src is fully qualified URL of the html page that has the Google gadget

  • The last step was to use the steps defined in Deploying custom widget on Connections Home Page for adding Weather widget to HomePage, If you want to add the widget to the profiles page use Adding widget on profiles page for more information


This is how my HomePage looks like after adding it Weather widget to it

WAS 8 is out

I saw WebSphere Application Server 8 is out press release today. It looks like bunch of other software products are also released. The main focus is on Mobile, cloud,...

Adding facebook iwdiget on the Connections Home page

YOu can add iWidgets to either Home, Profile or Communities page in the Connections. If you go to the IBM Lotus and WebSphere Portal Business Solutions Catalog and search for Lotus Connections, you will find bunch of iWidgets that you can use, there is iWidget for LinkedIn, Facebook, Twitter, Flickr,...

I wanted to try the iWidget for Facebook and these are the steps that i followed

  • First i did download the Facebook iWidget from the Solution Catalog

  • When i looked inside the .zip file i could see that it contains a FacebookGoogleGadget.xml (iWidget .xml file) and GoogleFacebook.html (Google gadget html file), i want to host this on my HTTP server so i did unzip it into the document root of my HTTP server at E:\IBM\HTTPServer\htdocs

  • Then i verified that i can access the FacebookGoogleGadget.xml at


  • The last step was to use the steps defined in Deploying custom widget on Connections Home Page for adding Facebook widget to HomePage, If you want to add the widget to the profiles page use Adding widget on profiles page for more information

  • After the widget is added to home page i went to home page and it did prompt me for my facebook login and once i supply my login information i could see my facebook page


Using Facebook iWidget turned out to be really easy.

Adding widget on profiles page

I was trying to add LinkedIn iWidget to my Connection's Homepage and as part of that process i had to figure out how to add custom iWidget to the profiles page, during the process i learned that the process for adding custom iWidget on profiles page is very similar to adding iWidget on the communities page.

The configuration for the iWidget is stored in widgets-config.xml file, This file has two sections one for profiles and other for communities. While adding iWidget first i had to add the definition of the iWidget, by that i mean point to the URL, define preferences,... The widget-config.xml file also has page definition in xml format, so i had to add the widget definition to the suitable position on the page, i followed these steps to add LinkedIn iWidget


  • Connect to Deployment manager of your lotus connection server using wsadmin client

    wsadmin.bat -lang jython -username wasadmin -password wasadmin -port 8879


  • The profilesAdmin.py has some jython functions that make administration of the profiles functionality easier, you should execute that file to make the functions available in the wsadmin console by calling

    execfile("profilesAdmin.py")


  • Checkout the currents widgets-config.xml in c:/temp using following command

    ProfilesConfigService.checkOutWidgetConfig("c:/temp", "wpconnectionsCell01")


  • Open the widgets-config.xml file using a text editor, you will notice that it has two top level resource elements one for profiles and other for communities. Expand the profiles related related element. You will find bunch of widgetDef elements in that file add following widgetDef element at the end pointing to HelloWorld widget

    <widgetDef defId="HelloWorld" url="/hellowidget.xml">
    </widgetDef>

    In my case the hellowidget.xml is available on HTTP server at the root. Once widget is defined next step is to add it to one or more pages, under the layout element you will have multiple page elements, you can add the widget definition to one of the pages here, In my case i want to add HelloWorld widget to 3rd column on the profilesView page, so i did add it to the page like this

    <page pageId="profilesView">
    <widgetInstance uiLocation="col2" defIdRef="multiWidget"/>
    <widgetInstance uiLocation="multiWidget" defIdRef="board"/>
    <widgetInstance uiLocation="multiWidget" defIdRef="contactInfo"/>
    <widgetInstance uiLocation="multiWidget" defIdRef="backgroundInfo"/>
    <widgetInstance uiLocation="multiWidget" defIdRef="multiFeedReader"/>
    <widgetInstance uiLocation="col1" defIdRef="socialTags"/>
    <widgetInstance uiLocation="col1" defIdRef="sand_thingsInCommon"/>
    <widgetInstance uiLocation="col1" defIdRef="LinkedIn"/>
    <widgetInstance uiLocation="col3" defIdRef="sand_socialPath"/>
    <widgetInstance uiLocation="col3" defIdRef="reportStructure"/>
    <widgetInstance uiLocation="col3" defIdRef="friends"/>
    <widgetInstance uiLocation="col3" defIdRef="linkRoll"/>
    <widgetInstance uiLocation="col3" defIdRef="HelloWorld"/>
    </page>


  • Once your done making changes to the widgets-config.xml file you can check it in by executing following wsadmin command

    ProfilesConfigService.checkInWidgetConfig()


  • You can synchronize your changes across the nodes by executing following wsadmin function

    synchAllNodes()


  • Restart the Profiels application using the WAS Admin console for changes to take effect


Connections solution catalog

The IBM Lotus and WebSphere Portal Business Solutions Catalog provides some ready made components that you might be interested in. It has some of the useful iWidgets such as iWidget for LinkedIn, facebook,... It also has plugings for Microsoft Outlook, Lotus Notes,...