Showing posts with label lcdeploywidget. Show all posts

Adding a Google gadget to Connection

In the Adding Facebook iWidget on the Connections Home page i talked about how you can add Facebook iWidget to the Connection page, If you look inside the Facebook iWidget you will notice that is simply wrapping the Facebook Google gadget which is hosted at , i thought i will figure out the steps that are required to wrap Google gadget into Widget. I am using the Google Weather Forcast as sample Gadget that i want to wrap into iWidget and it to the Connections Home page.


  • First i went to Google Gadgets for your Web page, to find out all the Google Gadgets that are available to be added to my page
  • Then i went to the Weather Gadget page, and i did click on Add to your webpage button, on the next screen i did get screen that would let me configure the widget before adding it to page, Ex, i can select the city that i am interested in, i can change title of the gadget,...


  • After configuring the Gadget i did click on Get the code button, which gives me a HTML script tag like this

    <script src="http://www.gmodules.com/ig/ifr?url=http://hosting.gmodules.com/ig/gadgets/file/100080069921643878012/facebook.xml&synd=open&w=320&h=400&title=&border=%23ffffff%7C3px%2C1px+solid+%23999999&output=js"></script>


  • I copied this HTML into a HTML file called GoogleWeatherGadget.html file and i did copy it on my HTTP server at E:\IBM\HTTPServer\htdocs\weather

    <script src="http://www.gmodules.com/ig/ifr?url=http://hosting.gmodules.com/ig/gadgets/file/100080069921643878012/facebook.xml&synd=open&w=320&h=400&title=&border=%23ffffff%7C3px%2C1px+solid+%23999999&output=js"></script>


  • Next i had to create a GoogleWeatherGadget.xml file which points to the GoogleWeatherGadget.html file on my HTTP server in E:\IBM\HTTPServer\htdocs\weather directory like this

    <iw:iwidget name="googleFacebook" xmlns:iw="http://www.ibm.com/xmlns/prod/iWidget">
    <iw:content mode="view">
    <![CDATA[
    <iframe scrolling="auto" width="100%" height="330" frameborder="0" src="http://wpconnections.atech.com/weather/GoogleWeather.html"></iframe>
    ]]>
    </iw:content>
    </iw:iwidget>

    In this the value of iframe src is fully qualified URL of the html page that has the Google gadget

  • The last step was to use the steps defined in Deploying custom widget on Connections Home Page for adding Weather widget to HomePage, If you want to add the widget to the profiles page use Adding widget on profiles page for more information


This is how my HomePage looks like after adding it Weather widget to it

Adding facebook iwdiget on the Connections Home page

YOu can add iWidgets to either Home, Profile or Communities page in the Connections. If you go to the IBM Lotus and WebSphere Portal Business Solutions Catalog and search for Lotus Connections, you will find bunch of iWidgets that you can use, there is iWidget for LinkedIn, Facebook, Twitter, Flickr,...

I wanted to try the iWidget for Facebook and these are the steps that i followed

  • First i did download the Facebook iWidget from the Solution Catalog

  • When i looked inside the .zip file i could see that it contains a FacebookGoogleGadget.xml (iWidget .xml file) and GoogleFacebook.html (Google gadget html file), i want to host this on my HTTP server so i did unzip it into the document root of my HTTP server at E:\IBM\HTTPServer\htdocs

  • Then i verified that i can access the FacebookGoogleGadget.xml at


  • The last step was to use the steps defined in Deploying custom widget on Connections Home Page for adding Facebook widget to HomePage, If you want to add the widget to the profiles page use Adding widget on profiles page for more information

  • After the widget is added to home page i went to home page and it did prompt me for my facebook login and once i supply my login information i could see my facebook page


Using Facebook iWidget turned out to be really easy.

Deploying custom widget on Connections Home Page

I wanted to learn how to add a custom iwidget to my HomePage in the Connections so i followed these steps


  • First i did create hellowidget.xml file that will display Hello lotus connections widget message in the view mode, this is how my hellowidget.xml file looks like


    <?xml version="1.0" encoding="UTF-8" ?>
    <iw:iwidget id="MyWidgets"
    xmlns:xsi="http://www.w3.org/2001/XMLSchema-instance"
    xmlns:iw="http://www.ibm.com/xmlns/prod/iWidget"
    supportedModes="view" mode="view" lang="en">
    <iw:content mode="view">
    <![CDATA[
    <div>Hello lotus connections widget</div>
    ]]>
    </iw:content>
    </iw:iwidget>

    You can find more information about the iwidget here

  • Before i could use the widget i need to make it available on http, there are few different options for doing that, you can copy it in web application and install that web application on your connections server or the simplest is to copy it to HTTP server, in my case i copied it to E:\IBM\HTTPServer\htdocs and then i did access it by going to http://wpconnections.atech.com/hellowidget.xml to make sure i can access the widget.xml like this


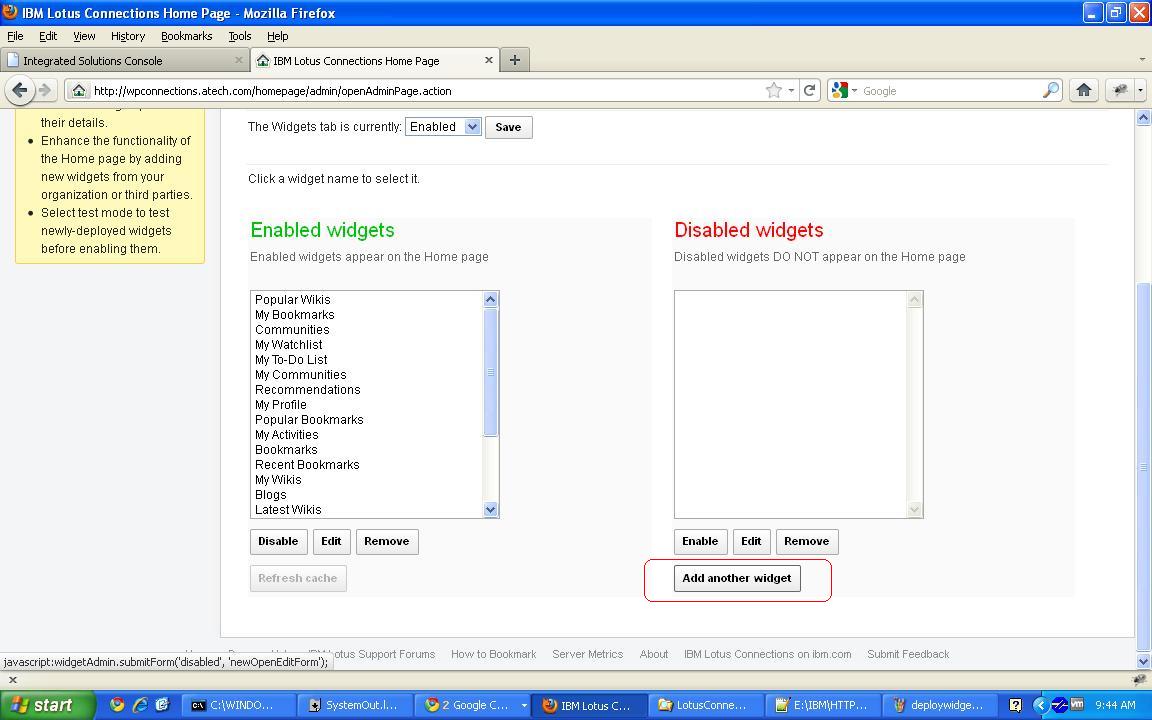
  • Then i logged into the Connections Home page as admin user and went to Administration tab


    On this page click on Add another widget button

  • On the next page enter values for the newly added widget such as title, URL of the widget.xml file,...etc


  • Save your changes and it will take you back to the Administration tab, by default the newly added widget appears in the Disabled Widgets column, so select the widget can click on Enable button


  • Once you enable the widget it gets displayed under the Enabled Widgets column like this


  • Now if you go to HomePage and click on the HomePage you can see the HelloConnections widget in the available widget list click on add button to add to the page


You will notice that the widget is added to page and the view mode markup is displayed like this