Adding a Google gadget to Connection

In the Adding Facebook iWidget on the Connections Home page i talked about how you can add Facebook iWidget to the Connection page, If you look inside the Facebook iWidget you will notice that is simply wrapping the Facebook Google gadget which is hosted at , i thought i will figure out the steps that are required to wrap Google gadget into Widget. I am using the Google Weather Forcast as sample Gadget that i want to wrap into iWidget and it to the Connections Home page.


  • First i went to Google Gadgets for your Web page, to find out all the Google Gadgets that are available to be added to my page
  • Then i went to the Weather Gadget page, and i did click on Add to your webpage button, on the next screen i did get screen that would let me configure the widget before adding it to page, Ex, i can select the city that i am interested in, i can change title of the gadget,...


  • After configuring the Gadget i did click on Get the code button, which gives me a HTML script tag like this

    <script src="http://www.gmodules.com/ig/ifr?url=http://hosting.gmodules.com/ig/gadgets/file/100080069921643878012/facebook.xml&synd=open&w=320&h=400&title=&border=%23ffffff%7C3px%2C1px+solid+%23999999&output=js"></script>


  • I copied this HTML into a HTML file called GoogleWeatherGadget.html file and i did copy it on my HTTP server at E:\IBM\HTTPServer\htdocs\weather

    <script src="http://www.gmodules.com/ig/ifr?url=http://hosting.gmodules.com/ig/gadgets/file/100080069921643878012/facebook.xml&synd=open&w=320&h=400&title=&border=%23ffffff%7C3px%2C1px+solid+%23999999&output=js"></script>


  • Next i had to create a GoogleWeatherGadget.xml file which points to the GoogleWeatherGadget.html file on my HTTP server in E:\IBM\HTTPServer\htdocs\weather directory like this

    <iw:iwidget name="googleFacebook" xmlns:iw="http://www.ibm.com/xmlns/prod/iWidget">
    <iw:content mode="view">
    <![CDATA[
    <iframe scrolling="auto" width="100%" height="330" frameborder="0" src="http://wpconnections.atech.com/weather/GoogleWeather.html"></iframe>
    ]]>
    </iw:content>
    </iw:iwidget>

    In this the value of iframe src is fully qualified URL of the html page that has the Google gadget

  • The last step was to use the steps defined in Deploying custom widget on Connections Home Page for adding Weather widget to HomePage, If you want to add the widget to the profiles page use Adding widget on profiles page for more information


This is how my HomePage looks like after adding it Weather widget to it

WAS 8 is out

I saw WebSphere Application Server 8 is out press release today. It looks like bunch of other software products are also released. The main focus is on Mobile, cloud,...

Adding facebook iwdiget on the Connections Home page

YOu can add iWidgets to either Home, Profile or Communities page in the Connections. If you go to the IBM Lotus and WebSphere Portal Business Solutions Catalog and search for Lotus Connections, you will find bunch of iWidgets that you can use, there is iWidget for LinkedIn, Facebook, Twitter, Flickr,...

I wanted to try the iWidget for Facebook and these are the steps that i followed

  • First i did download the Facebook iWidget from the Solution Catalog

  • When i looked inside the .zip file i could see that it contains a FacebookGoogleGadget.xml (iWidget .xml file) and GoogleFacebook.html (Google gadget html file), i want to host this on my HTTP server so i did unzip it into the document root of my HTTP server at E:\IBM\HTTPServer\htdocs

  • Then i verified that i can access the FacebookGoogleGadget.xml at


  • The last step was to use the steps defined in Deploying custom widget on Connections Home Page for adding Facebook widget to HomePage, If you want to add the widget to the profiles page use Adding widget on profiles page for more information

  • After the widget is added to home page i went to home page and it did prompt me for my facebook login and once i supply my login information i could see my facebook page


Using Facebook iWidget turned out to be really easy.

Adding widget on profiles page

I was trying to add LinkedIn iWidget to my Connection's Homepage and as part of that process i had to figure out how to add custom iWidget to the profiles page, during the process i learned that the process for adding custom iWidget on profiles page is very similar to adding iWidget on the communities page.

The configuration for the iWidget is stored in widgets-config.xml file, This file has two sections one for profiles and other for communities. While adding iWidget first i had to add the definition of the iWidget, by that i mean point to the URL, define preferences,... The widget-config.xml file also has page definition in xml format, so i had to add the widget definition to the suitable position on the page, i followed these steps to add LinkedIn iWidget


  • Connect to Deployment manager of your lotus connection server using wsadmin client

    wsadmin.bat -lang jython -username wasadmin -password wasadmin -port 8879


  • The profilesAdmin.py has some jython functions that make administration of the profiles functionality easier, you should execute that file to make the functions available in the wsadmin console by calling

    execfile("profilesAdmin.py")


  • Checkout the currents widgets-config.xml in c:/temp using following command

    ProfilesConfigService.checkOutWidgetConfig("c:/temp", "wpconnectionsCell01")


  • Open the widgets-config.xml file using a text editor, you will notice that it has two top level resource elements one for profiles and other for communities. Expand the profiles related related element. You will find bunch of widgetDef elements in that file add following widgetDef element at the end pointing to HelloWorld widget

    <widgetDef defId="HelloWorld" url="/hellowidget.xml">
    </widgetDef>

    In my case the hellowidget.xml is available on HTTP server at the root. Once widget is defined next step is to add it to one or more pages, under the layout element you will have multiple page elements, you can add the widget definition to one of the pages here, In my case i want to add HelloWorld widget to 3rd column on the profilesView page, so i did add it to the page like this

    <page pageId="profilesView">
    <widgetInstance uiLocation="col2" defIdRef="multiWidget"/>
    <widgetInstance uiLocation="multiWidget" defIdRef="board"/>
    <widgetInstance uiLocation="multiWidget" defIdRef="contactInfo"/>
    <widgetInstance uiLocation="multiWidget" defIdRef="backgroundInfo"/>
    <widgetInstance uiLocation="multiWidget" defIdRef="multiFeedReader"/>
    <widgetInstance uiLocation="col1" defIdRef="socialTags"/>
    <widgetInstance uiLocation="col1" defIdRef="sand_thingsInCommon"/>
    <widgetInstance uiLocation="col1" defIdRef="LinkedIn"/>
    <widgetInstance uiLocation="col3" defIdRef="sand_socialPath"/>
    <widgetInstance uiLocation="col3" defIdRef="reportStructure"/>
    <widgetInstance uiLocation="col3" defIdRef="friends"/>
    <widgetInstance uiLocation="col3" defIdRef="linkRoll"/>
    <widgetInstance uiLocation="col3" defIdRef="HelloWorld"/>
    </page>


  • Once your done making changes to the widgets-config.xml file you can check it in by executing following wsadmin command

    ProfilesConfigService.checkInWidgetConfig()


  • You can synchronize your changes across the nodes by executing following wsadmin function

    synchAllNodes()


  • Restart the Profiels application using the WAS Admin console for changes to take effect


Connections solution catalog

The IBM Lotus and WebSphere Portal Business Solutions Catalog provides some ready made components that you might be interested in. It has some of the useful iWidgets such as iWidget for LinkedIn, facebook,... It also has plugings for Microsoft Outlook, Lotus Notes,...

Using Apache Abdera for working with Lotus Connections API

In the Connections API entry i blogged about how to make a REST call to the Connection server using simple Java based API, But in order to work with Connections we need two parts first is ability to make HTTP call and other is ability to parse the feed and get information from it.

The Apache Abdera project library provides infrastructure to help in both these infrastructure pieces. Both the part to make HTTP call and the part required for parsing and working with feed. I wanted to try this so i did create this HelloProfileAPI.java which is standalone Java application which makes a call to profile service and returns the result in ATOM format, once the results are returned it prints the content of feed entries on System.Out


package com.webspherenotes.connections;

import java.io.IOException;
import java.io.InputStream;
import java.net.HttpURLConnection;
import java.net.MalformedURLException;
import java.net.URL;
import java.util.List;

import org.apache.abdera.Abdera;
import org.apache.abdera.model.Document;
import org.apache.abdera.model.Entry;
import org.apache.abdera.model.Feed;
import org.apache.abdera.parser.Parser;

public class HelloProfileAPI {

public static void main(String[] args) {
try {
URL url = new URL(
"http://wpconnections.atech.com/profiles/atom/search.do?name=was");

// Open the URL: throws exception if not found
HttpURLConnection conn = (HttpURLConnection) url.openConnection();
conn.connect();
InputStream inputStream = conn.getInputStream();
Abdera abdera = new Abdera();
Parser parser = abdera.getParser();
Document feed_doc = parser.parse(inputStream);
Feed feed = feed_doc.getRoot();
List entryList = feed.getEntries();
for (Entry e : entryList) {
System.out.println(e.getContent());
}
} catch (MalformedURLException e) {
e.printStackTrace(System.out);
} catch (IOException e) {
e.printStackTrace(System.out);
}
}
}


In this case i am making call to "http://wpconnections.atech.com/profiles/atom/search.do?name=was" and then parsing the feed and then i am printing content of feed entry to System.out. In my case there is only one user with name equal to was so it returns big chunk of HTML for that user like this


<span xmlns="http://www.w3.org/1999/xhtml" class="vcard"><div><img src="http://wpconnections.atech.com/profiles/photo.do?key=c3219b57-5e65-4c50-b00a-3e722315d035&lastMod=1302886728960" class="photo"></img></div><div><a class="fn url" href="http://wpconnections.atech.com/profiles/atom/profile.do?key=c3219b57-5e65-4c50-b00a-3e722315d035">was bind</a></div><div><a class="sound url" href="http://wpconnections.atech.com/profiles/audio.do?key=c3219b57-5e65-4c50-b00a-3e722315d035&lastMod=1302886728960">Pronunciation</a></div><div class="x-groupwareMail" style="display:none"></div><div class="org"><span class="organization-unit"></span></div><div class="role"></div><div class="title"></div><div class="x-office"><span class="x-building"></span><span class="x-floor"></span><span class="x-office-number"></span></div><div class="tel"><abbr class="type" title="work">Work:</abbr><span class="value"></span></div><div class="x-manager-uid" style="display:none"></div><div class="x-is-manager" style="display:none">N</div><div class="x-profile-key">c3219b57-5e65-4c50-b00a-3e722315d035</div><div class="uid">546b0260-6273-497e-acfa-1e898f3037d4</div><div class="x-profile-uid">wasbind</div><div class="x-lconn-userid">546b0260-6273-497e-acfa-1e898f3037d4</div><div class="rev" style="display:none">2011-04-15T16:58:48.960Z</div><div class="x-profile-type" style="display:none">default</div></span></>


I tried pasting the HTML in a simple test.html to see what is getting returned and i can see the markup for person card like this

Using Connection API

There could be situations when you would want to use the Connections API for interacting with Connections from outside the Web interface provided by Connection. Ex, you want to create a custom web application or portlet that will let you search for user in the Connection profile repository or want to pull users blog entries and display them outside, if thats the case you should use the REST API provided by Connections, basic idea is you make a HTTP call from your application to Connection, and it will return ATOM based response, you can then parse the feed,.. If you want to post data to connections you will have to create ATOM feed and send it to Connection using HTTP using either HTTP POST or PUT methods or you can delete a record by calling HTTP DELETE method.

I wanted to try this feature so i did create a simple standalone Java application which makes use of plain java to make a HTTP call with name of the user as argument to profiles feature in Connections and the Connections server will return list of all the users with matching name and i will print the output to Standard output


package com.webspherenotes.ssl;

import java.io.BufferedReader;
import java.io.IOException;
import java.io.InputStream;
import java.io.InputStreamReader;
import java.net.HttpURLConnection;
import java.net.MalformedURLException;
import java.net.URL;

public class HelloSSL {

public static void main(String[] args) {
try {
URL url =
new URL("http://wpconnections.atech.com/profiles/atom/search.do?name=was");

// Open the URL: throws exception if not found
HttpURLConnection conn =
(HttpURLConnection)url.openConnection();
conn.connect();
InputStream inputStream = conn.getInputStream();
BufferedReader reader =
new BufferedReader(new InputStreamReader(inputStream));
String line = null;
while((line = reader.readLine()) != null){
System.out.println(line);
}
} catch (MalformedURLException e) {
e.printStackTrace(System.out);
} catch (IOException e) {
e.printStackTrace(System.out);
}
}
}


In my case the profiles application is available at http://wpconnections.atech.com/profiles and i am calling the Search API with one parameter name=was, which is my search criteria. Similarly you can search for all the users from say Fremont city by passing city=fremont as argument.

Connection will return a search result in ATOM feed format, i am reading that response and printing it to System.out.Take a look at Lotus Connections API document for more information what API meets your requirement and what are the inputs and outputs of the API call.

Making HTTPS call from inside the WebSphere Application Server

In the Getting markup from HTTPS connection in Java program entry i talked about how to make a HTTPS call from standalone Java program, but what if you want to make a HTTPS call from a Servlet, or some code that is running inside J2EE container such as WebSphere Application server, In that case you will have to import the SSL certificate inside WAS.

I wanted to figure out the steps to make HTTPS call from inside WAS so i did create a DemoSSL servlet that takes URL that you want to access as input and makes request to that URL, once the request is successful it will write the response back to the output. Then i configured WAS so that i can make call to https://mail.atech.com, my employers email server but you can use some other https url if you want.

First i did create a DemoSSLServlet that looks like this


package com.webspherenotes.ssl;

import java.io.BufferedReader;
import java.io.IOException;
import java.io.InputStream;
import java.io.InputStreamReader;
import java.net.HttpURLConnection;
import java.net.URL;

import javax.servlet.ServletException;
import javax.servlet.http.HttpServlet;
import javax.servlet.http.HttpServletRequest;
import javax.servlet.http.HttpServletResponse;

/**
* Servlet implementation class DemoSSLServlet
*/
public class DemoSSLServlet extends HttpServlet {

protected void doGet(HttpServletRequest request, HttpServletResponse response) throws ServletException, IOException {
// TODO Auto-generated method stub
}

/**
* @see HttpServlet#doPost(HttpServletRequest request, HttpServletResponse response)
*/
protected void doPost(HttpServletRequest request, HttpServletResponse response) throws ServletException, IOException {
System.out.println("Entering DemoSSLServlet.doPost()");
String submitUrl = request.getParameter("url");
System.out.println("Value of URL " + submitUrl);
URL url = new URL(submitUrl);

// Open the URL: throws exception if not found
HttpURLConnection conn =
(HttpURLConnection)url.openConnection();
conn.connect();
InputStream inputStream = conn.getInputStream();
BufferedReader reader = new BufferedReader(new InputStreamReader(inputStream));
String line = null;
while((line = reader.readLine()) != null){
response.getWriter().println(line);
}
System.out.println("Exiting DemoSSLServlet.doPost()");
}

}


In the DemoSSLServlet servlet, i did override the doPost() method and in this method i am making call to the supplied URL and printing response to the output. also had to create index.jsp to take URL as input from user


<%@ page language="java" contentType="text/html; %>
<html>
<head>
<meta http-equiv="Content-Type" content="text/html;
charset=ISO-8859-1">
<title>Insert title here</title>
</head>
<body>
<form action="DemoSSLServlet" method="post">
<table>
<tr>
<td>URL</td>
<td><input type="text" name="url" /></td>
<td><input type="Submit" name="submit" /></td>
</tr>
</table>
</form>
</body>
</html>


Then i did install the DemoSSL.war file on my WAS server, i tried testing it with http://www.google.com and made sure that it works and it is able to return markup, But when i tried accessing the https://mail.atech.com URL i got following error


So next step was to configure the WAS trust store so that it would trust SSL certificate from https://mail.atech.com. Login into the WAS Admin console and go to Security -< SSL Certificate and Key Management page like this


Click on Key Stores and Certificates


Click on CellDefaultTrustStore


Click on Signer Certificates


Click on Retrieve from Port button to get a screen like this,


On this page enter the information related to the Host from which you want to import the SSL certificate


Click on Retrieve signer certificate button, at this point WAS will import the SSL certificate from host and display it like this


Now save the changes and when you try to hit the URL again it should work without throwing exception

Getting markup from HTTPS connection in Java program

One of the common requirements in J2EE is making a request to HTTP URL and getting response back. The JDK has support to make HTTP call and get response, you dont have to use any external library if you dont want to but (But most of us use Apache HTTP Client).

This sample code demonstrates how you can make a HTTP call to http://wpconnections1.atech.com/ and get and print response back to the console


package com.webspherenotes.ssl;
import java.io.BufferedReader;
import java.io.IOException;
import java.io.InputStream;
import java.io.InputStreamReader;
import java.net.HttpURLConnection;
import java.net.MalformedURLException;
import java.net.URL;

public class HelloSSL {
public static void main(String[] args) {
try {
URL url = new URL("http://wpconnections1.atech.com/");

// Open the URL: throws exception if not found
HttpURLConnection conn =
(HttpURLConnection)url.openConnection();
conn.connect();
InputStream inputStream = conn.getInputStream();
BufferedReader reader =
new BufferedReader(new InputStreamReader(inputStream));
String line = null;
while((line = reader.readLine()) != null){
System.out.println(line);
}
} catch (MalformedURLException e) {
e.printStackTrace(System.out);
} catch (IOException e) {
e.printStackTrace(System.out);
}
}
}


This program works but you might want to access the same URL on HTTPs instead of HTTP, This program will work if you try to access say https://encrypted.google.com. But, In development environment we use self-signed SSL certificate and your JVM would not trust the self-signed SSL certificate. So when you try to connect to http://wpconnections1.atech.com/ it will throw this exception


javax.net.ssl.SSLHandshakeException: sun.security.validator.ValidatorException:
PKIX path building failed: sun.security.provider.certpath.SunCertPathBuilderException:
unable to find valid certification path to requested target
at com.sun.net.ssl.internal.ssl.Alerts.getSSLException(Unknown Source)
at com.sun.net.ssl.internal.ssl.SSLSocketImpl.fatal(Unknown Source)
at com.sun.net.ssl.internal.ssl.Handshaker.fatalSE(Unknown Source)
at com.sun.net.ssl.internal.ssl.ClientHandshaker.serverCertificate(Unknown Source)
at com.sun.net.ssl.internal.ssl.ClientHandshaker.processMessage(Unknown Source)
at com.sun.net.ssl.internal.ssl.Handshaker.processLoop(Unknown Source)
at com.sun.net.ssl.internal.ssl.Handshaker.process_record(Unknown Source)
at com.sun.net.ssl.internal.ssl.SSLSocketImpl.readRecord(Unknown Source)
at com.sun.net.ssl.internal.ssl.SSLSocketImpl.performInitialHandshake(Unknown Source)
at com.sun.net.ssl.internal.ssl.SSLSocketImpl.startHandshake(Unknown Source)
at sun.net.www.protocol.https.HttpsClient.afterConnect(Unknown Source)
at sun.net.www.protocol.https.AbstractDelegateHttpsURLConnection.connect(Unknown Source)
at sun.net.www.protocol.https.HttpsURLConnectionImpl.connect(Unknown Source)
at com.webspherenotes.ssl.HelloSSL.main(HelloSSL.java:23)
Caused by: sun.security.validator.ValidatorException: PKIX path building failed: sun.security.provider.certpath.SunCertPathBuilderException: unable to find valid
certification path to requested target
at sun.security.validator.PKIXValidator.doBuild(Unknown Source)
at sun.security.validator.PKIXValidator.engineValidate(Unknown Source)
at sun.security.validator.Validator.validate(Unknown Source)
at com.sun.net.ssl.internal.ssl.X509TrustManagerImpl.validate(Unknown Source)
at com.sun.net.ssl.internal.ssl.X509TrustManagerImpl.checkServerTrusted(Unknown Source)
... 12 more
Caused by: sun.security.provider.certpath.SunCertPathBuilderException: unable to find valid
certification path to requested target
at sun.security.provider.certpath.SunCertPathBuilder.engineBuild(Unknown Source)
at java.security.cert.CertPathBuilder.build(Unknown Source)
... 18 more


You will have to follow some additional steps to import the self signed SSL certificate in your JVM so that it trust it. There are multiple ways to do that but the one that i like is outlined here http://blogs.sun.com/andreas/entry/no_more_unable_to_find, first i had to download the InstallCert.java on my machine and package it into a .jar file then i executed


java -jar InstallCert.jar wpconnections1.atech.com


This will create a jssecacert file on your machine where you executed the InstallCert.jar. In my case i did execute the .jar in c:\temp so i did create a C:\Temp\jssecacert file in that directory. This file has the imported certificate for wpconnections1.atech.com

Then i went back to my program and i did execute it by adding following JVM argument -Djavax.net.ssl.trustStore="c:\temp\jssecacerts" like this


Now when i run the HelloSSL program i can see response being returned

Deploying custom widget on Connections Home Page

I wanted to learn how to add a custom iwidget to my HomePage in the Connections so i followed these steps


  • First i did create hellowidget.xml file that will display Hello lotus connections widget message in the view mode, this is how my hellowidget.xml file looks like


    <?xml version="1.0" encoding="UTF-8" ?>
    <iw:iwidget id="MyWidgets"
    xmlns:xsi="http://www.w3.org/2001/XMLSchema-instance"
    xmlns:iw="http://www.ibm.com/xmlns/prod/iWidget"
    supportedModes="view" mode="view" lang="en">
    <iw:content mode="view">
    <![CDATA[
    <div>Hello lotus connections widget</div>
    ]]>
    </iw:content>
    </iw:iwidget>

    You can find more information about the iwidget here

  • Before i could use the widget i need to make it available on http, there are few different options for doing that, you can copy it in web application and install that web application on your connections server or the simplest is to copy it to HTTP server, in my case i copied it to E:\IBM\HTTPServer\htdocs and then i did access it by going to http://wpconnections.atech.com/hellowidget.xml to make sure i can access the widget.xml like this


  • Then i logged into the Connections Home page as admin user and went to Administration tab


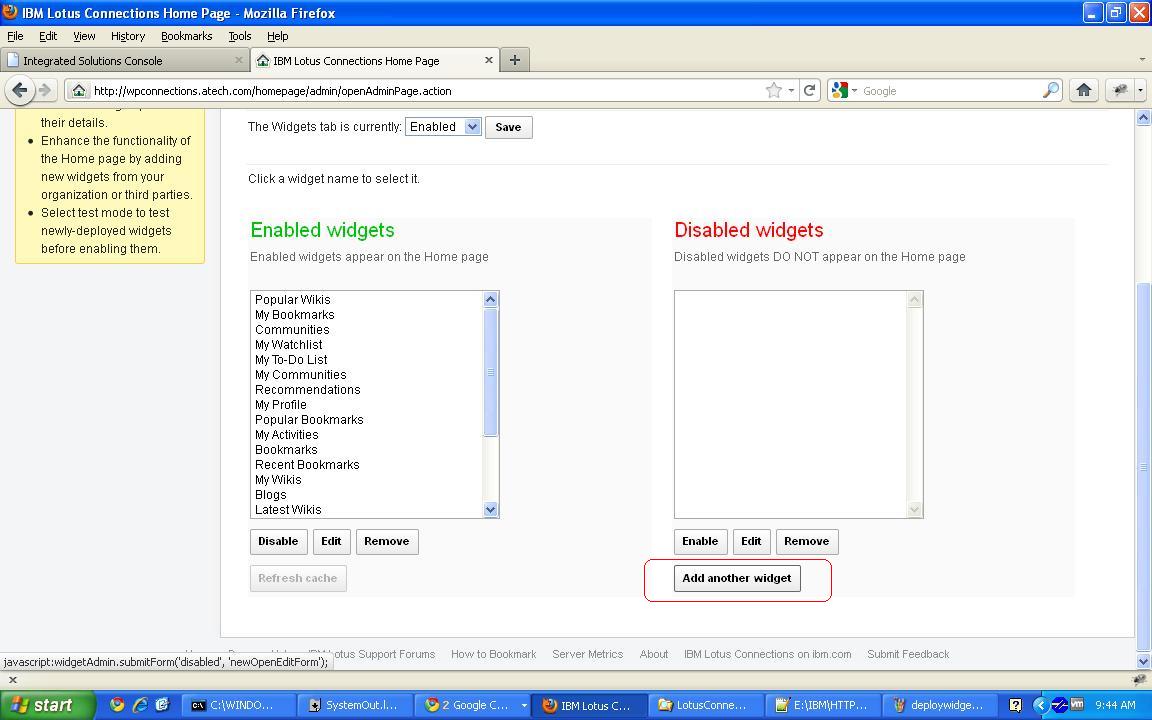
    On this page click on Add another widget button

  • On the next page enter values for the newly added widget such as title, URL of the widget.xml file,...etc


  • Save your changes and it will take you back to the Administration tab, by default the newly added widget appears in the Disabled Widgets column, so select the widget can click on Enable button


  • Once you enable the widget it gets displayed under the Enabled Widgets column like this


  • Now if you go to HomePage and click on the HomePage you can see the HelloConnections widget in the available widget list click on add button to add to the page


You will notice that the widget is added to page and the view mode markup is displayed like this