Empty Skin

Similar to Empty Theme, i built this empty skin that does not generate any markup, only iterate through portal page and pass control to all the portlets on page and let them generate markup for the page.

You can download the sample code for the Empty skin from here. The Empty skin has following three JSP pages

  1. This is how the UnlayeredContainer-V.jsp looks like

    <%@ page session="false" buffer="none" %>
    <%@ taglib uri="http://www.ibm.com/xmlns/prod/websphere/portal/v6.0/portal-skin"
    prefix="portal-skin" %>
    <portal-skin:layoutNodeLoop var="currentLayoutNode">
    <portal-skin:layoutNodeRender/>
    </portal-skin:layoutNodeLoop>

    In this jsp i am looping through all the portlets in the current vertical container using portal-skin:layoutNodeLoop and passing control to the child container for rendering by calling portal-skin:layoutNodeRender/

  2. This is how the UnalyeredContainer-H.jsp looks like

    <%@ page session="false" buffer="none" %>
    <%@ taglib uri="http://www.ibm.com/xmlns/prod/websphere/portal/v6.0/portal-skin"
    prefix="portal-skin" %>
    <portal-skin:layoutNodeLoop var="currentLayoutNode">
    <portal-skin:layoutNodeRender/>
    </portal-skin:layoutNodeLoop>

    This JSP is same as that of the UnlayeredContainer-V.jsp it iterates through every container and forwards control to that container for generating markup. In the actual Skin implementation the way this pages work is they create a table and if its vertical(UnlayeredContainer-V.jsp) then add every child container in row but if its horizontal container(UnlayeredContainer-H.jsp) then displays every child container next to each other using td tag. In empty skin, all the content will be generated after each other

  3. This is how the Control.jsp page in Empty Skin looks like

    <%@ page session="false" buffer="none" %>
    <%@ taglib uri="http://www.ibm.com/xmlns/prod/websphere/portal/v6.0/portal-skin"
    prefix="portal-skin" %>
    <portal-skin:portletRender>
    </portal-skin:portletRender>

    The Control.jsp is forwarding control to the portlet by calling portal-skin:portletRender tag and then taking the markup generated by portlet and displaying it at current location


Important Note In the real world example you should generate table structure inside your UnlayeredContainer-*.jsp and create either td or tr for every portlet, to display the portlets either next to each other or below each other

Empty Theme

In the Portal page popup with empty theme and empty skin entry i talked about how to open a portlet in the dialog box. And how you can use empty theme and empty skin so that portlet has full control on what gets displayed in the dialog box.

You can download the empty theme from here , the empty theme has only one file Default.jsp, which is very simple like this


<%@ page session="false" buffer="none" %>
<%@ taglib uri="http://www.ibm.com/xmlns/prod/websphere/portal/v6.0/portal-core"
prefix="portal-core" %>
<portal-core:screenRender/>


Only thing that Default.jsp is doing is forwarding control to portal-core:screenRender, which will go pass control to portal page aggregation engine for generating markup for the page. If you look at a page after applying this theme you will notice that it has only the markup generated by skin

Important Note In the real world your Default.jsp should look like this


<%@ page session="false" buffer="none" %>
<%@ taglib uri="http://www.ibm.com/xmlns/prod/websphere/portal/v6.0/portal-core"
prefix="portal-core" %>
<html>
<head>
<head>
// JavaScript and CSS file includes to handle rendering

</head>
<body>
<portal-core:screenRender/>
</body>
</html>


You should include your style classes and JavaScript code inside head

Portal page popup with empty theme and empty skin

In the How to open a portal page in dialog box entry i built a sample portlet that opens portal page in dialog box.

But if you open a portlet in a dialog box then displaying the full portal page with navigation, tool bar,.. does not look good, so i did create a Empty theme and Empty Skin that does not display any of the additional markup instead only returns the markup generated by the portlet.

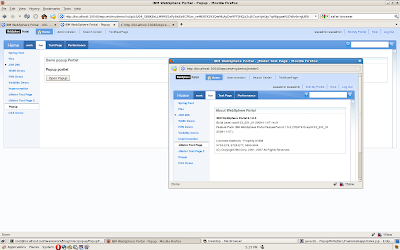
This is how my popup dialog box looks like after adding empty theme and empty skin to it

How to open a portal page in dialog box

In the Opening a popup inside portlet, i built a sample portlet that will open www.google.com in a popup dialog box, but most probably you will want to open another portal page in dialog box.

You can do that by creating a URL mapping to the portal page that you want to open in popup dialog box. In my local environment i have a portal page at /wpcert/mydemo/jmeter1 URL, that i wanted to open in popup dialog box, so i changed my JSP like this


<%@page language="java" contentType="text/html; %>
<%@taglib uri="http://java.sun.com/portlet_2_0" prefix="portlet"%>
<%@ taglib uri="http://java.sun.com/jsp/jstl/core" prefix="c" %>
<%@ taglib uri="/WEB-INF/tld/portal.tld" prefix="portal" %>

<portlet:defineObjects />
<h3>Popup portlet</h3>

<script type="text/javascript">
<!--
function openPopup(popupUrl){
if (window.showModalDialog) {
window.showModalDialog(popupUrl,"name","dialogWidth:255px;dialogHeight:250px");
} else {
window.open(popupUrl,'name',
'height=500,width=500,toolbar=no,directories=no,status=no,menubar=no,
scrollbars=no,resizable=no ,modal=yes');
}
}
//-->
</script>


<input type="button" onclick="openPopup('/wpcert/mydemo/jmeter1')"
label="Open popup" value="Open Popup" />


And now this is how my portal page popup dialog box looks like


If you dont want to create all the URL mappings upfront then you can also use Portal URL generation service for creating URL to the portal page, i might blog about sample portlet :)

Opening a popup inside portlet

Opening a dialog box from portlet is one of the uncommon requirements, but i wanted to try that. Basic idea is opening a dialog box from portlet is normal as opening it from any other web application, but the problem is when you want to open a dialog box from any other web application.

I built this sample portlet which opens www.google.com in the dialog box like this


Inside the doView() method of the portlet i am forwarding control to index.jsp which is like this

<%@page language="java" contentType="text/html; %>
<%@taglib uri="http://java.sun.com/portlet_2_0" prefix="portlet"%>
<%@ taglib uri="http://java.sun.com/jsp/jstl/core" prefix="c" %>
<%@ taglib uri="/WEB-INF/tld/portal.tld" prefix="portal" %>

<portlet:defineObjects />
<h3>Popup portlet</h3>

<script type="text/javascript">
<!--
function openPopup(popupUrl){
if (window.showModalDialog) {
window.showModalDialog(popupUrl,
"name","dialogWidth:255px;dialogHeight:250px");
} else {
window.open(popupUrl,'name',
'height=500,width=500,toolbar=no,directories=no,
status=no,menubar=no,scrollbars=no,resizable=no ,modal=yes');
}
}
//-->
</script>

<input type="button" onclick="openPopup('www.google.com')"
label="Open popup" value="Open Popup" />


When user clicks on Open popup button i am calling openPopup() method in JavaScript which takes care of opening popup

On the fly JavaScript minification using Dojo ShrinkSafe

The Dojo ShrinkSafe is a tool that you can use to minify JavaScript, it can reduce size of JavaScript by close to 1/3 rd or more. You can call ShrinkSafe through commandline, or through Ant as part of your web applications build process. I wanted to see if i can call ShrinkSafe Java API to minify JavaScript.

I built ShrinkSafeFilter which will be part of my .war file and then i applied it to JavaScript URLs and what the ShrinkSafeFilter will do is it will collect the JavaScript file response into String minify it using ShrinkSafe API and return the minifed version to the browser, you can download the sample code from here

My Web application has index.html that includes three JavaScript files which are inside the /WebContent/js folder, this is the screen shot of how the test.js file looks like in the firebug


These are the steps that i had to follow to create ShrinkSafe Filter

  • First i had to create a ShrinkSafeFilter like this


    package com.webspherenotes.performance.minfy;

    import java.io.IOException;

    import javax.servlet.Filter;
    import javax.servlet.FilterChain;
    import javax.servlet.FilterConfig;
    import javax.servlet.ServletException;
    import javax.servlet.ServletRequest;
    import javax.servlet.ServletResponse;
    import javax.servlet.http.HttpServletRequest;
    import javax.servlet.http.HttpServletResponse;

    import org.dojotoolkit.shrinksafe.Compressor;

    public class ShrinkSafeFilter implements Filter{


    public void destroy() {
    System.out.println("Entering ShrinkSafeFilter.destroy()");
    System.out.println("Exiting ShrinkSafeFilter.destroy()");
    }

    public void doFilter(ServletRequest request, ServletResponse response,
    FilterChain filterChain) throws IOException, ServletException {
    try {
    System.out.println("Entering ShrinkSafeFilter.doFilter()");

    System.out.println("Received request for " + ((HttpServletRequest)request).getPathInfo());
    SSHttpServletResponseWrapper responseWrapper = new SSHttpServletResponseWrapper((HttpServletResponse)response);
    filterChain.doFilter(request, responseWrapper);
    responseWrapper.finishResponse(response.getWriter());
    System.out.println("Exiting ShrinkSafeFilter.doFilter()");
    } catch (Throwable e) {
    e.printStackTrace(System.out);
    }
    }

    public void init(FilterConfig arg0) throws ServletException {
    System.out.println("Entering ShrinkSafeFilter.init()");
    System.out.println("Exiting ShrinkSafeFilter.init()");
    }

    }

    In the doFilter() method of ShrinkSafeFilter i am wrapping the HttpServletResponse object into the SSHttpServletResponseWrapper method, and then forwarding control to application server for letting it written the static JavaScript file

  • This is how my SSHttpServletResponseWrapper.java looks like
    package com.webspherenotes.performance.minfy;

    import java.io.IOException;
    import java.io.PrintWriter;

    import javax.servlet.ServletOutputStream;
    import javax.servlet.http.HttpServletResponse;
    import javax.servlet.http.HttpServletResponseWrapper;

    import org.dojotoolkit.shrinksafe.Compressor;

    public class SSHttpServletResponseWrapper extends HttpServletResponseWrapper{

    StringOutputStream stringOutputStream;

    public SSHttpServletResponseWrapper(HttpServletResponse response) {
    super(response);
    }


    public ServletOutputStream getOutputStream() throws IOException {
    stringOutputStream = new StringOutputStream();
    return stringOutputStream;
    }

    public void finishResponse(PrintWriter writer){
    String inputJavaScript = stringOutputStream.getString();
    long beginTime = System.currentTimeMillis();
    String outputJavaScript = Compressor.compressScript(inputJavaScript, 0, 1, "all");
    System.out.println("Time took to compress " +( System.currentTimeMillis() -beginTime));
    writer.println(outputJavaScript);

    }

    }

    In the getOutputStream() method i am returning a custom ServletOutputStream object that will be used for collecting the actual response into String. Then inside the finishResponse() method i am taking the actual JavaScript output returned by application server into String and calling the Compressor.compressScript(inputJavaScript, 0, 1, "all") method of ShrinkSafe to minify it.

  • THis is how my StringOutputStream class looks like

    package com.webspherenotes.performance.minfy;

    import java.io.ByteArrayOutputStream;
    import java.io.IOException;

    import javax.servlet.ServletOutputStream;

    class StringOutputStream extends ServletOutputStream {

    ByteArrayOutputStream byteArrayOutputStream = new ByteArrayOutputStream();

    public void write(byte[] b, int offset, int length) throws IOException {
    byteArrayOutputStream.write(b, offset, length);
    }

    public void write(byte[] b) throws IOException {
    byteArrayOutputStream.write(b);
    }

    public void write(int b) throws IOException {
    byteArrayOutputStream.write(b);
    }

    public String getString() {

    return new String(byteArrayOutputStream.toByteArray());
    }

    public void close() throws IOException {
    byteArrayOutputStream.close();
    }

    public void flush() throws IOException {
    byteArrayOutputStream.flush();
    }

    }

    This is simple ServletOutputStream class that collects the response in string


This is how the firebug output looks like after i applied the ShrinkSafeFilter to it, did you notice the shinksafe has removed comments from the test.js and also the indentation.

YUI Compressor

The YUI Compressor is another tool similar to Dojo ShrinkSafe, that we can use to minify JavaScript. It can also be used to minify CSS files.


If you want to use YUI COmpressor first you should download it from here. Then you use it using command line tool.


  • You can use following syntax to compress test.js into test.min.js

    java -jar yuicompressor-***.jar -o test.min.js test.js

    It seems that YUI Compressor does nto support combining multiple files into one, instead you will have to use either cat command on linux or copy command on windows to combine multiple files into one and then use YUICompressor to minify the resultant file

  • You can use the YUI COmpressor to compress the CSS files too, it depends on the file extension to figure out if its .js or .css file and takes care to minify it accordingly

    java -jar yuicompressor-***.jar -o test.min.css test.css


    But if you want you can also specify the the --type command to specify the type of file you want to compress, so the syntax for compressing CSS file would be like this

    java -jar yuicompressor-***.jar --type css -o test.min.css test.css


Take a look at YUI compressor help page for details on the command line option

Dojo ShrinkSafe

Dojo Shrinksafe is JavaScript compression system that can reduce size of your JavaScript by close to 1/3rd and it can also be used for combining multiple JavaScript files into one.

If you don't work with a lot of JavaScript, odds are you don't need ShrinkSafe. If, on the other hand, you're pushing browsers or building an amazing "Web 2.0" user experience, ShrinkSafe can make your pages respond faster by reducing the number of HTTP requests needed and by decreasing the size of the files served.

You can use ShrinkSafe in two ways either you can upload the files that you want to ship to its site and it will combine/shrink for you or you can download the latest ShrinkSafe jar file and use it on your local like this


  • If you want to compress test.js into test.min.js

    java -jar shrinksafe.jar test.js > test.min.js


  • If you want to combine and compress test.js, test1.js and test2.js into test.min.js you can do it like this

    java -jar shrinksafe.jar test.js test1.js test2.js > test.min.js

Portal Style classes

The CSS style sheets that are used for the portal page are dynamically generated by JSPs located in the /themes/Portal/ directory. You can change the tag definitions and the class definitions in the CSS style sheets. However, make sure that you do not delete any style sheets or remove any style classes. Portlets require these style classes for JSP output. The following provides information about the CSS File structure:

  • styles.jsp - root page which includes children

  • styles_cacheSettings.jspf - sets headers to control how the output CSS is cached

  • styles_rules.jspf - defines logic to be consumed by style definitions

  • styles_theme.jspf - contains style definitions for the theme

  • styles_portlet.jspf - contains standard styles for portlets

  • styles_ibm.jspf - contains styles for IBM portlets

  • styles_help.jspf - contains styles for portlet help files

  • styles_oob.jspf - contains styles for out of box Information portlet JSPs


If you want to add your own additional styles, create your own JSP fragment, such as styles_myStyles.jspf, and modify styles.jsp to include it as well. In this way, your styles are incorporated into the portal stylesheet and are able to use the dynamic rules.

Dynamic styles vary their output by browser, locale, and color palette. The <portal-theme:cacheProxyUrl> tag generates a cacheable url to styles.jsp that encodes the browser, locale and color palette variables. This allows the output CSS to be cached by the server for improved performance. This is how the styles.jspf gets included in my page when i access it from Firefox browser


http://localhost:10040/wpcert/themes/html/Portal/styles.jsp?themeContextInfo=policyPath:theme%2FSingleTopNavMinimal:policyVersion:1:colorPalette:default:browserVendor:Netscape:browserName:Navigator:browserVersion:unknown:locale:en:themeOid:J_CGAH47L008IC40I4BOR2EO00H0:protectedUrl:false&userLocale=en

Utilize of standard portlet cascading style-sheet classes

The Portlet Specification and WSRP Specification define set of CSS classes that portlet developer should use while developing the compliant portlet. Basic idea is that portlet developer will use these classes and then theme developer will provide implementation of these classes so that all the portlets on the page look same and provide same look and feel as the theme.

For example a Portlet author wants a certain font type to be larger or smaller, they should indicate this using a relative size.


Example1: <div class="portlet-font" style="font-size:larger">Important information</div>

Example2: <div class="portlet-font-dim" style="font-size:80%">Small and dim</div>


In this case the developer is using portlet-font and portlet-font-dim css classes, when this portlet is deployed in IBM WPS and we apply IBM theme, it will provide implementation of the class

Default IBM themes provide implementations of classes defined in portlet specification. you can find them in WebSphere/wp_profile/installedApps/DefaultNode/wps.ear/wps.war/themes/html/Portal/styles_portlet.jspf, This is the implementation of above two classes


<%-- Text in body of standard portlet and portlet in edit mode --%>
.portlet-font {
font-family: ${requestScope.cssRules.portalSansSerif};
font-size: ${requestScope.cssRules.fontSize.portalNormal};
color: #333333;
}

<%-- Text for form element descriptions --%>
.portlet-font-dim {
color: #808080;
}

Configuring Keep-Alive connection in Apache Http Server

When i tried accessing a page Login page of WebSPhere Portal server on my local i noticed that Keep-Alive was not set and the browser took 4.05 seconds with empty cache


In most of installations you will have a Http Server in front of your application server, and you can configure Apache Http server to use keep alive persistent connection by changing following configuration in httpd.conf


#
# KeepAlive: Whether or not to allow persistent connections (more than
# one request per connection). Set to "Off" to deactivate.
#
KeepAlive On

#
# MaxKeepAliveRequests: The maximum number of requests to allow
# during a persistent connection. Set to 0 to allow an unlimited amount.
# We recommend you leave this number high, for maximum performance.
#
MaxKeepAliveRequests 100

#
# KeepAliveTimeout: Number of seconds to wait for the next request from the
# same client on the same connection.
#
KeepAliveTimeout 100


The httpd.conf has 3 settings to control tune keep-alive connection

  1. KeepAlive: Value of this flag indicates if you want to use persistent Keep-Alive connection or not. Setting it true will turn the Keep-Alive connection on

  2. MaxKeepAliveRequests Value of this property indicates what should be value of max attribute, value of 100 means the Keep-Alive: max=100 header would be sent to the browser, to indicate that the server is going to keep this connection open for next 100 requests

  3. KeepAliveTimeout : Value of this property indicates what should be value of timeout attribute in Keep-Alive header. Value of 300 means it will set Keep-Alive: max=300, this will let browser know that the persistent connection will timeout in 300 seconds


After i made these configuration changes and restarted my Apache Http Server, when i made the same login request again i could see that Apache was setting following headers


I wanted to see overall impact of Keep-Alive so after making the changes i cleaned up my cache and performed the same login page request as before now the response time came down to 2.95s from 4.2 seconds below.


Both my browser and server are on the same machine, so the performance improvement could be bigger when the client is accessing remote server

How HTTP persistent connection between browser and server work ?

The Keep-alive is deprecated in Http 1.1 specification, but it is still commonly used by browsers and servers. Clients implementing HTTP/1.0 keep-alive connection can request that a connection be kept open by including the Connection: Keep-Alive request header. If the server is willing to keep the connection open for the next request, it will respond with the same header in the response. If there is no Connection: Keep-Alive header in the response, the client assumes that the server does not support keep-alive and that the server will close the connection when the response message is sent back.

Keep-Alive header must be sent with all messages that want to continue the persistent If the client does not send a Connection: Keep-Alive header the server will close the connection after that request. Same thing if the response does not have Connection: Keep-Alive header browser will assume that server has closed the connection.

The browsers make use of connection close signal even to figure out end of message body. So if you want the connection to remain open, you will have to set correct value for Content-Length, also set correct Content Type header set or the message should be encoded with the chuncked transfer encoding.

The keep-alive behavior can be tuned by following comma-separated options specified in the Keep-Alive general header

  1. The timeout parameter is sent in a Keep-Alive response header. It estimates how long the server is likely to keep the connection alive for.

  2. The max parameter is sent in a Keep-Alive response header. It estimates how many more HTTP transactions the server is likely to keep the connection alive for.

  3. The Keep-Alive header also supports arbitrary unprocessed attributes, primarily for diagnostic and debugging purpose.


The Keep-Alive header is completely option but is permitted only when Connection:Keep-Alive header is present.

Connection: Keep-Alive
Keep-Alive: max=100, timeout=300


These headers in response, will tell browser that server will keep this connection open for next 100 resource request and if you don't make request it will timeout in 300 seconds

What is Http Persistent connection

HTTP protocol has a concept of persistent connection, which means the connection is not closed after Http request and response transaction, instead the Http connection is kept open across multiple transaction. I.e. browser opens a Http connection to get a web page and then reuses that connection to get images, JavaScript, CSS on the page. By reusing an idle, persistent connection that is already open to a target server, you can avoid the slow connection establishment as well as slow start-up throttle.

Persistent connections provide quite few advantages like reduce the delays and overheads of connection establishment, keep the connections in a tuned state, and reduce the potential number of open connections. But if you don't handle persistent connections with care, you may end up accumulating a large number of idle connections, consuming local resources and resources on remote clients and servers.

There are two types of persistent connections

  1. Http/1.0: had concept of keep-alive connections:

  2. Http/1.1 has concept of persistent connections.

How HTTP connection works ?

When you try to access particular URL in your browser it goes through following steps to get response


  • First browser needs to determine the IP address and port number of the web server from the URL. If the host name in the URI was not recently visited it may take tens of seconds to convert the host name from a URI into an IP address using the DNS resolution infrastructure

  • Next the client sends a TCP connection request to the server and waits for the sever to send back a connection acceptance reply. Connection setup delay occurs for every new TCP connection. This usually takes a second or two but it can add up quickly when hundreds of Http transactions are made.

  • Once the connection is established, the client sends the HTTP request over the newly established TCP pipe. The web server reads the request message from the TCP connection as the data arrives and processes the request. It takes time for request message to travel over the internet and get processed by the server

  • The web server then writes back the Http response, which takes some time


YOu can use Firebug to loot at the time spent by browser in each of these steps, take a look at following screen shot


Firebug will display timeline for each of the resource, different colors in the timeline display time spent in each of the phase of getting response, when you take your mouse over particular resource it will display a popup with details on time spent in each phase


  • DNS Lookup This is amount of time it took for Firefox to figure out IP address and port number from the URL. Please note that Firefox will cache the results of DNS lookups. This time is longer for first request to host name

  • Connecting This is amount of time it took for Firefox to establish Http connection with the server

  • Sending This is amount of time it takes for Firefox to send the request

  • Waiting Time taken for server to read the request process it and start sending message

  • Receiving Time taken for firefox to receive the response sent by server

What is TCP startup throttle

TCP slow start throttles the number of packets a TCP endpoint can have in flight at any one time. Put simply, each time a packet received successfully, the sender gets permission to send two more packets. If an Http transaction has a large amount of data to send, it cannot send all the packages at once. It must send one packet and wait for an acknowledgement; then it can send two packets, each of which must be acknowledged, which allows four packets, etc. Because of this congestion-control feature, new connections are slower than tuned connections that are already have exchanged, a modest amount of data. Because tuned connections are faster, HTTP includes facilities that let you reuse existing connection.

Apache mod_info module

The Apache Http Server has mod_info module that can be used to obtain the server information. The mod_info module is disabled by default but you can enable it by un-commenting following lines from the httpd.conf

<Location /server-info>
SetHandler server-info
</Location>


Once configured and loaded you can access the Server Information by going to http://localhost/server-info like this. It provides detail information about the server configuration.

Apache mod_status module

Apache Http Server has a mod_status module that allows a server administrator to find out how well their server is performing. A HTML page is presented that gives the current server statistics in an easily readable form. If required this page can be made to automatically refresh (given a compatible browser).

The mod_status module is disabled by default but You can configure the mod_status module by un-commenting following lines from httpd.conf


LoadModule status_module modules/mod_status.so
<IfModule mod_status.c>
ExtendedStatus On
</IfModule>


After your httpd.conf file is reloaded try accessing the Http Server at http://localhost/server-status URL and you will get a page like this.


It gives you details on what all requests its service, how many threads are in use,..
The details given are:

  • The number of worker serving requests

  • The number of idle worker

  • The status of each worker, the number of requests that worker has performed and the total number of bytes served by the worker (*)

  • A total number of accesses and byte count served (*)

  • The time the server was started/restarted and the time it has been running for

  • Averages giving the number of requests per second, the number of bytes served per second and the average number of bytes per request (*)

  • The current percentage CPU used by each worker and in total by Apache (*)

  • The current hosts and requests being processed (*)

Developing JMeter Test for WebSphere Portal

I was trying to figure out how to test WebSphere Portal Application using Apache JMeter and it seems that we can use concept of WebSphere Portal login URL to create JMeter Test.


  • I started by creating two portal page JMeter Test Page and JMeter Test Page 2 in WebSphere Portal and i did add the portlet that i want to add to this page. Both pages are protected pages, so JMeter will have to login in the portal as first thing

  • Then i had to create following two URL mappings

    1. JMeter Test Page -> jmeter1

    2. JMeter Test Page -> jmeter1


  • Inside JMeter create a new test and add Config - Http Cookie Manager as the first element in the Test plan, The Cookie Manager element has two functions: First, it stores and sends cookies just like a web browser. If you have an HTTP Request and the response contains a cookie, the Cookie Manager automatically stores that cookie and will use it for all future requests to that particular web site. Each JMeter thread has its own "cookie storage area". So, if you are testing a web site that uses a cookie for storing session information, each JMeter thread will have its own session


    WebSphere Portal depends on cookies to store the users login information, so cookie manager will copy the cookies returned by portal login requests to subsequent requets

  • The first thing that we want to do is login into portal and for that we will make a GET request to the WebSphere Portal login URL like this


    As you can see i am passing user name and password as query parameter to the /wpcert/demo/cxml/04_SD9ePMtCP1I800I_KydQvyHFUBADPmuQy

  • Once the JMeter script is logged in into portal, next thing will be to make a request to the friendly url of the portal page like this


  • Finally add a View Results in Tree element, that will display results of the test and our final test plan should look like this


Now run your test case and you should be able to see the results, you can download the test plan from here

Creating Impersonation URL in the theme

As per the portal Infocenter, we can create a Impersonation link in the theme by adding following code to the theme

<portal-logic:if loggedIn="yes">
<portal-logic:if userImpersonated="false">
<portal-navigation:urlGeneration contentNode="ibm.portal.Impersonation">
<li><a href='<% wpsURL.write(escapeXmlWriter); %>'><portal-fmt:text key='link.impersonate'
bundle='nls.engine'/></a></li>
</portal-navigation:urlGeneration>
</portal-logic:if>
</portal-logic:if>


I tried adding this code to banner_toolbar.jsp in default IBM theme but it does not work, first i got compiler error in portal:logic tag saying the userImpersonated attributed does not exists and when i changed in Info center it seems that portal:logic tag does not have that attribute.

Then i tried without the portal:logic tab and it seems that the ibm.portal.Impersonation content node does not exist either. So portal cant generate url to that page.

Whats new in WebSphere Portal Server Version 6.1.5

WebSphere Portal Server Version 6.1.5 has introduced quite a few new features, i tried playing around with some of them.


  1. Impersonation Service

  2. Enhanced Portal theme

  3. Improved version of enable-develop-mode-startup-performance

  4. The Client side aggregation theme works in IE 8 and Firefox 3.5

  5. Support for Dojo 1.3.2

Sample Impersonation portlet

WebSphere Portal 6.1.5 has a feature called Impersonation that you can use to create a portlet that will let support person impersonate other users.

I built a sample portlet to demonstrate how to use impersonation service. This sample portlet has a form where you can enter uid of the user that you want to impersonate, once you enter uid and click submit, it will impersonate that user. Once your done and want to switch back to the original user you can click on Switch back to original user link. You can download this sample portlet from here

Important Note: I followed the documentation to build this portlet and i could get impersonation part working but switching back to original user is not working. Even after calling ImpersonationService.loginOriginalUser() method it still keeps showing impersonated user. But when i click on logout, it starts showing the original user. I got this problem on WebSphere Portal Version wp6103_201_01 2009-11-07. I am planning to apply fixpack 6.1.5.1 to my portal and see if it helps

This is how my ImpersonationPortlet.java looks like


package com.webspherenotes.misc;

import java.io.IOException;

import javax.naming.InitialContext;
import javax.naming.NamingException;
import javax.portlet.ActionRequest;
import javax.portlet.ActionResponse;
import javax.portlet.GenericPortlet;
import javax.portlet.PortletException;
import javax.portlet.ProcessAction;
import javax.portlet.RenderRequest;
import javax.portlet.RenderResponse;

import com.ibm.portal.portlet.service.PortletServiceHome;
import com.ibm.portal.portlet.service.impersonation.ImpersonationException;
import com.ibm.portal.portlet.service.impersonation.ImpersonationService;

public class ImpersonationPortlet extends GenericPortlet{

PortletServiceHome psh;
public void init() throws PortletException {
System.out.println("Entering ImpersonationPortlet.init()");
try {
InitialContext context = new InitialContext();
psh= (PortletServiceHome)context.lookup(ImpersonationService.JNDI_NAME);
} catch (NamingException e) {
e.printStackTrace(System.out);
}
System.out.println("Exiting ImpersonationPortlet.init()");
}

protected void doView(RenderRequest request, RenderResponse response)
throws PortletException, IOException {
System.out.println("Entering ImpersonationPortlet.init()");

response.setContentType("text/html");
getPortletContext().getRequestDispatcher("/index.jsp").include(request, response);
System.out.println("Exiting ImpersonationPortlet.init()");
}

@ProcessAction(name="switchUser")
public void switchUser(ActionRequest request, ActionResponse response)
throws PortletException, IOException {
System.out.println("Entering ImpersonationPortlet.switchUser()");
try {
String userId = request.getParameter("USER_NAME");
System.out.println("Value of USER_NAME " + userId);
ImpersonationService impersonationService = psh.getPortletService(ImpersonationService.class);
impersonationService.doImpersonate(request, response, userId);
} catch (ImpersonationException e) {
e.printStackTrace(System.out);
}
System.out.println("Exiting ImpersonationPortlet.switchUser()");
}

@ProcessAction(name="originalUser")
public void originalUser(ActionRequest request, ActionResponse response) throws PortletException, IOException{
System.out.println("Entering ImpersonationPortlet.originalUser()");
try {

ImpersonationService impersonationService = psh.getPortletService(ImpersonationService.class);
System.out.println("Switching back to original user " + impersonationService.getOriginalUser());
System.out.println("Is User Impersonated " + impersonationService.isUserImpersonated());
impersonationService.loginOriginalUser(request, response);
System.out.println("After switching back to original user " + request.getRemoteUser());
} catch (ImpersonationException e) {
e.printStackTrace(System.out);
}
System.out.println("Exiting ImpersonationPortlet.originalUser()");
}
}


The ImpersonationPortlet has following two methods that can handle the Action Request,


  1. switchUser: method will get called whenever user enters a uniqueName for the user that you want to impersonate and click submit. In this method i am reading name the value submitted by user and then calling impersonationService.doImpersonate() method with userName submitted by the user. THis method will switch the user and redirect you to the home page for that user

  2. originalUser: THis method will get called when user clicks on Switch back to original user link, at this point i am calling impersonationService.loginOriginalUser(request, response) method to switch back to the original user.


This is the jsp that gets displayed to the user in the VIEW mode and has methods for impersonating and switching back the user.

<%@page language="java" %>
<%@taglib uri="http://java.sun.com/portlet_2_0" prefix="portlet"%>
<portlet:defineObjects />

<%
String userId = request.getRemoteUser();
%>
<portlet:actionURL var="switchUserUrl">
<portlet:param name="javax.portlet.action" value="switchUser" />
</portlet:actionURL>
<h4>Current User - <%=userId %></h4>
<h4>Enter name of the user to impersonate</h4>
<form method="post" action="<%=switchUserUrl %>">
<table>
<tr>
<td>User Id</td>
<td><input type="text" name="USER_NAME" /></td>
</tr>
<tr>

<td><input type="submit" name="submit" /></td>
</tr>

</table>

</form>
<portlet:actionURL var="originalUserUrl">
<portlet:param name="javax.portlet.action" value="originalUser" />
</portlet:actionURL>

<h4>Click on URL to switch back to Original User</h4>
<a href='<%=originalUserUrl %>' >Switch back to original user</a>


This is the screen shot of the impersonation portlet

What is impersonation

Websphere Portal 6.1.5 has a new feature called Impersonation, what it does is allow a user, such as a support specialist, to access another user's system to test out a new page, portlet, etc. and to see any issues as they occur on the end user system. Portal Access Control (PAC) controls the ability to impersonate another user. To be able to impersonate another user, the Delegator role on the virtual resource Users, i.e. Delegator@Users must be assigned. You first need to enable the impersonation feature within IBM WebSphere Portal.

The impersonation feature is disabled by default and you will have to follow these steps to enable it


  • Log on to the WebSphere Application Server Integrated Solutions Console or Network Deployment Administration Console.

  • Perform the following steps to enable the Impersonation feature:

    1. Navigate to Resources > Resource Environment > Resource Environment Providers > WP Authentication Service > Custom Properties.

    2. Click New.

    3. Enter logout.explicit.filterchain in the Name field.

    4. Enter com.ibm.wps.auth.impersonation.impl.ImpersonationLogoutFilter in the Value field.


    5. Click Apply and then click Save to save the changes directly to the master configuration.

    6. Navigate to Resources > Resource Environment > Resource Environment Providers > WP PortletServiceRegistryService > Custom Properties.

    7. Click New.

    8. Enter jndi.com.ibm.portal.portlet.service.impersonation.ImpersonationService in the Name field.

    9. Enter com.ibm.wps.portletservice.impersonation.impl.ImpersonationServiceImpl in the Value field.


    10. Click Apply and then click Save to save the changes directly to the master configuration.

    11. Stop and restart the WebSphere_Portal server.

    12. Perform the following steps to assign the Delegator role to a user:

      • Log on to WebSphere Portal as the Administrator.

      • Click Administration.

      • Click Access > User and Group Permissions.

      • Click Users.

      • Search for the user you want to assign as Delegator.

      • Click the Select Resource Type icon for the required user.

      • Navigate to the page that contains the Virtual Resources option, using the Page Next button and click that link.

      • Navigate to the page that contains the USERS option and click the Assign Access icon.

      • Select the Explicitly Assign checkbox for the Delegator role.


      • Click OK.

      • Verify that the required user now has User and Delegator access.


Custom Login Portlet

Starting from WPS 6.1.0.1, IBM WebSPhere Portal Server provides a Login Service that you can use to create a custom login portlet. You may want to create a custom login portlet to IBM WebSphere Portal if the base portlet is not in the format you want, or if you want to add additional checking to the login.

In order to demonstrate how you can use Login Service i did built a CustomLoginPortlet, it shows a Login form to user and when you enter user and password on the form, it will login into portal for you. You can download this sample portlet from here

This is how my CustomLoginPortlet.java looks like

package com.webspherenotes.services;

import java.io.IOException;
import java.util.HashMap;
import java.util.Map;

import javax.naming.InitialContext;
import javax.naming.NamingException;
import javax.portlet.ActionRequest;
import javax.portlet.ActionResponse;
import javax.portlet.GenericPortlet;
import javax.portlet.PortletException;
import javax.portlet.RenderRequest;
import javax.portlet.RenderResponse;
import javax.security.auth.login.LoginException;

import com.ibm.portal.auth.exceptions.AuthenticationException;
import com.ibm.portal.auth.exceptions.AuthenticationFailedException;
import com.ibm.portal.auth.exceptions.PasswordInvalidException;
import com.ibm.portal.auth.exceptions.PortletLoginDisabledException;
import com.ibm.portal.auth.exceptions.SessionTimeOutException;
import com.ibm.portal.auth.exceptions.SystemLoginException;
import com.ibm.portal.auth.exceptions.UserAlreadyLoggedInException;
import com.ibm.portal.auth.exceptions.UserIDInvalidException;
import com.ibm.portal.portlet.service.PortletServiceHome;
import com.ibm.portal.portlet.service.login.LoginHome;
import com.ibm.portal.portlet.service.login.LoginService;
import com.ibm.websphere.security.WSSecurityException;

public class CustomLoginPortlet extends GenericPortlet{
protected void doView(RenderRequest request, RenderResponse response)
throws PortletException, IOException {
System.out.println("Entering CustomLoginPortlet.doView()");
response.setContentType("text/html");
getPortletContext().getRequestDispatcher("/login.jsp").include(request, response);
System.out.println("Exiting CustomLoginPortlet.doView()");
}

LoginHome loginHome;
public void init() throws PortletException {
System.out.println("Entering CustomLoginPortlet.init()");
try {
InitialContext ctx = new InitialContext();
PortletServiceHome psh = (PortletServiceHome) ctx.lookup(LoginHome.JNDI_NAME);
loginHome = (LoginHome) psh.getPortletService(LoginHome.class);
//loginHome =(LoginHome) ctx.lookup(LoginHome.JNDI_NAME);
} catch (NamingException e) {
e.printStackTrace();
}
System.out.println("Exiting CustomLoginPortlet.init()");
}

public void processAction(ActionRequest request, ActionResponse response)
throws PortletException, IOException {
try {
System.out.println("Entering CustomLoginPortlet.processAction()");
String userId = request.getParameter("USER_NAME");
System.out.println("User Id " + userId);
String password = request.getParameter("PASSWORD");
System.out.println("Password " + password);
LoginService loginService = loginHome.getLoginService(request, response);
System.out.println("Login Service " + loginService);
Map contextMap = new HashMap();
contextMap.put(LoginService.DO_RESUME_SESSION_KEY, new Boolean(false));
loginService.login(userId, password.toCharArray(), contextMap, null);
System.out.println("Exiting CustomLoginPortlet.processAction()");
response.sendRedirect("/wpcert/mydemo");
} catch (PasswordInvalidException e) {
// TODO Auto-generated catch block
e.printStackTrace();
} catch (UserIDInvalidException e) {
// TODO Auto-generated catch block
e.printStackTrace();
} catch (AuthenticationFailedException e) {
// TODO Auto-generated catch block
e.printStackTrace();
} catch (AuthenticationException e) {
// TODO Auto-generated catch block
e.printStackTrace();
} catch (SessionTimeOutException e) {
// TODO Auto-generated catch block
e.printStackTrace();
} catch (PortletLoginDisabledException e) {
// TODO Auto-generated catch block
e.printStackTrace();
} catch (UserAlreadyLoggedInException e) {
// TODO Auto-generated catch block
e.printStackTrace();
} catch (SystemLoginException e) {
// TODO Auto-generated catch block
e.printStackTrace();
} catch (LoginException e) {
// TODO Auto-generated catch block
e.printStackTrace();
} catch (WSSecurityException e) {
// TODO Auto-generated catch block
e.printStackTrace();
} catch (com.ibm.portal.auth.exceptions.LoginException e) {
// TODO Auto-generated catch block
e.printStackTrace();
}
}
}


In the doView() method of the CustomLoginPortlet, i am forwarding control to login.jsp, which displays a form to user. Once user enters user id and password and submits the form, in the processAction() method i am reading those values and calling login() method of the LoginService. The login() method will first login user into the portal and then redirect him to the logged in page.

Once your portlet is ready, deploy it on portal and add User role to anonymous users. Then you have two options either you can change the login page of the portal to add this portlet or create a new page, allow anonymous users access to that page and may be create friendly URL for that page. Then you can try login portlet by opening a new browser instance and accessing the custom login page Url directly and entering userid an password on the custom login portlet

GZiping text files using Apache Http Server

In most of the enterprise installation the request made by browser first goes to Http Server and then Http Server forwards that request to the J2EE Server such as IBM WebSphere Application Server, WebSphere Portal Server or WebSphere Commerce server.

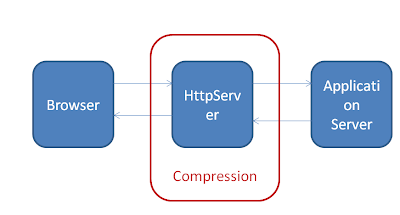
If you have a Http Server in between your browser and Application Server, then you can configure it to compress the response before sending it back to the Browser. YOu can configure Http Server to configure not only the static text files that are hosted on Http Server such as CSS and JavaScript files but it can also configure the dynamic Html files created by Application server like this.


One of the advantage of this approach is that your application server does not have to know anything about GZIP and you can simply configure Http Server to decide what type of files to compress, enable compression trace, exclude browsers that bugs from compression, exclude URL's or file extensions that should be excluded from compression, configure your proxy to handle compression.

The Apache Http Server(IBM Http Server is based on Apache Http Server) has mod_deflate module that can be used to configure compression.

You can enable Http Compression at Apache level by opening HTTPServerRoot/conf/httpd.conf and adding these lines to it


LoadModule deflate_module modules/mod_deflate.so
AddOutputFilterByType DEFLATE text/html text/plain text/xml


The AddOutputFilterByType directive activates a particular output filter for a request depending on the response MIME-type. In our example it is applying mod_deflate to response where content-type is either text/html, text/plain or text/xml. The DEFLATE filter will compress the output before sending it to the client.

Enabling filters with AddOutputFilterByType may fail partially or completely in some cases. For example, no filters are applied if the MIME-type could not be determined and falls back to the DefaultType setting, even if the DefaultType is the same. SO there is another more complex and powerful way in which we can configure mod_deflate

<Location />
# Insert filter
SetOutputFilter DEFLATE

# Netscape 4.x has some problems...
BrowserMatch ^Mozilla/4 gzip-only-text/html

# Netscape 4.06-4.08 have some more problems
BrowserMatch ^Mozilla/4\.0[678] no-gzip

# MSIE masquerades as Netscape, but it is fine
# BrowserMatch \bMSIE !no-gzip !gzip-only-text/html

# NOTE: Due to a bug in mod_setenvif up to Apache 2.0.48
# the above regex won't work. You can use the following
# workaround to get the desired effect:
BrowserMatch \bMSI[E] !no-gzip !gzip-only-text/html

# Don't compress images
SetEnvIfNoCase Request_URI \
\.(?:gif|jpe?g|png)$ no-gzip dont-vary

# Make sure proxies don't deliver the wrong content
Header append Vary User-Agent env=!dont-vary
</Location>

YSlow - Compress components with GZIP

I wanted to improve client side performance of the WebSphere Portal site, so i did YSlow analysis of the login page and one of the recommendations that i got from YSlow was to "Compress components with GZIP"


So i wanted to see effects of GZIP on the WebSphere Portal performance, so what i did is i did delete everything from my browser cache and then tried accessing the portal login page, and used firefox to see how much data is being downloaded


When i access the portal login page with empty cache, the browser is trying to download 16 resources, close to 1 MB of data for downloading all the 16 resources.

Then i configured my HttpServer, which is seating infront of WebSphere Portal to gzip all the text resources and i tried accessing the same page after clearing browser cache, it made 16 requests to download all the resources as before, but the amount of data being downloaded came down to 240.9KB from 1 MB (without gzip) before and the time it took to download and execute the resources came down from 2.9 seconds to 1.8 second.


The GZIP compression reduces size of Http Response by close to 70 %. The actual performance improvement would depend on the network speed for the client. For the clients who have slow network this could be a big boost

Updating wps.ear using WSAdmin Script

The WebSphere Portal engine is implemented as J2EE application. The portal engine logic is implemented in wps.ear. These are some of the use cases in which you might want to update the wps.ear


  • You want to introduce a new THeme or Skin or something that is deployed as part of wps.ear

  • You might want to add Servlet Filter to do some pre/post processing on the portal engine requests.


I am working on creating a new Theme and Skin and as part of that i need to update the wps.ear frequently and i follow these steps to update wps.ear using wsadmin script

  • First connect to wsadmin console for WebSphere Portal, you can do that by executing following command

    ./wsadmin.sh -user wasadmin -password wasadmin -lang jython -port 10033

    By default the portal is configured to listen on 10033 port for SOAP connection

  • THen execute AdminApp.export('appname','eardestinationpath') command on the wsadmin consoel and it will export the installed application into .ear

    AdminApp.export('wps','/tmp/wpsear/wps.ear')

    In this case i am export wps enterprise application into /tmp/wpsear/wps.ear

  • The wps.ear contains 3 .war files and one .ejb.jar file. I can use either normal jar utility to expand the .ear first and then expand .war files in the .ear file or i can use EARExpander utility which is part of WAS and available even in profile_home/bin directory to expand the .ear file

    ./EARExpander.sh -ear /tmp/wpsear/wps.ear -operationDir /tmp/wpsear -operation expand -expansionFlags all

    This will expand the wps.ear and the .war files inside into /tmp/wpsear directory

  • Now you can apply your changes by either copying new theme or skin related directory or modifying the web.xml file for adding filter definition

  • We can use the EARExpander utility to collapsing the content of directory into .ear file using command like this

    ./EARExpander.sh -ear /tmp/wps.ear -operationDir /tmp/wpsear -operation collapse


  • Once the updated wps.ear is ready we can use the following wasadmin command to update the .ear file on the server

    AdminApp.update('wps', 'app', '[ -operation update -contents /tmp/wps.ear -nopreCompileJSPs -installed.ear.destination $(APP_INSTALL_ROOT)/DefaultNode -distributeApp -nouseMetaDataFromBinary -nodeployejb -createMBeansForResources -noreloadEnabled -nodeployws -validateinstall warn -processEmbeddedConfig -filepermission .*\.dll=755#.*\.so=755#.*\.a=755#.*\.sl=755 -noallowDispatchRemoteInclude -noallowServiceRemoteInclude]' )


  • Last step would be to commit changes in the WAS configuration, at this point the WAS xml configuration files will actually get modified

    AdminConfig.save()


How to configure Apache Server for not gziping response to Apache Commons Http Client

In the Decoding the gziped response in HttpClient entry i demonstrated a sample of how you can decode the gzip response in Apache HttpClient program.

But if you are calling a URL of your own site then you might not want to first compress response on the producer and decompress response on the consumer side. Or your web site is already accessed by lot of other java programs and now if you start gzipping response your afraid that it might break existing clients.

If thats the case then you can figure out what is value of User-Agent header when request is made by Java client, In case if your using Apache Jakarta Commons Http Client, the User Agent header would be set like this

User-Agent Jakarta Commons-HttpClient/3.1


If your using Apache Server for gzipping your response, you can add BrowerMatch statement like this to tell Apache server not to gzip response if the client is Jakarta commons http client


AddOutputFilterByType DEFLATE text/html text/plain text/xml text/json

BrowserMatch ^Jakarta Commons-HttpClient no-gzip

What content should be compressed

As mentioned in the What is GZIP compression, the gzip can reduce size of the response by approximately 70%. You should apply gzip to all text response such as


  • HTML

  • XML

  • JSON

  • CSS

  • JavaScript


But applying gzip to binary content is not a good idea. For example content such as images, pdfs, .tar, .zip files are already compressed trying to compress them again will require CPU and it might be counter productive. So you should not compress


  • Images

  • EXE

  • PDF

  • .ZIP

  • JavaScript

What is GZIP compression

You can reduce size of the Http response (HTML, CSS, JavaScript ) by zipping your response (Approximately 70% reduction in response size). Its same as normal zip that we use for sending files as email attachment, with difference that in this case either your Application Server of Http Server will zip the response and the browser knows how to unzip the response. Reducing size of response will result in faster network response time and as a result improve the web site performance.

Starting from Http 1.1, browser can let your Http Server know that it can handle zipped content by sending Accept-Encoding header in request like this

 
Accept-Encoding: gzip, deflate


This header tells the server that browser know how to unzip content zipped using either gzip or deflate.

When web server sees this, it might decide to zip the response using one of the method that browser understand say gzip, so first it zips the response and sets Content-Encoding header like this on the response to let browser know that the response is zipped and the method used for zipping response


Content-Encoding: gzip


There are two methods for zipping the Http Response one is gzip and other is deflate. Most of the browsers support gzip but not deflate. Some of the browsers that do support deflate, also support gzip, so we should use gzip as much as possible.

Decoding the gziped response in HttpClient

I am using Apache Http Client to get Http response from a a web site and display that response in the portlet. That website supports GZIP and i wanted to take advantage of it. So i built this sample code to demonstrate how you can set Accept-Encoding header while making Http call to the web site and then once you get response check if the response is gziped using value of Content-Encoding header and if yes decode that value


package com.webspherenotes.performance;

import java.io.BufferedReader;
import java.io.IOException;
import java.io.InputStreamReader;
import java.io.PrintWriter;
import java.io.Reader;
import java.io.StringWriter;
import java.util.zip.GZIPInputStream;

import org.apache.commons.httpclient.DefaultHttpMethodRetryHandler;
import org.apache.commons.httpclient.Header;
import org.apache.commons.httpclient.HttpClient;
import org.apache.commons.httpclient.HttpException;
import org.apache.commons.httpclient.HttpMethod;
import org.apache.commons.httpclient.HttpStatus;
import org.apache.commons.httpclient.methods.GetMethod;
import org.apache.commons.httpclient.params.HttpMethodParams;

public class GZIPHttpClient {

public static void main(String[] args) {
HttpClient client = new HttpClient();

HttpMethod method = new GetMethod("http://www.apache.org");
method.getParams().setParameter(HttpMethodParams.RETRY_HANDLER,
new DefaultHttpMethodRetryHandler(3, false));
System.out.println("Setting gzip header explicitiy");
method.addRequestHeader("Accept-Encoding", "gzip");
try {
int statusCode = client.executeMethod(method);

if (statusCode != HttpStatus.SC_OK) {
System.err.println("Method failed: " + method.getStatusLine());
}
Header[] responseHeader = method.getResponseHeaders();
for(int i = 0 ; i < responseHeader.length ;i++){
Header header = responseHeader[i];
System.out.println(header.getName() +" " + header.getValue());
}
String responseBody = getResponseBody(method);
System.out.println(new String(responseBody));

} catch (HttpException e) {
System.err.println("Fatal protocol violation: " + e.getMessage());
e.printStackTrace();
} catch (IOException e) {
System.err.println("Fatal transport error: " + e.getMessage());
e.printStackTrace();
} finally {
// Release the connection.
method.releaseConnection();
}
}

public static String getResponseBody(HttpMethod method) throws IOException{
Header contentEncoding = method.getResponseHeader("Content-Encoding");
System.out.println("Value of Content-encoding header " + contentEncoding);
if(contentEncoding != null ){
String acceptEncodingValue = contentEncoding.getValue();
if(acceptEncodingValue.indexOf("gzip") != -1){
System.out.println("This is gzipped content " );
StringWriter responseBody = new StringWriter();
PrintWriter responseWriter = new PrintWriter(responseBody);
GZIPInputStream zippedInputStream = new GZIPInputStream(method.getResponseBodyAsStream());
BufferedReader r = new BufferedReader(new InputStreamReader(zippedInputStream));
String line = null;
while( (line =r.readLine()) != null){
responseWriter.println(line);
}
return responseBody.toString();
}
}
System.out.println("The response is not zipped");
return method.getResponseBodyAsString();
}
}


You can let a Http Server know that you can handle gzip response by setting Accept-Encoding header like this method.addRequestHeader("Accept-Encoding", "gzip").

If the HttpServer is able to compress the response using gzip it will do that and set Content-Encoding header with value equal to gzip. In your client code you will have to check if this header is set if yes, unzip the response body

Supporting custom portlet mode in Spring Portlet MVC Framework

In the Supporting Multiple modes with Spring Portlet MVC Framework, entry i built a sample portlet to demonstrate how you can support more than one portlet mode in Spring Portlet MVC Framework portlet. I changed that sample to see what it will take to add support for custom portlet mode in Spring Portlet MVC Framework portlet.

First i had to add a new Controller class that will get called whenever this portlet gets invoked int the config mode, like this

package com.webspherenotes.mvc.spring.action;

import javax.portlet.RenderRequest;
import javax.portlet.RenderResponse;

import org.springframework.web.portlet.ModelAndView;
import org.springframework.web.portlet.mvc.AbstractController;

public class ConfigController extends AbstractController{

public ModelAndView handleRenderRequest(RenderRequest request,
RenderResponse response) throws Exception {
System.out.println("Entering ConfigController.handleRenderRequest()");
ModelAndView modelAndView = new ModelAndView("config");
System.out.println("Exiting ConfigController.handleRenderRequest()");
return modelAndView;
}

}


Then i had to change the MultipleModesPortlet-portlet.xml, spring configuration file for the portlet like this


<?xml version="1.0" encoding="UTF-8"?>
<beans xmlns="http://www.springframework.org/schema/beans"
xmlns:xsi="http://www.w3.org/2001/XMLSchema-instance"
xmlns:aop="http://www.springframework.org/schema/aop"
xsi:schemaLocation="
http://www.springframework.org/schema/beans http://www.springframework.org/schema/beans/spring-beans-3.0.xsd
http://www.springframework.org/schema/aop http://www.springframework.org/schema/aop/spring-aop-3.0.xsd">
<bean id="viewController"
class="com.webspherenotes.mvc.spring.action.ViewController" />

<bean id="editController"
class="com.webspherenotes.mvc.spring.action.EditController" />

<bean id="helpController"
class="com.webspherenotes.mvc.spring.action.HelpController" />

<bean id="configController"
class="com.webspherenotes.mvc.spring.action.ConfigController" />

<bean id="portletModeHandlerMapping"
class="org.springframework.web.portlet.handler.PortletModeHandlerMapping">
<property name="order" value="1" />
<property name="portletModeMap">
<map>
<entry key="view">
<ref bean="viewController" />
</entry>
<entry key="edit">
<ref bean="editController" />
</entry>
<entry key="help">
<ref bean="helpController" />
</entry>
<entry key="config">
<ref bean="configController" />
</entry>

</map>
</property>
</bean>
<bean id="viewResolver"
class="org.springframework.web.servlet.view.InternalResourceViewResolver">
<property name="viewClass">
<value>org.springframework.web.servlet.view.JstlView</value>
</property>
<property name="prefix">
<value>/WEB-INF/jsp/</value>
</property>
<property name="suffix">
<value>.jsp</value>
</property>
</bean>
</beans>


So i had to map the config mode to configModeController bean in the portletModeMap.

Eclipse Memory Analyzer tool(MAT)

If you want to analyze Heap Dump of application you can use IBM Heap Analyzer. It works in most of the cases but in cases where it runs for few minutes and then throws OutOfMemoryException i use Eclipse Memory Analyzer Tool. So far i never ran into issues with this tool.

WebSphere portal server managed custom Portlet modes

A preference is modified by using setValue. This normally occurs at the personalized layer and therefore affects only the current user. WebSphere Portal uses two special custom modes from the set of predefined custom modes in the Java Portlet Specification to allow setting up the more general preference levels:


  • The edit_defaults custom portlet mode is used to work directly on the shared preferences. In this case the personalized preferences level is not available.

  • Similarly, the config mode is used to read and modify the administrator level of preferences.

  • The deployment descriptor level of preferences can only change when the portlet is redeployed with a modified portlet.xml. It cannot be modified by portlet code.


I built a sample portlet to demonstrate how you can use the edit_defaults and config mode supported by WebSphere Portal Server.

package com.webspherenotes.portlet.jsr286;

import java.io.IOException;
import java.util.ArrayList;

import javax.portlet.ActionRequest;
import javax.portlet.ActionResponse;
import javax.portlet.GenericPortlet;
import javax.portlet.PortletException;
import javax.portlet.PortletMode;
import javax.portlet.PortletPreferences;
import javax.portlet.RenderRequest;
import javax.portlet.RenderResponse;

public class WPSCustomPortletMode extends GenericPortlet{

protected void doView(RenderRequest request, RenderResponse response)
throws PortletException, IOException {
System.out.println("Entering CustomPortletMode.doView()");
response.setContentType("text/html");
response.getWriter().println("User Name "
+ request.getPreferences().getValue("userName", "Not Set"));
System.out.println("Exiting CustomPortletMode.doView()");
}

public void processAction(ActionRequest request, ActionResponse response)
throws PortletException, IOException {
System.out.println("Entering CustomPortletMode.processAction()");
String userName = request.getParameter("userName");
PortletPreferences preference = request.getPreferences();
preference.setValue("userName", userName);
preference.store();
System.out.println("Entering CustomPortletMode.processAction()");
}

protected void doEdit(RenderRequest request, RenderResponse response)
throws PortletException, IOException {
System.out.println("Entering CustomPortletMode.doEdit()");
response.setContentType("text/html");
getPortletContext().getRequestDispatcher("/index.jsp").include(request, response);
System.out.println("Exiting CustomPortletMode.doEdit()");
}


protected void doEditDefaults(RenderRequest request, RenderResponse response)
throws PortletException, IOException{
System.out.println("Entering CustomPortletMode.doEditDefaults()");
response.setContentType("text/html");
getPortletContext().getRequestDispatcher("/index.jsp").include(request, response);
System.out.println("Exiting CustomPortletMode.doEdit()");
System.out.println("Entering CustomPortletMode.doEditDefaults()");
}
protected void doConfig(RenderRequest request, RenderResponse response)
throws PortletException, IOException{
System.out.println("Entering CustomPortletMode.doConfig()");
response.setContentType("text/html");
getPortletContext().getRequestDispatcher("/index.jsp").include(request, response);
System.out.println("Exiting CustomPortletMode.doConfig()");

}

PortletMode configMode = new PortletMode("config");
PortletMode editDefaultsMode = new PortletMode("edit_defaults");
protected void doDispatch(RenderRequest request, RenderResponse response)
throws PortletException, IOException {
System.out.println("Entering CustomPortletMode.doDispatch");
System.out.println("Requested portlet mode " + request.getPortletMode());
if(request.getPortletMode().equals(configMode)){
System.out.println("Request for config mode");
doConfig(request, response);
}else if(request.getPortletMode().equals(editDefaultsMode)){
System.out.println("Request for edit_defaults mode");
doEditDefaults(request, response);
}else{
super.doDispatch(request, response);
}

System.out.println("Exiting CustomPortletMode.doDispatch");
}
}


The WPSCustomPortletMode.java overrides doDispatch() and forwards control to corresponding custom modes. I am forwarding control to same index.jsp in edit, edit_defaults and config mode and all three of them allow user to submit a value for userName that i am storing in preference in processAction() method. Depending on the mode this value will get stored at different preference level.

This is how the portlet.xml file for WPCustomPortletMode looks like

<?xml version="1.0" encoding="UTF-8"?>
<portlet-app xmlns="http://java.sun.com/xml/ns/portlet/portlet-app_2_0.xsd"
version="2.0" xmlns:xsi="http://www.w3.org/2001/XMLSchema-instance"
xsi:schemaLocation="http://java.sun.com/xml/ns/portlet/portlet-app_2_0.xsd
http://java.sun.com/xml/ns/portlet/portlet-app_2_0.xsd">
<portlet>
<portlet-name>WPSCustomPortletMode</portlet-name>
<display-name>WPS Custom Portlet Mode Portlet</display-name>
<portlet-class>com.webspherenotes.portlet.jsr286.WPSCustomPortletMode</portlet-class>
<expiration-cache>0</expiration-cache>
<supports>
<mime-type>text/html</mime-type>
<portlet-mode>view</portlet-mode>
<portlet-mode>edit</portlet-mode>
<portlet-mode>config</portlet-mode>
<portlet-mode>edit_defaults</portlet-mode>
</supports>
<portlet-info>
<title>WPS Custom Portlet Mode Portlet</title>
<short-title>WPS Custom Portlet Mode Portlet</short-title>
<keywords>WPS Custom Portlet Mode Portlet</keywords>
</portlet-info>
</portlet>
<custom-portlet-mode>
<description>Shared Settings mode</description>
<portlet-mode>edit_defaults</portlet-mode>
</custom-portlet-mode>
<custom-portlet-mode>
<description>Administrative mode</description>
<portlet-mode>config</portlet-mode>
</custom-portlet-mode>
</portlet-app>


I am defining two custom-portlet-modes here and for both of them the value of portal-managed equal to true, which is default value to indicate that these custom portlet modes are managed by WebSphere Portal

Non portal managed custom portlet modes

Portal vendors may define custom portlet modes for vendor specific functionality for modes that need to be managed by the portal. Portlets may define additional modes that don’t need to be managed by the portal and correspond to the VIEW mode from a portal point of view. The portlet must declare portlet modes that are not managed by the portal via the <portal-managed>false</portal-managed> tag. Portlet modes are considered portal managed by default.

I tried building a sample portlet, to demonstrate if i can use a non container managed portlet mode. My sample portlet has a clipboard mode and in that mode i am just displaying markup that says this clipbarod mode.


<?xml version="1.0" encoding="UTF-8"?>
<portlet-app xmlns="http://java.sun.com/xml/ns/portlet/portlet-app_2_0.xsd"
version="2.0" xmlns:xsi="http://www.w3.org/2001/XMLSchema-instance"
xsi:schemaLocation="http://java.sun.com/xml/ns/portlet/portlet-app_2_0.xsd
http://java.sun.com/xml/ns/portlet/portlet-app_2_0.xsd">
<portlet>
<portlet-name>CustomPortletMode</portlet-name>
<display-name>Custom Portlet Mode Portlet</display-name>
<portlet-class>com.webspherenotes.portlet.jsr286.CustomPortletMode</portlet-class>
<expiration-cache>0</expiration-cache>
<supports>
<mime-type>text/html</mime-type>
<portlet-mode>view</portlet-mode>
<portlet-mode>clipboard</portlet-mode>

</supports>
<portlet-info>
<title>Custom Portlet Mode Portlet</title>
<short-title>Custom Portlet Mode Portlet</short-title>
<keywords>Custom Portlet Mode Portlet</keywords>
</portlet-info>
</portlet>
<custom-portlet-mode>
<description>Sample non portal managed mode</description>
<portlet-mode>clipboard</portlet-mode>
</custom-portlet-mode>

</portlet-app>


This is how my portlet.xml file looks like. I did add one custom-portlet-mode declaration for clipboard with value of portal-managed equal to false indicating that this mode is not managed by portal server.

Then i did create a CustomPortletMode.java like this

package com.webspherenotes.portlet.jsr286;

import java.io.IOException;

import javax.portlet.GenericPortlet;
import javax.portlet.PortletException;
import javax.portlet.PortletMode;
import javax.portlet.PortletURL;
import javax.portlet.RenderMode;
import javax.portlet.RenderRequest;
import javax.portlet.RenderResponse;

public class CustomPortletMode extends GenericPortlet{

protected void doView(RenderRequest request, RenderResponse response)
throws PortletException, IOException {
System.out.println("Entering CustomPortletMode.doView()");
response.setContentType("text/html");
response.getWriter().println("Hello from View Mode");
/* PortletURL porteltURL = response.createRenderURL();
porteltURL.setPortletMode(new PortletMode("clipboard"));
response.getWriter().println("<a href='"+ porteltURL.toString()+"'>Go to clipboard Mode</a>"); */
System.out.println("Exiting CustomPortletMode.doView()");
}


protected void doClipboard(RenderRequest request, RenderResponse response)
throws PortletException, IOException{
System.out.println("Entering CustomPortletMode.doClipboard()");
response.setContentType("text/html");
response.getWriter().println("Hello from Clipboard Mode");
System.out.println("Exiting CustomPortletMode.doClipboard()");

}


PortletMode clipboardMode = new PortletMode("clipboard");
protected void doDispatch(RenderRequest request, RenderResponse response)
throws PortletException, IOException {
System.out.println("Entering CustomPortletMode.doDispatch");
System.out.println("Portlet Mode " + request.getPortletMode());
System.out.println("Is Config mode " + request.getPortletMode().equals(configMode));
System.out.println("Is Config mode " + request.getPortletMode().equals(clipboardMode));
if(request.getPortletMode().equals(clipboardMode)){
doClipboard(request, response);
}else{
super.doDispatch(request, response);
}
System.out.println("Exiting CustomPortletMode.doDispatch");
}

}


When i tried deploying this portlet in the WebSPhere Portal Server it did not show me a button to switch to Clipboard mode. I tried creating a link in the VIEW mode manually that will give me change to move to clipboard mode. But when i deployed in WPS the doView() started failing with this exception. It seems that WPS does not like concept of non portal managed custom mode.

If you want to use a Custom POrtlet mode in your portlet, then you will have to override the doDispatch() method of the GenericPortlet class and in that method check if the request is for custom portlet mode and if yes forward control to the appropriate method to handle that mode, if you dont do that GenericPortlet will throw exception


javax.portlet.PortletModeException: Can't set this PortletMode
at com.ibm.ws.portletcontainer.core.impl.PortletURLImpl.setPortletMode(PortletURLImpl.java:74)
at com.webspherenotes.portlet.jsr286.CustomPortletMode.doView(CustomPortletMode.java:20)
at javax.portlet.GenericPortlet.doDispatch(GenericPortlet.java:328)
at javax.portlet.GenericPortlet.render(GenericPortlet.java:233)
at com.ibm.ws.portletcontainer.invoker.impl.PortletFilterChainImpl.doFilter(PortletFilterChainImpl.java:128)
at com.ibm.wps.propertybroker.standard.filter.C2APortletFilter.doFilter(C2APortletFilter.java:183)
at com.ibm.ws.portletcontainer.invoker.impl.PortletFilterChainImpl.doFilter(PortletFilterChainImpl.java:120)
at com.ibm.ws.portletcontainer.invoker.impl.PortletServlet.doDispatch(PortletServlet.java:573)
at com.ibm.ws.portletcontainer.invoker.impl.PortletServletCollaboratorChainImpl.doCollaborator(PortletServletCollaboratorChainImpl.java:114)
at com.ibm.isclite.container.collaborator.PortletServletCollaborator.doRender(PortletServletCollaborator.java:68)
at com.ibm.ws.portletcontainer.invoker.impl.PortletServletCollaboratorChainImpl.doCollaborator(PortletServletCollaboratorChainImpl.java:105)
at com.ibm.ws.portletcontainer.rrd.RRDServerPortletServletCollaborator.doRender(RRDServerPortletServletCollaborator.java:123)
at com.ibm.ws.portletcontainer.invoker.impl.PortletServletCollaboratorChainImpl.doCollaborator(PortletServletCollaboratorChainImpl.java:105)
at com.ibm.ws.portletcontainer.cache.CacheCollaborator.doRender(CacheCollaborator.java:92)
at com.ibm.ws.portletcontainer.invoker.impl.PortletServletCollaboratorChainImpl.doCollaborator(PortletServletCollaboratorChainImpl.java:105)
at com.ibm.wps.pe.pc.waspc.core.impl.PortletServletCollaboratorImpl.doRender(PortletServletCollaboratorImpl.java:156)
at com.ibm.ws.portletcontainer.invoker.impl.PortletServletCollaboratorChainImpl.doCollaborator(PortletServletCollaboratorChainImpl.java:105)
at com.ibm.ws.portletcontainer.invoker.impl.PortletServlet.doDispatch(PortletServlet.java:273)
at com.ibm.ws.portletcontainer.invoker.impl.PortletServletCollaboratorChainImpl.doCollaborator(PortletServletCollaboratorChainImpl.java:82)
at com.ibm.isclite.container.collaborator.PortletServletCollaborator.doDispatch(PortletServletCollaborator.java:124)
at com.ibm.ws.portletcontainer.invoker.impl.PortletServletCollaboratorChainImpl.doCollaborator(PortletServletCollaboratorChainImpl.java:74)
at com.ibm.ws.portletcontainer.rrd.RRDServerPortletServletCollaborator.doDispatch(RRDServerPortletServletCollaborator.java:60)
at com.ibm.ws.portletcontainer.invoker.impl.PortletServletCollaboratorChainImpl.doCollaborator(PortletServletCollaboratorChainImpl.java:74)
at com.ibm.ws.portletcontainer.cache.CacheCollaborator.doDispatch(CacheCollaborator.java:74)
at com.ibm.ws.portletcontainer.invoker.impl.PortletServletCollaboratorChainImpl.doCollaborator(PortletServletCollaboratorChainImpl.java:74)
at com.ibm.wps.pe.pc.waspc.core.impl.PortletServletCollaboratorImpl.doDispatch(PortletServletCollaboratorImpl.java:121)
at com.ibm.ws.portletcontainer.invoker.impl.PortletServletCollaboratorChainImpl.doCollaborator(PortletServletCollaboratorChainImpl.java:74)
at com.ibm.ws.portletcontainer.invoker.impl.PortletServlet.dispatch(PortletServlet.java:208)
at com.ibm.ws.portletcontainer.invoker.impl.PortletServlet.service(PortletServlet.java:165)
at javax.servlet.http.HttpServlet.service(HttpServlet.java:856)
at com.ibm.ws.webcontainer.servlet.ServletWrapper.service(ServletWrapper.java:1146)
at com.ibm.ws.webcontainer.servlet.ServletWrapper.service(ServletWrapper.java:1087)
at com.ibm.ws.webcontainer.filter.WebAppFilterChain.doFilter(WebAppFilterChain.java:118)
at com.ibm.ws.webcontainer.filter.WebAppFilterChain._doFilter(WebAppFilterChain.java:87)
at com.ibm.ws.webcontainer.filter.WebAppFilterManager.doFilter(WebAppFilterManager.java:837)
at com.ibm.ws.webcontainer.filter.WebAppFilterManager.doFilter(WebAppFilterManager.java:680)
at com.ibm.ws.webcontainer.servlet.ServletWrapper.handleRequest(ServletWrapper.java:588)
at com.ibm.ws.wswebcontainer.servlet.ServletWrapper.handleRequest(ServletWrapper.java:524)
at com.ibm.wsspi.webcontainer.servlet.GenericServletWrapper.handleRequest(GenericServletWrapper.java:122)
at com.ibm.ws.portletcontainer.webextension.PortletExtensionProcessor.handleRequest(PortletExtensionProcessor.java:93)
at com.ibm.ws.webcontainer.webapp.WebAppRequestDispatcher.include(WebAppRequestDispatcher.java:639)
at com.ibm.ws.portletcontainer.invoker.impl.PortletInvokerImpl.invoke(PortletInvokerImpl.java:235)
at com.ibm.ws.portletcontainer.invoker.impl.PortletInvokerCollaboratorChainImpl.doCollaborator(PortletInvokerCollaboratorChainImpl.java:78)
at com.ibm.ws.portletcontainer.cache.PortletInvokerCacheCollaborator.doRender(PortletInvokerCacheCollaborator.java:58)
at com.ibm.ws.portletcontainer.invoker.impl.PortletInvokerCollaboratorChainImpl.doCollaborator(PortletInvokerCollaboratorChainImpl.java:67)
at com.ibm.ws.portletcontainer.ext.PortletInvokerPerformanceCollaborator.invoke(PortletInvokerPerformanceCollaborator.java:313)
at com.ibm.ws.portletcontainer.ext.PortletInvokerPerformanceCollaborator.doInvoke(PortletInvokerPerformanceCollaborator.java:101)
at com.ibm.ws.portletcontainer.ext.PortletInvokerPerformanceCollaborator.invokePMI(PortletInvokerPerformanceCollaborator.java:163)
at com.ibm.ws.portletcontainer.ext.PortletInvokerPerformanceCollaborator.doInvoke(PortletInvokerPerformanceCollaborator.java:91)
at com.ibm.ws.portletcontainer.ext.PortletInvokerPerformanceCollaborator.doRender(PortletInvokerPerformanceCollaborator.java:74)
at com.ibm.ws.portletcontainer.invoker.impl.PortletInvokerCollaboratorChainImpl.doCollaborator(PortletInvokerCollaboratorChainImpl.java:67)
at com.ibm.ws.portletcontainer.invoker.impl.PortletInvokerImpl.render(PortletInvokerImpl.java:97)
at com.ibm.ws.portletcontainer.PortletContainerImpl.doRender(PortletContainerImpl.java:119)


When i deployed same code in the Apache Pluto i could go to Clipboard button like this